

Upscale and enhance images as the last step
Choose an upscaler and a factor, balance fidelity against invented detail, protect faces and text.
- Guide
- Step 1 Learn
Run it in ScenarioTopaz Image Upscale
Upscaling makes an image bigger and sharper so it holds up in print, on a large screen or as a texture. In Scenario it's called Enhance. This lesson takes a small 800 × 448 image to 3200 × 1792 with Topaz Image Upscale, then shows how to choose between the other upscalers.
Quick version
- Approve the image first: composition, edits and text. Upscale last.
- Open the image and click Enhance in the bar above it.
- Set Scaling Factor, turn on Face Enhancement if there's a face, and keep Creativity at 0.
- Click Enhance, then compare the original and the result at 100% zoom.
Before you start
- Upscale once, at the end. Every edit after an upscale has to run on a much bigger file, and some editing models shrink it again. Finish the composition, the edits and any text at the original size, then upscale the approved image.
- Know the size you need. A 4x upscale turns 1024 pixels into 4096. If 2x is enough for where the image is going, stop at 2x: bigger factors take longer and give the model more room to invent detail.
- Look at what's in the image. Faces, small text and fine patterns are where upscalers go wrong. Each one has a setting or a model below.
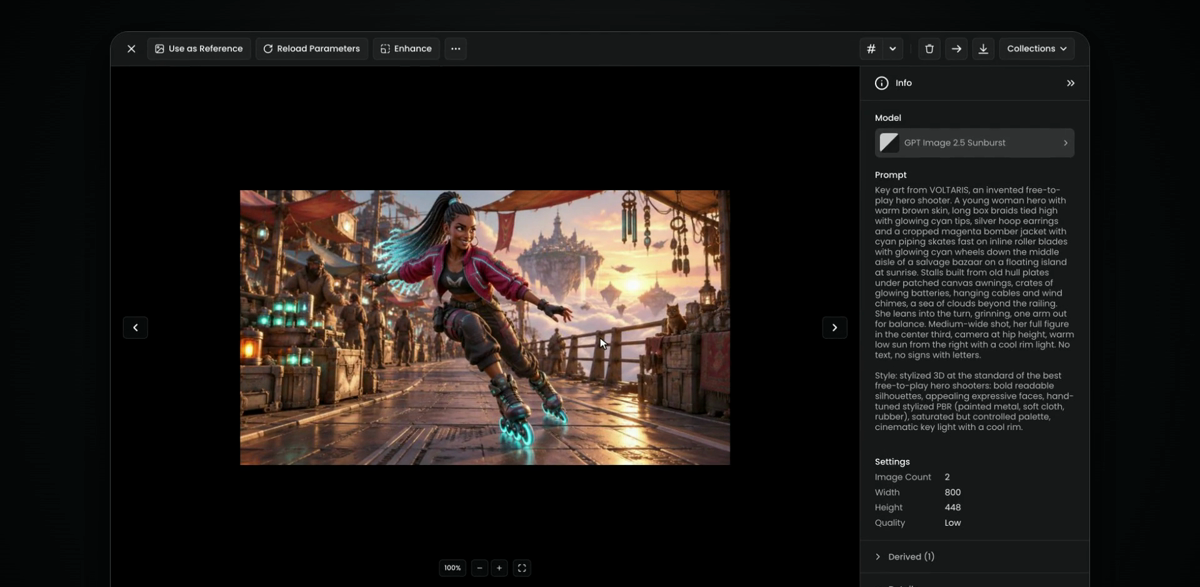
Step 1: Open Enhance
There are two ways in:
- From the viewer: open the image and click Enhance in the bar above it. The image is loaded for you.
- From a thumbnail: open the ... menu on any image in your gallery and choose Enhance.
The example image was made with GPT Image 2.5 Sunburst at 800 × 448, and the viewer's Info panel shows its prompt. Enhance itself takes no prompt here. The prompt, as run:
Key art from VOLTARIS, an invented free-to-play hero shooter. A young woman hero with warm brown skin, long box braids tied high with glowing cyan tips, silver hoop earrings and a cropped magenta bomber jacket with cyan piping skates fast on inline roller blades with glowing cyan wheels down the middle aisle of a salvage bazaar on a floating island at sunrise. Stalls built from old hull plates under patched canvas awnings, crates of glowing batteries, hanging cables and wind chimes, a sea of clouds beyond the railing. She leans into the turn, grinning, one arm out for balance. Medium-wide shot, her full figure in the center third, camera at hip height, warm low sun from the right with a cool rim light. No text, no signs with letters.

Style: stylized 3D at the standard of the best free-to-play hero shooters: bold readable silhouettes, appealing expressive faces, hand-tuned stylized PBR (painted metal, soft cloth, rubber), saturated but controlled palette, cinematic key light with a cool rim.
Enhance opens with an upscale model already picked, here Topaz Image Upscale, and your image under Image. To use another image, remove this one and drag, paste or upload a new one, or choose it with Select from Library.
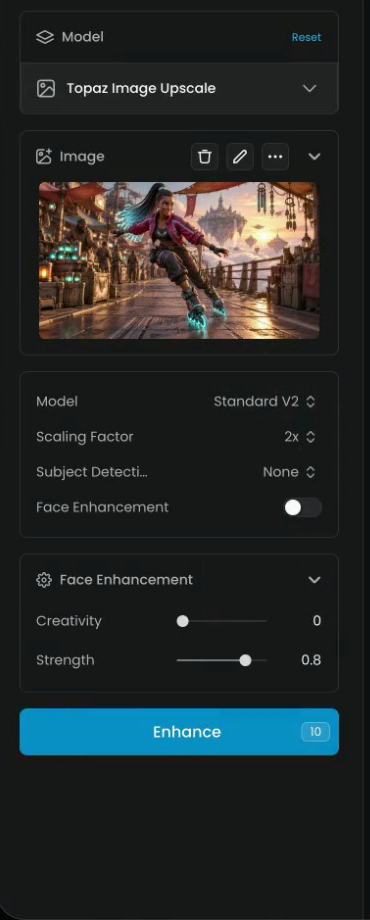
Step 2: Set the scaling factor
Scaling Factor multiplies both sides of the image. At 4x, 800 × 448 becomes 3200 × 1792.
| Factor | 800 × 448 becomes | 1024 × 1024 becomes |
|---|---|---|
| 2x | 1600 × 896 | 2048 × 2048 |
| 4x | 3200 × 1792 | 4096 × 4096 |
Topaz also has a Model setting. It's a choice of Topaz's own models, not of upscaler:
- Standard V2: the general-purpose default.
- Low Resolution V2: for very small or heavily compressed sources.
- CGI: for digital art, renders and illustration.
- High Fidelity V2: keeps the most of the original detail.
- Text Refine: sharpens lettering without redrawing it. Use it for packshots, labels and posters.
Subject Detection tells Topaz what to focus on (for example the foreground subject). Leave it at None unless the background turns soft while the subject is sharp, or the other way round.
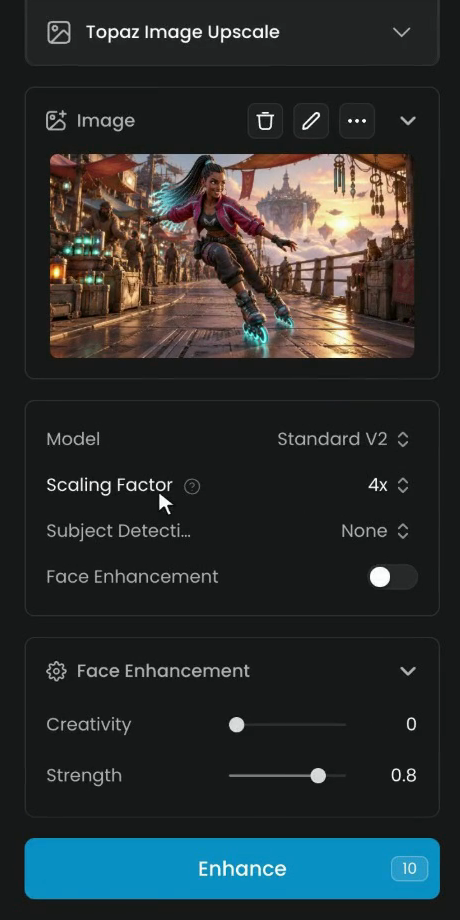
Step 3: Protect faces
Faces are where upscalers fail first: skin turns waxy, eyes change shape, and a person stops looking like themselves. Face Enhancement runs a second pass on faces only. This image has one, so turn it on.
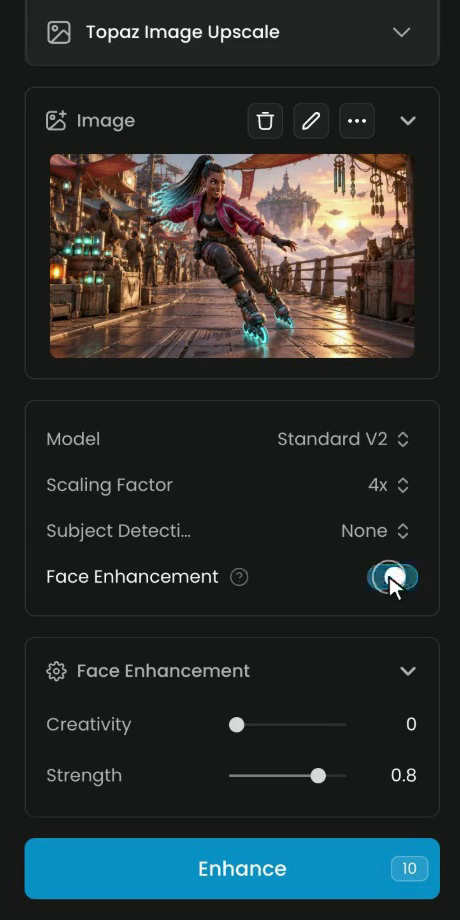
Under Face Enhancement there are two settings:
- Creativity sets how much the model may invent in the face. Keep it at 0 to stay true to the original. Raise it only to rescue a face that is too blurry to keep.
- Strength sets how much of the face pass is blended in. The default, 0.8, is a good start. Lower it if the face looks retouched.
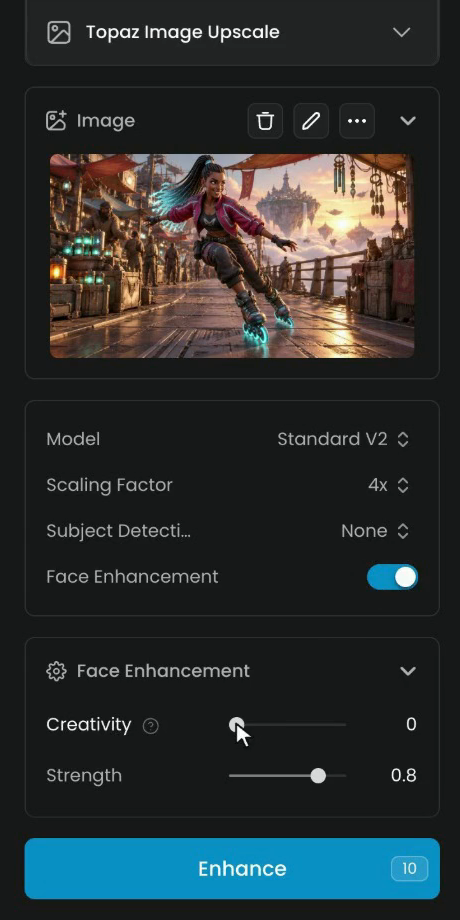
Click Enhance.
Step 4: Check the result
The result opens in the viewer at full size: 3200 × 1792.
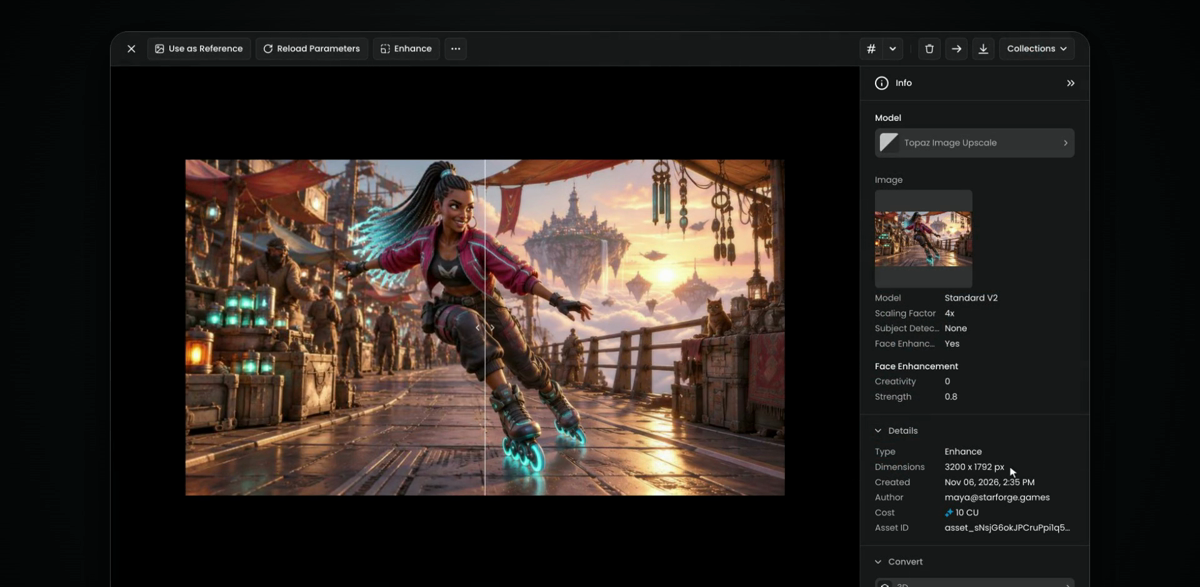
The line across the image splits the original, on the left, from the upscale, on the right. Under the image, click + three times to zoom in, then drag the line over the parts that matter.
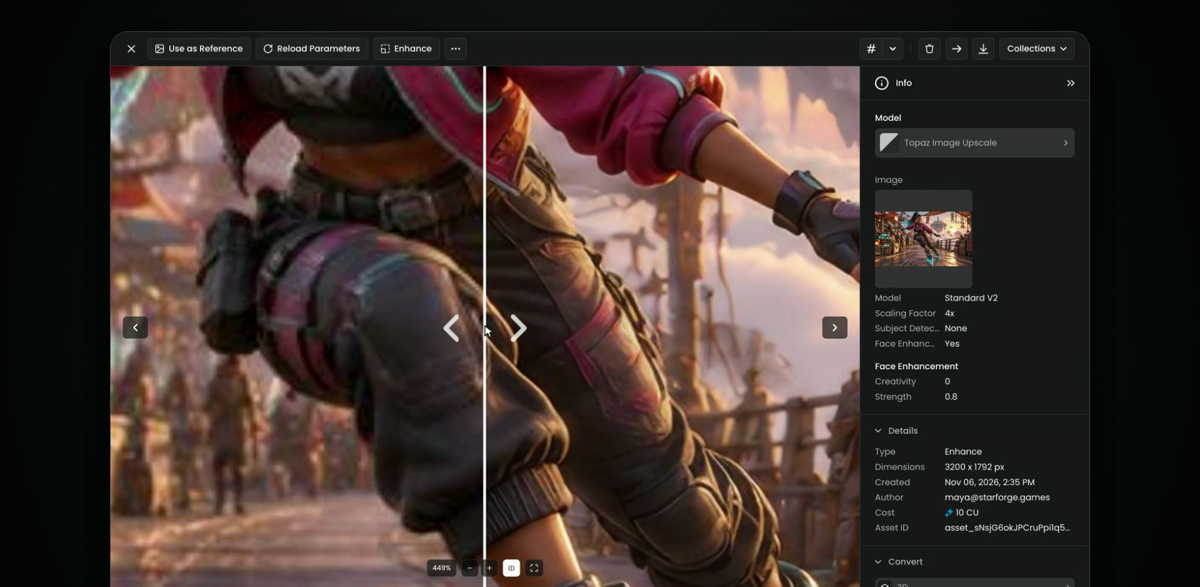
Check at 100% or closer, not at the size the viewer opens at:

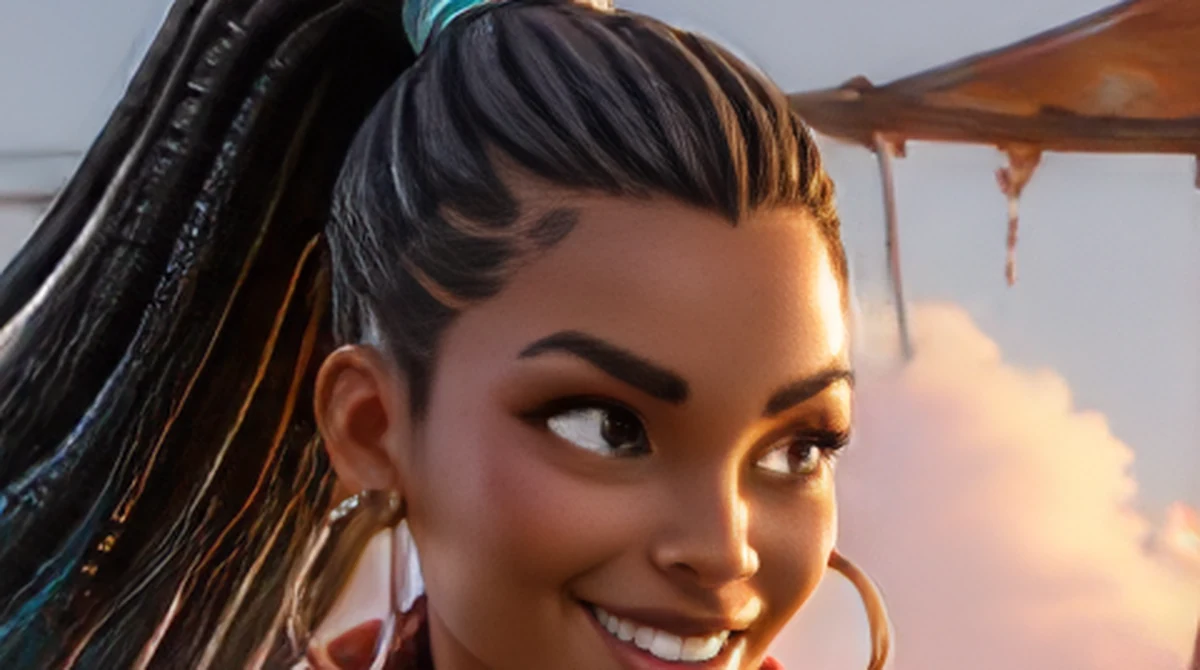
the face is the same person, edges are clean, textures look like the material they are (fabric, wood, metal), and any text reads exactly as in the original.
skin is plastic, eyes or teeth changed, letters changed shape, patterns repeat in a grid, or there are halos along hard edges. Lower the factor, keep Creativity at 0, or switch model (next step).
Step 5: Choose another upscaler when you need to
To see every upscaler, click the model name at the top of the panel, then View model library. Under Capabilities, click Show all and tick Image Upscale.
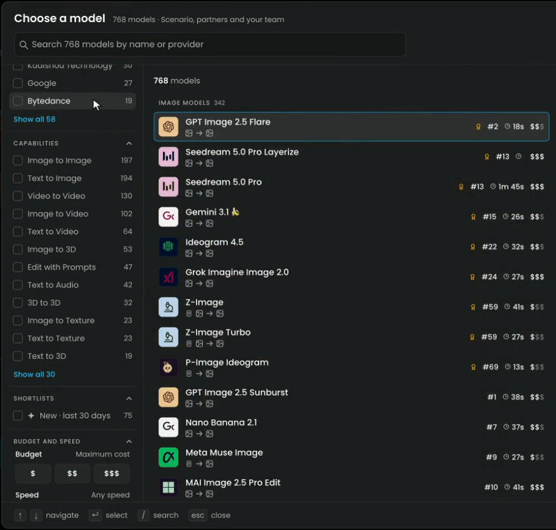
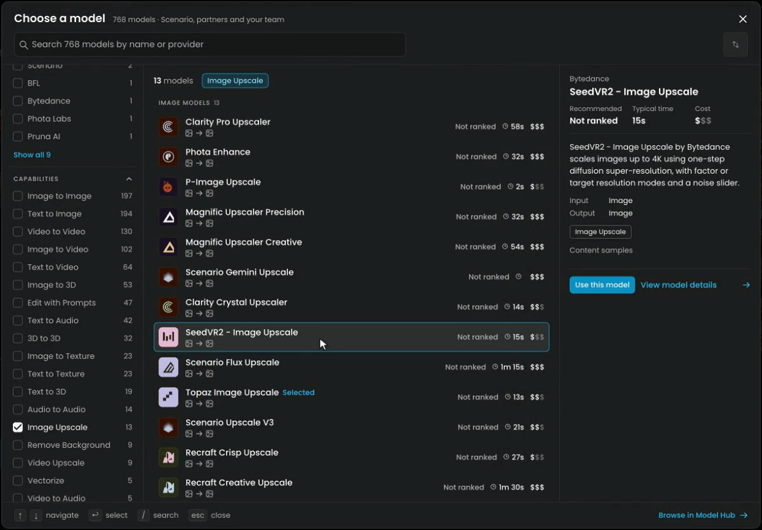
They fall into two families. Fidelity upscalers add resolution and keep what's there. Creative upscalers add detail that wasn't there, which can rescue a soft image but also changes it.
| Upscaler | Family | Best for | Scale |
|---|---|---|---|
| Topaz Image Upscale | Fidelity | Photos, renders, noisy images; Text Refine for lettering | Factor |
| Magnific Upscaler Precision | Fidelity | Approved work that must not change: products, architecture | 2x to 16x |
| Clarity Crystal Upscaler | Fidelity | Enlarging portraits, faces and product photos with minimal quality loss | Factor |
| SeedVR2 - Image Upscale | Fidelity | A fixed output (720p to 2160p) or 2x to 10x | Factor or target |
| P-Image Upscale | Fidelity | A final polish to a fixed size (1 to 8 megapixels) | Target or factor |
| Recraft Crisp Upscale | Fidelity | Quick, sharp edges, no settings | One click |
| Scenario Flux Upscale | Either, by preset | Stylized art; accepts a LoRA and style images | 2x to 8x |
| Scenario Upscale V3 | Either, by preset | Quick illustration upscales | Factor |
| Magnific Upscaler Creative | Creative | Concept art and illustration that needs new detail | 2x to 16x |
| Scenario Gemini Upscale | Creative | Graphic or stylized detail, outputs at 4K, Creativity 0 to 100 | 4K |
| Recraft Creative Upscale | Creative | Adding artistic detail in one click | One click |
The list also has Clarity Pro Upscaler and Phota Enhance. And two Scenario upscalers are made for one kind of image: Scenario Texture Upscale for tileable materials and Scenario Skybox Upscale for 360° panoramas. Use them for those, so seams and the horizon stay continuous.
Scenario Flux Upscale settings
Scenario's own upscalers have controls the others don't:
- Preset: Precise keeps the original, Balanced adds some detail, Creative adds a lot.
- Prompt: describe the image or the finish you want, for example "fine fabric weave, crisp metal edges". If the image was made in Scenario, its prompt loads for you.
- LoRA (Flux Upscale only): pick the model that made the image to keep its style. An influence of 0.50 to 0.75 works best.
- Style images: up to 10 references, with Style Fidelity for how much they count.
- Structure Fidelity and Creativity: high Structure Fidelity and low Creativity stay close to the original; the reverse lets the model redraw.
Start at 2x with the Precise or Balanced preset, compare, then go higher only if you need to.
Common problems
| What you see | What to do |
|---|---|
| The face looks like someone else | Turn on Face Enhancement, keep its Creativity at 0, or use a fidelity upscaler |
| Letters changed or turned to gibberish | Use Topaz with Model Text Refine, or Magnific Upscaler Precision; never a creative upscaler |
| Skin or surfaces look like plastic | Lower Creativity, or the Strength of the face pass |
| New objects or patterns appeared | Switch from a creative upscaler to a fidelity one, or lower the preset to Precise |
| A tileable texture shows a seam | Use Scenario Texture Upscale instead |
| The result is soft at 8x or more | Upscale 2x or 4x, check it, then upscale that result once more if you really need the size |
What's next
The upscaled file is the one to deliver. Keep the original next to it in the same collection, so anyone can see what it came from and upscale it again with another model if needed.