

Build with the Node Agent
Describe a workflow in plain text and let the Node Agent build or change the graph, then read its report and review the graph before you run.
- Guide
- Step 2 Repeat
Use the Node Agent when you know what a workflow should do but not which nodes to wire. What it builds stays editable, and nothing generates until you click Run.
- 1Describeinputs, steps, output, notes
- 2Buildnodes, wires, models, parameters
- 3Reporteach node and model, in the chat
- 4Reviewbadge, wires, models
- 5Runfirst nodes alone, then all
It is one of the two Scenario Agents and shares instructions and memory with Scenario Genie. See Scenario Agents overview.
Open it
- Open a workflow in edit mode, or click Create on the Workflows page for a new one.
- In the right toolbar, click Agent Mode (the sparkle icon at the top, marked NEW).
- The panel opens on the right with New chat at the top.
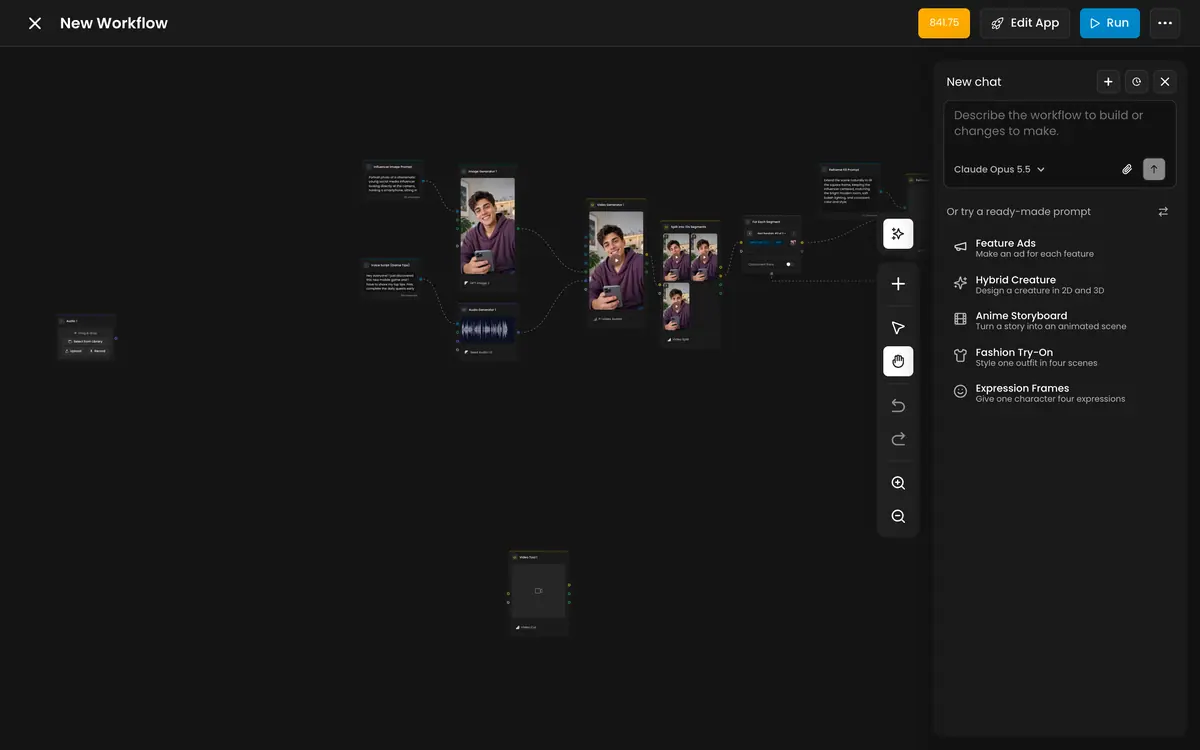
| Control | What it does |
|---|---|
| + | Starts a new conversation with no earlier context |
| Clock icon | Opens the conversation history for this workflow |
| x | Closes the panel. The graph stays as it is |
| Model picker (below the message box) | Chooses the language model the agent reasons with (Claude Opus 5.5 in the capture). It does not limit which generation models it can place on the canvas |
| Paperclip | Attaches an image |
| Or try a ready-made prompt | Lists starters, with a shuffle button for more |
Write the request
A request in four parts usually produces a working graph on the first try; a loose paragraph often needs several follow-ups.
Inputs: one product photo on any background (Image A).
Steps: remove the background; upscale 2x; place the product on a plain warm-grey
studio background with a soft shadow; keep the product's shape, color and label exactly.
Output: one 2048 x 2048 PNG, square.
Notes: use GPT Image 2.5 Sunburst for the studio shot and Topaz Image Upscale for the
upscale. Expose the product photo as the only input. No text in the image.
- Inputs: what a person will bring each run. If you drop reference images on the canvas, say which is which ("Image A is the character, Image B is the style reference").
- Steps: the transformations, in order.
- Output: format, aspect ratio, resolution. Defaults may not match what you need.
- Notes: hard constraints and model choices. If you name a model, the agent uses it; otherwise it picks one of more than 750 models, including your trained models, from the task and your workspace.
Read the report, then the graph
After building, the agent reports each node, the model behind each generator, the aspect ratio and resolution, and where intermediate results show. Read it before you run, and fix mistakes in the chat:
Change the upscale to 2x, not 4x, and set the final output to 1:1 at 2048.
Then check the graph yourself:
- Read the cost badge next to the title. Is it in line with the job?
- Follow each wire: green into image ports, blue into text ports, no input left empty.
- Confirm each model by clicking the generator's model footer.
- Test the first node or two with Run This Node before the full Run.
Change an existing workflow
Open the workflow and describe the change. The agent reads the current graph and edits it; it does not start over.
Add a Slice Items node in Choose mode after the image generator so I can keep one of
four takes before the upscale. Set the generator to four images.
Each follow-up in the same chat edits the same workflow: add a branch, swap a model, remove a step. One change per message keeps each edit easy to check.
Cost
- Runs cost what their nodes cost, shown on the badge. The graph itself costs nothing until you run it.
- Agent messages: Scenario's usage documentation lists assistant and agent messages among the actions that use credits.
- Start a new chat per task. For Scenario Genie, the cost of a message grows with the length of the chat; the same habit is sensible here.
When to build by hand instead
- Three nodes or fewer: adding them yourself is faster than describing them.
- Fine-tuning a prompt or setting: edit the node directly.
- A documented standard: when the graph must match it exactly, build it once by hand, then ask the agent for changes.
When the graph works, turn it into an App for the team. See Publish a workflow as an App.
the report names every node and model you expected; every required port is wired; the cost badge matches the size of the job; a test of the first nodes returns the right kind of result.
the agent picked a model you did not intend and the report says so; an input you need each run is hard-coded inside a node; the badge is several times what you expected; the agent left a step out of the report that appears on the canvas, or the other way round.
If it breaks
| Symptom | Fix |
|---|---|
| The graph is close but wrong | Ask for one specific fix per message, naming the node ("in Generate Hero Shot, use 3:2") |
| It used the wrong reference image | Label images by role in your request, or rename the image nodes to say what they are |
| It keeps choosing a model you do not want | Name the model in the request. For a standing preference, put it in your instructions. See Instructions and memory |
| The chat is long and slow | Start a new chat with +. The graph keeps everything built so far |
| The same request gives a different graph | Normal variance. Review the result each time; do not assume it matches last week's |