

What the Scenario MCP is, and how to connect it
What the Scenario MCP does and when to use it, the exact setup for Claude, Cursor, VS Code, Codex and other clients, and Scenario's agent skills.
- Guide
- Step 3 Delegate
On this page17 sections
- Before you start
- Step 1: Ask your assistant for a picture
- Step 2: Understand what a skill adds
- Step 3: Add the skill in Claude
- Step 4: Let the skill do a whole job
- Step 5: Copy the address from mcp.scenario.com
- Step 6: Add a custom connector in Claude
- Step 7: Connect and authorize
- Step 8: Find more skills
- Step 9: Check with a free question
- Other assistants
- What a request looks like
- When to use it
- OAuth or an API key
- Team, project and tools
- Common problems
- What's next
The Scenario MCP connects your own AI assistant to Scenario, so the assistant can pick a model, run it and bring the result back into the chat. This lesson shows what that looks like in Claude, adds a skill that turns one sentence into a 3D lantern you can open in Blender, then walks through the connection itself, step by step, and the same setup for Claude Code, Cursor, VS Code, Codex and other clients.
Quick version
- Go to mcp.scenario.com, open Installation, pick your assistant and copy the address
https://mcp.scenario.com/mcp. - In Claude, open Customize › Connectors › Add › Add custom connector, name it Scenario, paste the address and add it.
- Click Connect, log in to Scenario and click Authorize.
- Ask a free question, such as "Can you see my Scenario project Brand Studio?", to check the connection.
- Add skills for the jobs you do: upload a skill file in Customize › Skills, or install them with
npx skills add scenario-labs/skillsin a code tool.
Before you start
- A Scenario account, with a team and a project for the results. Everything the assistant makes lands in that project, next to what you made in the web app.
- An AI assistant that can add remote tool servers. The film uses Claude on claude.ai. Claude Code, Claude Desktop, Cursor, VS Code, Codex, Windsurf, Zed and others work too (see Other assistants). On claude.ai, the Free, Pro and Max plans can each add a custom connector; on Team and Enterprise plans an owner adds it once for the whole organization.
- Node.js, only if you install skills from the command line.
Three ideas carry the whole lesson:
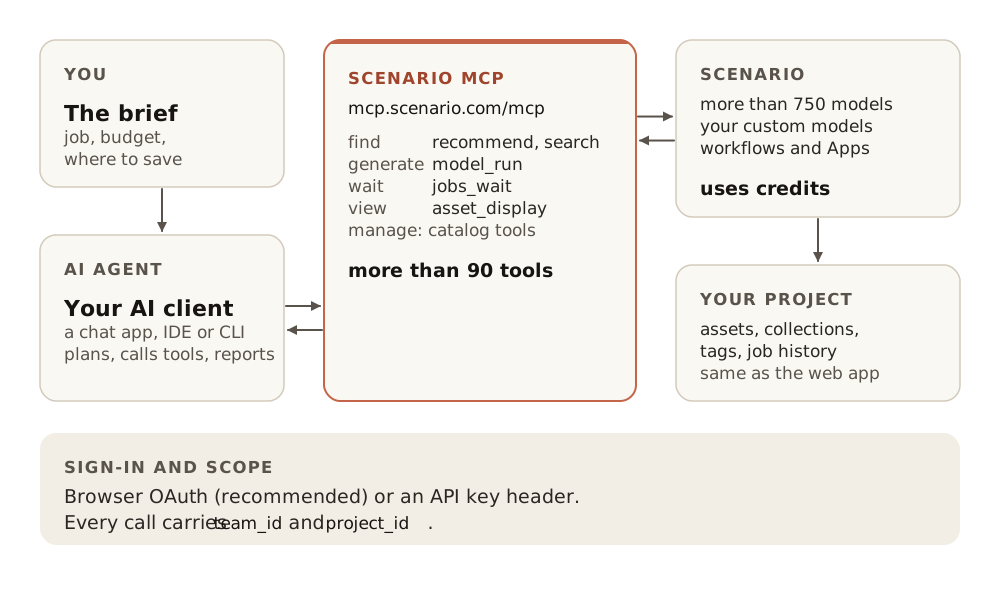
- The Scenario MCP is built on the Model Context Protocol, the open standard assistants use to call tools. It's a server at
https://mcp.scenario.com/mcpthat gives your assistant Scenario's tools: 99 of them, over more than 750 models, for images, video, 3D and audio. - You ask in plain words. The assistant chooses the tools and the model; you review what comes back.
- A skill is a file of instructions for one kind of job: the steps, the rules and the checks. Your assistant reads it and follows it, so the job is done the tested way.
| Once connected, your assistant can | For example |
|---|---|
| Find and read models | Search more than 750 models, read their parameters, recommend one with reasons |
| Generate | Images, video, 3D and audio, then wait for the jobs |
| Show and file results | Display results in the chat, organize assets into collections |
| Work with your files and pipelines | Upload your files, run your team's workflows, check usage |
Step 1: Ask your assistant for a picture
In the film, Claude is already connected (the connection itself starts at step 5 below). Open a new chat and type:
Using Scenario, make a picture of a red fox curled up in the snow, in my project Brand Studio.
"Using Scenario" tells the assistant to use the Scenario tools rather than answer from its own knowledge, and naming the project tells it where to save the result. Claude picks a Scenario model, runs it and shows the image with asset_display. Its answer says what it made and how: here a 1536×1024 image with GPT Image 2.5 Sunburst at high quality, saved in Brand Studio, with a View in Scenario link that opens it in the web app.
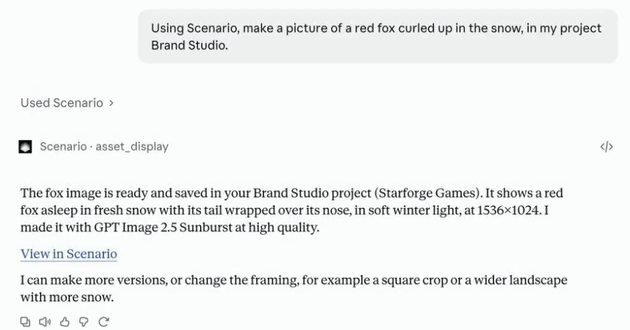
Used Scenario above the answer opens the list of tool calls the assistant made, if you want to see the steps.
Step 2: Understand what a skill adds
A skill makes the assistant much better at one kind of job. It's a folder with a SKILL.md file: a name, a description of when to use it, then the procedure. The film opens the scenario-3d skill in Scenario's open-source repository. Its description says to use it for 3D work through the Scenario MCP, and its overview gives the rule it follows: generate a concept image first, then run image-to-3D, which has a larger catalog and more art direction than text-to-3D.
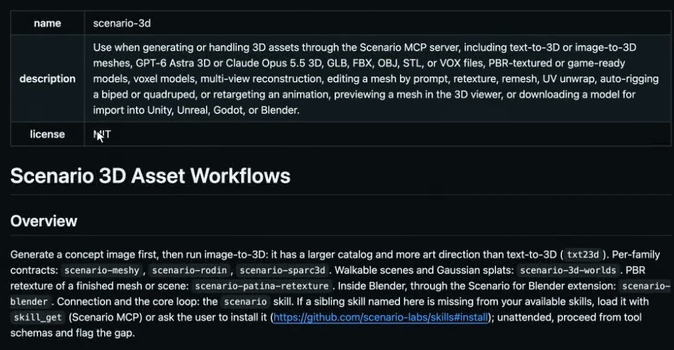
Step 3: Add the skill in Claude
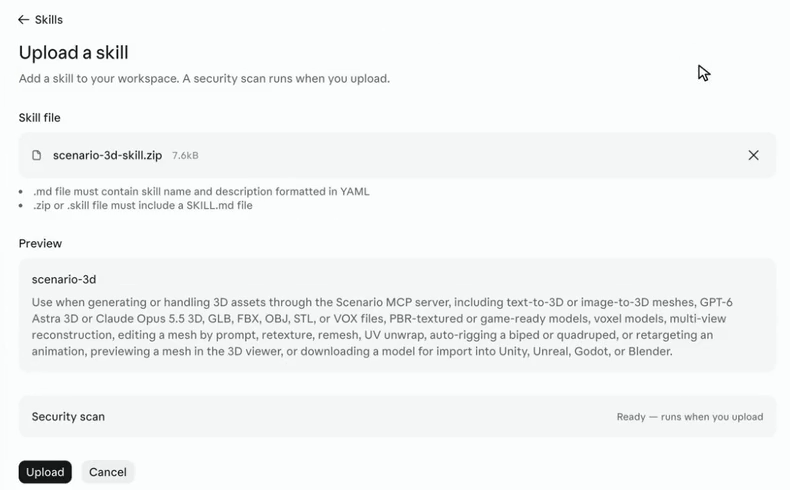
In claude.ai, open Customize, stay on Skills, then click Add › Upload skill.
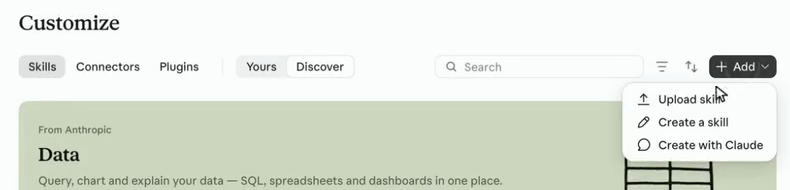
Choose the skill file, a .zip (here scenario-3d-skill.zip) or a .md file. The Upload a skill page checks the file before you add it:
- A
.mdfile must contain the skill's name and description in YAML. - A
.zipor.skillfile must include aSKILL.mdfile. - Preview shows the name and description it read, and Security scan runs when you upload.
Click Upload. The skill is on, and Claude uses it whenever a request matches its description, or when you name it.
Step 4: Let the skill do a whole job
Start a new chat and name the skill in the request:
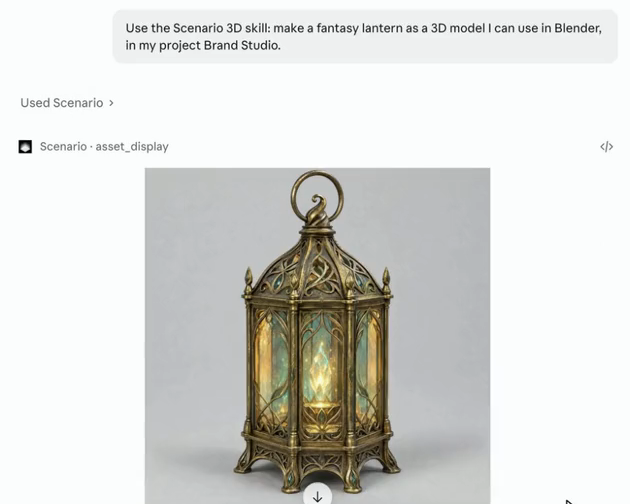
Use the Scenario 3D skill: make a fantasy lantern as a 3D model I can use in Blender, in my project Brand Studio.
Claude follows the skill: it makes a concept image of the lantern first, turns it into a 3D model with an image-to-3D model, and saves both in Brand Studio. The concept appears in the chat as it goes.
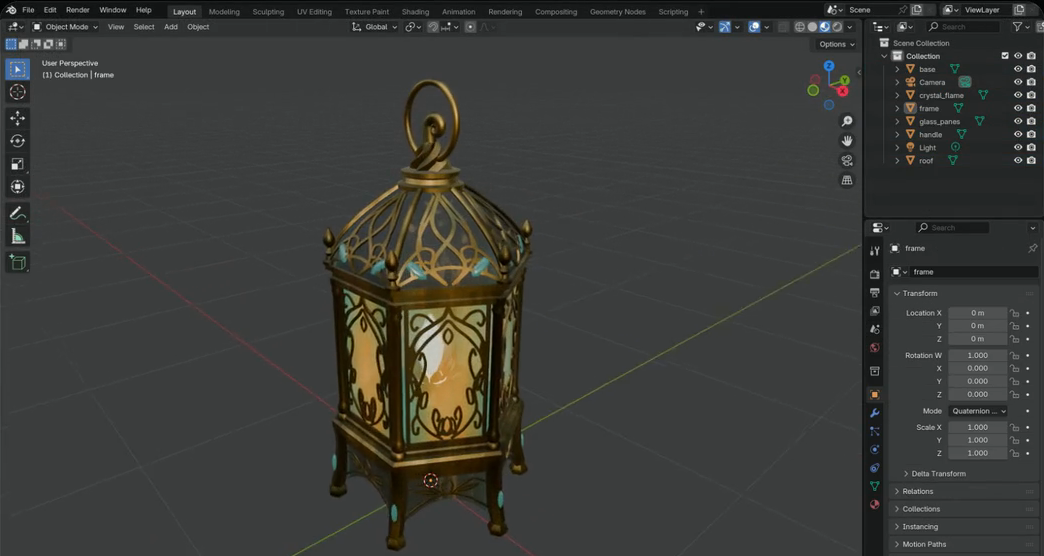
Download the model as a .glb file, then in Blender choose File › Import › glTF 2.0 (.glb). The lantern arrives as separate named parts (frame, glass panes, flame, handle, roof), ready to place in a scene.
A whole Blender project done this way is the next lesson, Blender and the Scenario MCP, live. First, the connection.
Step 5: Copy the address from mcp.scenario.com
In a new browser tab, go to mcp.scenario.com and scroll to Installation. Keep OAuth selected (the recommended sign-in), pick the tab for your assistant, here Claude.ai, and click Copy next to https://mcp.scenario.com/mcp.
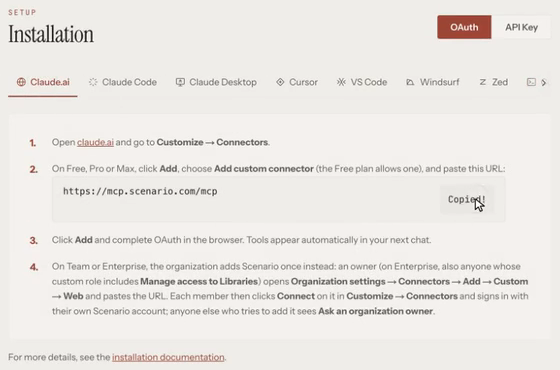
The tab lists the same steps as below. It also covers the organization case: on Team or Enterprise, an owner (on Enterprise, also anyone whose custom role includes Manage access to Libraries) opens Organization settings › Connectors › Add › Custom › Web and pastes the URL. Each member then clicks Connect on it in Customize › Connectors and signs in with their own Scenario account; anyone else who tries to add it sees Ask an organization owner.
Step 6: Add a custom connector in Claude
In claude.ai, open Customize › Connectors, then Add › Add custom connector. Type the name Scenario (it's how the connector shows in your list), paste the address in MCP server URL and click Continue.
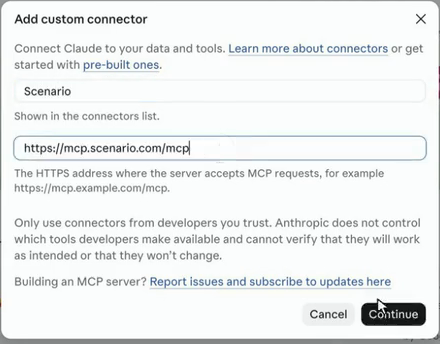
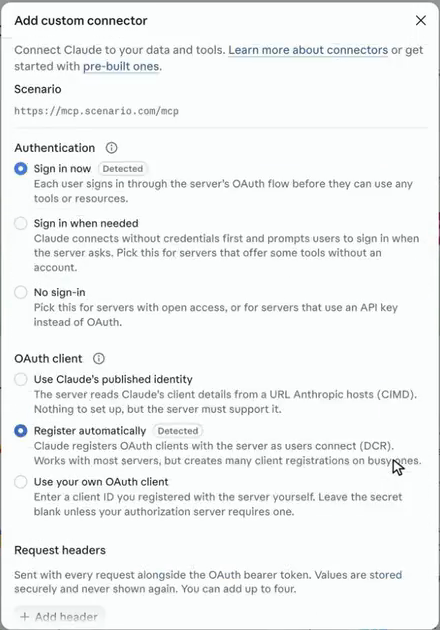
Claude checks the server: it connects, looks up the sign-in settings and checks the sign-in provider. It then detects the right options for Scenario, so you don't change anything:
- Authentication: Sign in now, marked Detected. Each person signs in through Scenario's OAuth flow before using any tool.
- OAuth client: Register automatically, marked Detected.
- Request headers: leave empty. Headers are for API keys, which you don't need with OAuth.
Click Add.
Step 7: Connect and authorize
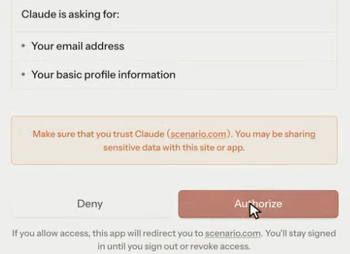
The connector page shows the address and a Connect button (until you finish, it says you started connecting but didn't finish). Click Connect. A Scenario page opens: Claude wants access to Scenario. Authorizing gives Claude the same access to Scenario that you have: running generations, browsing models and organizing your assets. It never sees your password. Click Authorize.
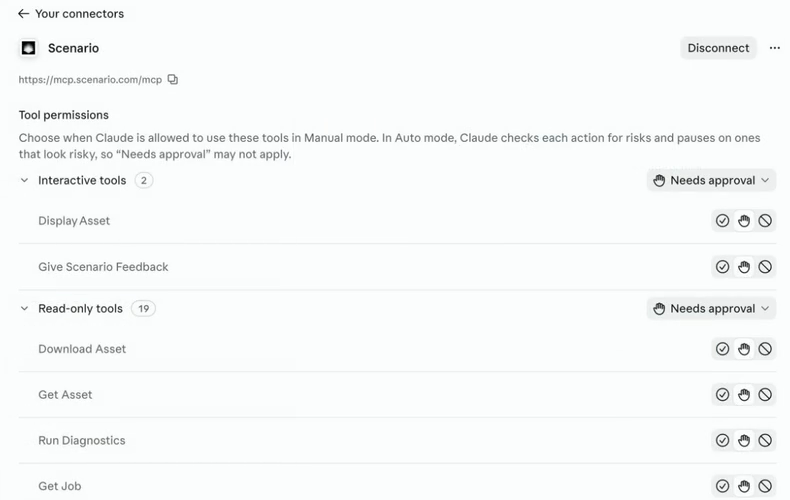
You return to Claude, where the Scenario connector now lists its tools under Tool permissions, in groups such as Interactive tools and Read-only tools. Each tool has three choices: always allow, Needs approval, or never. With Needs approval, Claude asks before each call in Manual mode; in Auto mode, Claude checks each action for risks and pauses only on ones that look risky. Allow the read-only tools if the approvals slow you down. Disconnect removes the connection.
Step 8: Find more skills
Skills come from two places:
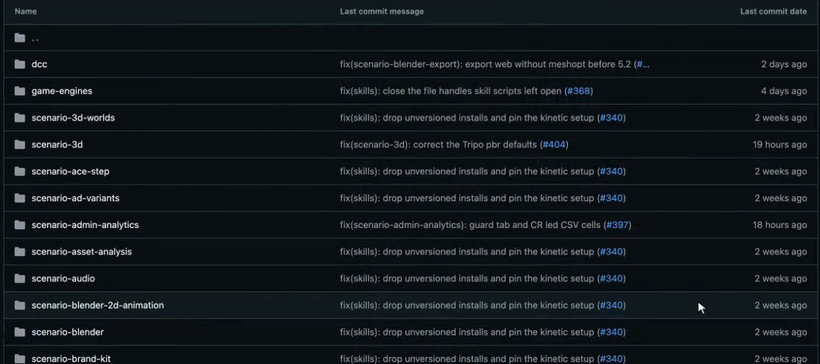
- Scenario's open-source repository, github.com/scenario-labs/skills. Its
skillsfolder holds dozens of skills, one per job (3D, audio, ad variants, brand kits and more) and, underdcc, skills for Blender, Maya and ZBrush. Any of them can be uploaded the same way as in step 3. - Scenario's Explorations, at scenario.com/explorations. Each Exploration is a real project shown step by step, and every Exploration has its skill to download, so you can make your own version.
Step 9: Check with a free question
Ask something that needs a Scenario tool but doesn't generate anything:
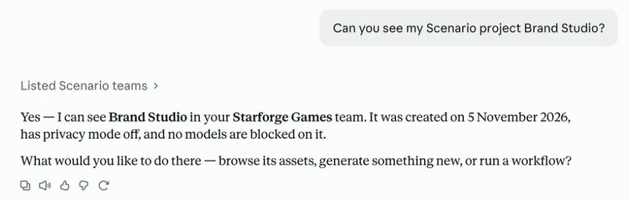
Can you see my Scenario project Brand Studio?
A working connection answers from a tool call, here Listed Scenario teams, with your project and its team. Lookups like this are free. If Claude answers without a tool call, or asks you for a key, see Common problems.
Other assistants
The steps are the same idea everywhere: add the URL, sign in once in the browser, then ask. The Installation section of mcp.scenario.com has a tab per assistant.
- Claude Desktop: custom connectors sync across every Claude surface, so a connector added on claude.ai is already there; on Team or Enterprise, click Connect on it in Customize › Connectors. Otherwise add it the same way: Customize › Connectors › Add › Add custom connector.
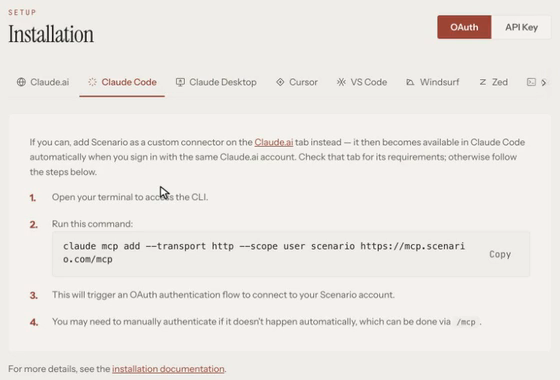
- Claude Code: the same applies if you sign in with the same Claude.ai account. Otherwise, run the command below; the OAuth sign-in opens on first use, and
/mcplets you sign in by hand.
| Client | Setup |
|---|---|
| Claude Code | claude mcp add --transport http --scope user scenario https://mcp.scenario.com/mcp; to sign in by hand, type /mcp and select scenario |
| Claude Desktop and claude.ai | Customize › Connectors › Add › Add custom connector, paste the URL |
| Cursor | Settings, Tools & MCP: { "mcpServers": { "scenario": { "url": "https://mcp.scenario.com/mcp" } } } |
| VS Code | Command Palette, MCP: Add Server, HTTP, enter the URL; start it from MCP: List Servers |
| Codex | codex mcp add scenario --url https://mcp.scenario.com/mcp, or add it to ~/.codex/config.toml; OAuth starts on first use |
| Gemini CLI | gemini mcp add --scope user --transport http scenario https://mcp.scenario.com/mcp, or add { "mcpServers": { "scenario": { "httpUrl": "https://mcp.scenario.com/mcp" } } } to ~/.gemini/settings.json (httpUrl, not url, which Gemini CLI reads as SSE); then /mcp auth scenario |
| Windsurf | Cascade, Configure MCP, the same mcpServers JSON as Cursor |
| Zed | { "context_servers": { "scenario": { "url": "https://mcp.scenario.com/mcp" } } } |
| Amp | amp mcp add scenario https://mcp.scenario.com/mcp |
| ChatGPT | No Scenario-specific steps yet. If your plan lets you add a custom connector, paste the URL there |
If you can't add a custom connector, use the mcp-remote bridge (needs Node.js). In Claude Desktop, open Settings › Developer › Edit Config, add this entry to claude_desktop_config.json, then quit and restart the app:
{ "mcpServers": { "scenario": {
  "command": "npx",
  "args": ["-y", "mcp-remote", "https://mcp.scenario.com/mcp"]
} } }
Prefer the native URL when a client offers both: the bridge is the usual cause of repeated sign-in prompts.
For skills in a code tool (Claude Code, Cursor, Codex, GitHub Copilot and other agents that read the open Agent Skills format), install them from the command line:
# The core skill: connecting, scoping, picking a model, generate and wait, errors
npx skills add scenario-labs/skills --skill scenario

# Choose more from a menu, then restart your agent
npx skills add scenario-labs/skills

# Update later
npx skills update
Start with scenario, then add the skills for the jobs you do: images, video, 3D, audio, game art, brand and formats, workflows, review or team administration, plus one skill per model family. The repository README lists bundles by goal and by role. Without installing anything, the agent can read the same skills from the server through skill://scenario/<name>/SKILL.md resources or the skill_get tool; served skills carry the text only, without bundled scripts.
What a request looks like
Behind a sentence like "Using Scenario, make a hero image of a ceramic teapot for a homeware shop, 3:2, pick a strong current model, show me the price first", the agent runs a loop of tool calls:
- 1Recommendrank models, free
- 2Read schemaexact parameters
- 3Quotedry run, in CU
- 4Generaterun, then wait
- 5Showinline, with an app link
recommendranks models for the task by measured quality, speed and cost. It's free.model_schema_getreads the chosen model's exact parameters.model_runwithdry_run: truequotes the cost in Compute Units (CU) and runs nothing.model_runfor real, thenjobs_waituntil the job finishes.asset_displayshows the result in the chat with a link to it in the web app.
Generations draw from the same team balance as the web app and the API; lookups such as recommend and search are free. Ask your agent to quote before any batch or video. An asset made in the web app can be handed to the agent by its ID (asset_...) to edit or build on, instead of starting over.
When to use it
In the web app, you are the operator. With the Scenario MCP, the agent operates and you review. That pays off when:
- The job has several steps. "Restyle this concept three ways, I pick one, then animate it" is one request instead of three trips through three panels.
- The job is repetitive. An agent on your machine can read a folder of 40 product photos, upload them, run the same edit on each and file the results.
- The job lives next to code or a 3D scene. A developer in Cursor or Claude Code can ask for placeholder sprites and drop the files into the project; an artist can get a model ready to import in Blender.
Keep the web app for what needs your eyes and hands: comparing many takes side by side, painting a mask, training a model, building a workflow on the canvas.
| Surface | Who drives it | Best for |
|---|---|---|
| Web app | You | Exploring, reviewing, training, building workflows |
| Scenario Agents | Scenario Genie and the Node Agent, inside the web app | Help on the page you are on |
| Scenario MCP | Your own AI agent, outside the web app | Multi-step and repeated jobs from chat, IDE or terminal |
| API | Your code | Production pipelines, apps, fixed integrations |
Use the Scenario MCP when a person is in the loop and the steps change from one request to the next. For fixed, unattended code that must run for months, use the API.
OAuth or an API key
| OAuth (recommended) | API key | |
|---|---|---|
| How | The client opens a browser, you log in and click Authorize | A Base64 header built from a key and secret |
| Credentials in config files | None | Yes, treat the file as a secret |
| Acts as | You, with your team and project roles | The key, with its role and scopes |
| Saved instructions and memory, team admin actions | Yes | No |
| Use it for | Day-to-day work in an assistant or IDE | Headless runs, CI, shared machines |
For an API key, open API Keys in Settings › Organization and use a project key with the Editor or Admin role; a read-only key connects, then fails with Forbidden on the first generation (API keys and authentication). Build the header value with echo -n 'YOUR_API_KEY:YOUR_API_SECRET' | base64, then add it to the client:
claude mcp add --transport http scenario https://mcp.scenario.com/mcp \
  --header "Authorization: Basic YOUR_BASE64_VALUE"
Clients with a JSON config take a headers entry next to the URL: "headers": { "Authorization": "Basic YOUR_BASE64_VALUE" }. Never paste a key or secret into a chat with your agent.
Team, project and tools
Every call that touches content needs a team and a project. With one of each, the agent finds them; with several, the server doesn't guess and the agent asks you to pick. Outputs land in that project and its credits pay for them, so name it in the request ("in my project Brand Studio") or once per session: "Use the team Design and the project Spring Campaign for everything today." In long sessions the agent may ask again; restate the pair.
By default the server lists a core set of tools; the rest, such as collections, tagging, training and members, sit in a catalog the agent searches with scenario_tools_search. If your agent struggles with the catalog, connect to https://mcp.scenario.com/mcp?toolsets=full to list every tool, at the cost of more of the agent's context. The full live list is on mcp.scenario.com.
the free question in step 9 comes back from a tool call with your team and project names, a request such as "recommend an image model for a product photo" returns ranked models, and a request that matches an installed skill follows its steps (concept first, then 3D, for the lantern).
the assistant answers from memory without a tool call, asks you for an API key in the chat, reports an authentication error, or ignores a skill you installed.
Common problems
| What you see | What to do |
|---|---|
| No option to add a custom connector | On Team or Enterprise, an owner adds Scenario in Organization settings › Connectors; then click Connect on it. On other clients, use the mcp-remote bridge |
| "You started connecting to Scenario but didn't finish" | Click Connect again and finish with Authorize on the Scenario page |
| An authentication error after it worked before | Clear the stored sign-in and connect again: in Claude Code, /mcp, Scenario, Clear authentication; in Cursor, turn the server off and on. If it persists with the bridge, delete ~/.mcp-auth and reconnect |
| Claude Desktop opens the browser on every message | Orphaned mcp-remote processes. Quit the app fully and restart, or use Connectors instead of the bridge |
Forbidden when generating | Your API key is read-only, or your role in the project is below Contributor. Use an Editor or Admin key |
| The assistant asks which team or project to use | Expected when you have several. Pick one, and repeat the pair in later requests. Errors naming context_missing or context_ambiguous mean the same |
| The assistant asks before every tool call | Set the read-only tools to always allow in the connector's Tool permissions, or add them to your client's auto-approve list |
| The assistant doesn't use a skill you added | Check it's switched on in Customize › Skills, name it in the request, and in code tools restart the agent after installing |
| Anything else | Ask the assistant to "run Scenario diagnostics" (diagnostics_run). It names the failing layer and returns trace IDs to send to support |
What's next
Put the connection and the skills to work on a full project in Blender and the Scenario MCP, live: two skills, a Blender blockout, a short film and a product ad, every prompt shown. For the agents built into the web app, see Scenario Agents.