Run it in Scenario
About this use case
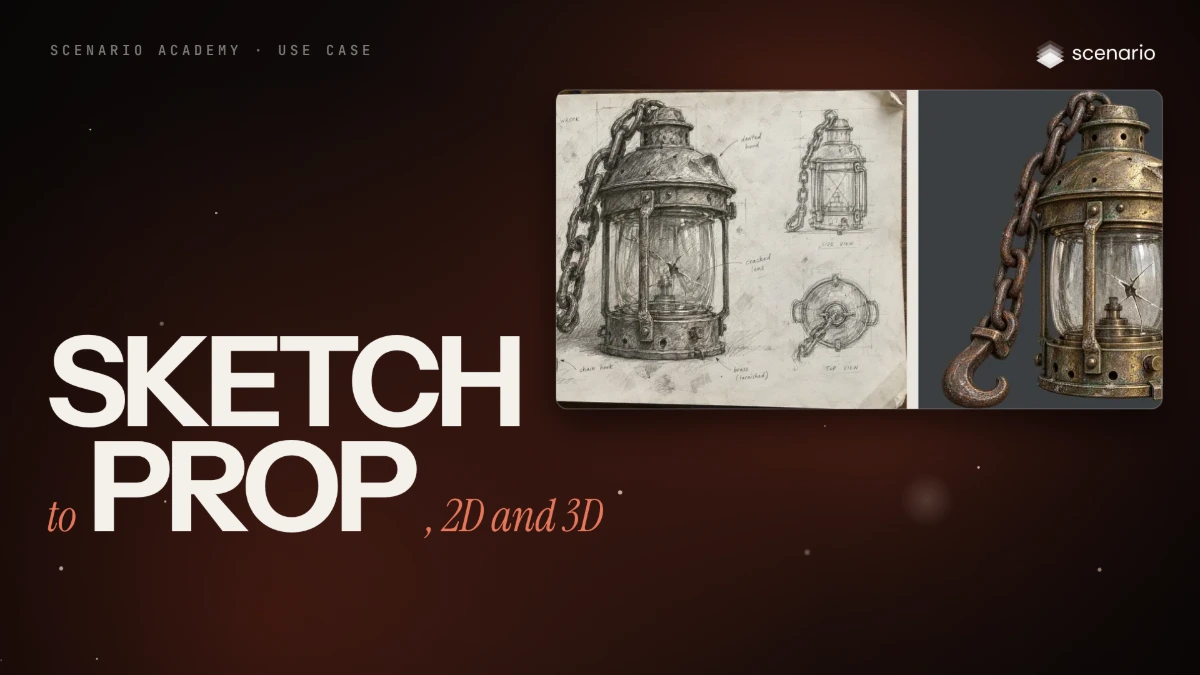
A graphite prop sketch taken to a clean transparent render that adds nothing you did not draw, then through two image-to-3D models and checked for what makes it game-ready: real size, triangle budget, PBR maps and the angles players see. The example is a salvaged ship's lantern for Ashen Tides, an invented dark-fantasy game by Hollowpeak Studios. The same steps then run as a batch. The models and settings in this use case are as of October 2026.
See moreSee less
- A graphite sketch of a game prop to a transparent render that follows every line, then to an engine-ready textured 3D model under 8,000 triangles.
- Name every sketched part in the prompt and forbid additions; count the parts on the render before paying for 3D.
- Set the triangle budget at generation time, then measure it: one model treated 8,000 as a target and landed 3 percent over.
- Meshy 7.1 kept more surface detail for a hero prop; Tripo P2 with Auto Size came back at real size, ready to drop in.
Step by step with an agent, through the Scenario MCP (7 steps)Hide the steps
Connect the Scenario MCP
Connect your agent and sign in once at mcp.scenario.com. Then tell it which Scenario team and project to use, so every file lands there.
Give the agent the files
The sketch of the prop: a scan, a phone photo or a tablet drawing. Upload it with upload_asset or give its asset ID. Keep your 3D tool (Blender, Unity, Unreal Engine or Godot) at hand for the measures.
Brief the agent: the render
The first paragraph names every part in the drawing and forbids the rest; the second gives the surface. Without the sketch, the same prompt moved the chain and added a handle and a cage.
PromptRender the prop with GPT Image 2.5 Sunburst (model_openai-gpt-image-2-5-sunburst): referenceImages set to [the sketch's asset ID], width 1536, height 1536, quality "high", background "transparent". Quote the cost with a dry run first and wait for my go. Prompt, word for word: The reference image is a graphite sketch of a game prop: follow the large main drawing only, its shapes, proportions, three-quarter angle and every part it shows: a short chimney cap with vent holes on top, a dented domed hood with small vent holes, a riveted top band with two side lugs, four vertical riveted guard bars, a clear glass globe with a star-shaped crack, a small burner inside the globe, a riveted base band with round vent holes and one knurled wick knob, a small latch tab on the base rim, and a heavy chain running from the chimney cap down to a cargo hook resting on the ground at the left. Do not add parts the sketch does not show. Ignore the small side and top views and all handwriting. Game prop: a salvaged ship's lantern from a harbor wreck. Tarnished brass with green verdigris in the seams, dents and scratches, salt crust around the rivets, a dark iron chain and hook with flaking rust, slightly grimy glass with the crack catching the light, the burner unlit. Single object, centered, filling about 80 percent of the square, three-quarter view as in the sketch, transparent background, no cast shadow, no text. Style: grounded AAA realism, weathered materials, soft overcast light, cinematic depth. Show me the render next to the sketch.Tick every part before any 3D
All of the listed parts should be there at the sketched angle, and nothing added. Fix it on the image, where it costs far less than on a mesh.
PromptTick every part of the prompt's list against the render, one by one: chimney cap with vent holes, domed hood, top band with two lugs, four guard bars, cracked globe, burner, base band with vent holes and wick knob, latch tab, chain and hook. Tell me what is missing, what was added, and whether the angle and the alpha edge are clean. Redo the render only if a part fails.Brief the agent: the 3D models
PromptTurn the approved render into 3D on two models, with the render as the image, started with wait: false and collected with one jobs_wait: - Meshy 7.1 - Image to 3D (model_meshy-7-1-img23d): image [render], geometryResolution "4k", textureResolution "2k", enablePbr true, shouldRemesh true, topology "triangle", targetPolycount 8000. - Tripo P2 (model_tripo-p2-image-to-3d): image, faceLimit 8000, pbr true, autoSize true. Quote each 3D job with a dry run first and wait for my go. Download both with format "glb".Measure in your 3D tool
Accept when the 3D front matches the render, the triangle count is measured and under budget, the PBR maps load and carry the wear, thin parts survive and nothing is missing from the back. In the run, Meshy returned 8,274 triangles for a target of 8,000 (a Decimate at 0.95 brought it to 7,860), Tripo came in at about 40 cm, and Meshy kept more of the wear, so it was kept for a prop near the camera.
PromptImport both GLB files into Blender, count the triangles, measure the real-world size, and check that the color, normal and roughness maps load. Turn each model and tell me if a part is lost, if thin parts merged into blobs, if texture smears on large faces, or if there are holes visible from a gameplay angle. If a count is over 8,000, apply a Decimate and report the new count.File and report
PromptCreate a collection for this prop with the sketch, the approved render and both 3D models. Report the models, every asset ID, the measured triangle counts and sizes, which model you recommend keeping and why, and the total cost spent.
Step by step in the web app (7 steps)Hide the steps
The sketch as the reference
Create › Images › GPT Image 2.5 Sunburst, Reference Images › Select from Library › the lantern sketch. Dimensions 1:1, Quality high, Background transparent, because the render goes on to 3D next.
List every part, forbid the rest
The first paragraph names every part in the drawing, then one sentence forbids anything else. The page also has small views and notes, so it says to follow the large drawing only.
PromptThe reference image is a graphite sketch of a game prop: follow the large main drawing only, its shapes, proportions, three-quarter angle and every part it shows: a short chimney cap with vent holes on top, a dented domed hood with small vent holes, a riveted top band with two side lugs, four vertical riveted guard bars, a clear glass globe with a star-shaped crack, a small burner inside the globe, a riveted base band with round vent holes and one knurled wick knob, a small latch tab on the base rim, and a heavy chain running from the chimney cap down to a cargo hook resting on the ground at the left. Do not add parts the sketch does not show. Ignore the small side and top views and all handwriting. Game prop: a salvaged ship's lantern from a harbor wreck. Tarnished brass with green verdigris in the seams, dents and scratches, salt crust around the rivets, a dark iron chain and hook with flaking rust, slightly grimy glass with the crack catching the light, the burner unlit. Single object, centered, filling about 80 percent of the square, three-quarter view as in the sketch, transparent background, no cast shadow, no text. Style: grounded AAA realism, weathered materials, soft overcast light, cinematic depth.Materials come second
In the same prompt, materials come in a second paragraph: tarnished brass, verdigris, a rusted chain. The first paragraph gives the shape, the second the surface.
Tick every part
Before any 3D, tick every part of the list against the render: all of it should be there and nothing added. Without the sketch, the same prompt moved the chain and added a handle and a cage; fix that on the image, where it costs far less than on a mesh.
Set the budget before you generate
Create › 3D › Meshy 7.1 - Image to 3D, Image: the approved render. Remesh on (without it the target is ignored), Target Polycount 8,000, Topology Triangle, Enable PBR on.
Same render, second model
Switch to Tripo P2 with the same render: Face Limit 8,000, PBR on, Auto Size on, which gives the mesh a real-world size. Meshy kept more of the wear (dents, rivets, open chain links), so it was kept for a prop near the camera.
Count the triangles in Blender
Measure outside Scenario, in your 3D tool. Meshy treated 8,000 as a target and returned 8,274; a Decimate at 0.95 brought it to 7,860 with no visible change. Tripo came in at about 40 cm, close to a real lantern, while Meshy has no real size, so scale it against a reference.
Related