

Set up your workspace
How an organization, its projects and its members fit together, and the rules an enterprise sets once for every surface.
- Tutorial
On this page11 sections
- Before you start
- Step 1: Read the pill
- Step 2: Open Settings
- Step 3: Give each person an organization role
- Step 4: Give each person a project role
- Step 5: See how settings narrow from organization to project
- Step 6: Know where every organization setting lives
- Step 7: Move work between projects
- Projects in more detail
- Common problems
- What's next
Before you invite anyone or set any rules, it helps to see how a Scenario workspace is built. This lesson walks through the Starforge Games organization: its projects, the two roles every person has, where the settings live, and how assets, models and workflows move from one project to another.
Quick version
- Click the pill at the top left to see your organizations on the left and their projects on the right.
- Click the gear next to the organization to open Settings: Organization for everything shared, Project for the project you are in.
- Give each person an organization role (Admin or Member) and a role in each project (Owner, Contributor or Viewer).
- Set rules at the organization level; a project can only make them stricter.
- Move work on purpose: Transfer for an asset, Transfer Model for a model, export and import for a workflow.
Before you start
- You need to be an organization Admin to change organization settings. Members can see and use the projects they belong to, and nothing else.
- Two levels hold everything. The organization is the top level: it holds the plan, the shared credits, the members and every rule your team works under. Projects sit inside it and hold the work: assets, models, workflows and collections.
- Content stays inside its project. What you generate or train in one project is not visible in another until you transfer it.
- Admin settings depend on your plan. Several of the controls shown here (Quality Gate, IP Detection, Watermark, the Solo project mode) are Enterprise features.
Step 1: Read the pill
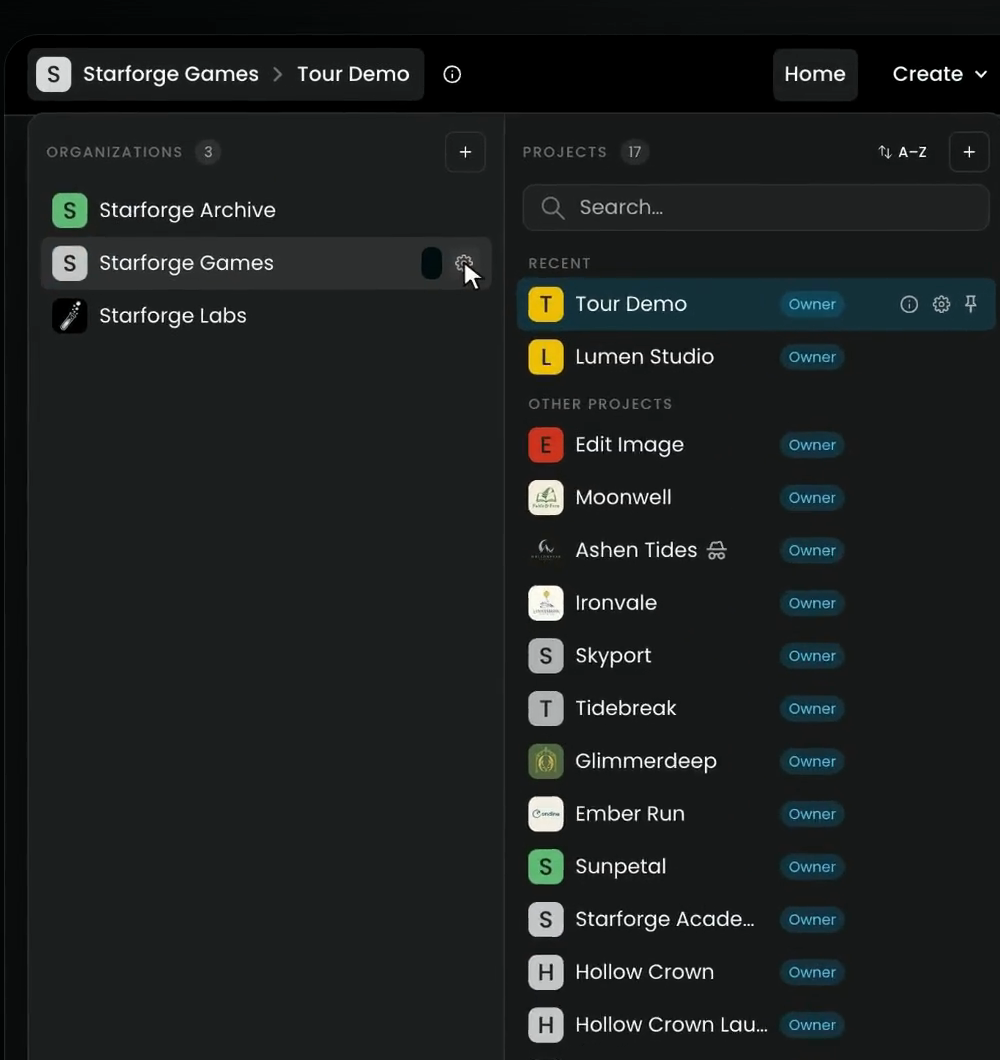
Everything starts from the pill at the top left of the top bar. It shows where you are: here, the organization Starforge Games and the project Tour Demo.
Click it. Two columns open:
- Organizations, on the left, lists every organization you belong to. The + at the top of the column creates a new one.
- Projects, on the right, lists the projects of the selected organization, with your role in each one. Recent projects come first, then Other projects. Use Search... or the A-Z sort when the list gets long.
A good rule is one project per product, client or campaign, plus a sandbox for trying things out. Admins create new projects with the + at the top of the Projects column.
Whatever you generate goes into the project selected here, so check the pill before you start.
Step 2: Open Settings
To manage all of this, click the gear next to the organization in the pill. (Each project has its own gear too, which opens the same page on that project's settings.) Settings opens with a left panel in three layers, the same layers as the workspace:
- Organization ("Defaults for every project") is for everything shared.
- Project ("Settings for this project") is for the project you are in.
- You ("Your personal preferences"), further down, holds your own profile and preferences.
Step 3: Give each person an organization role
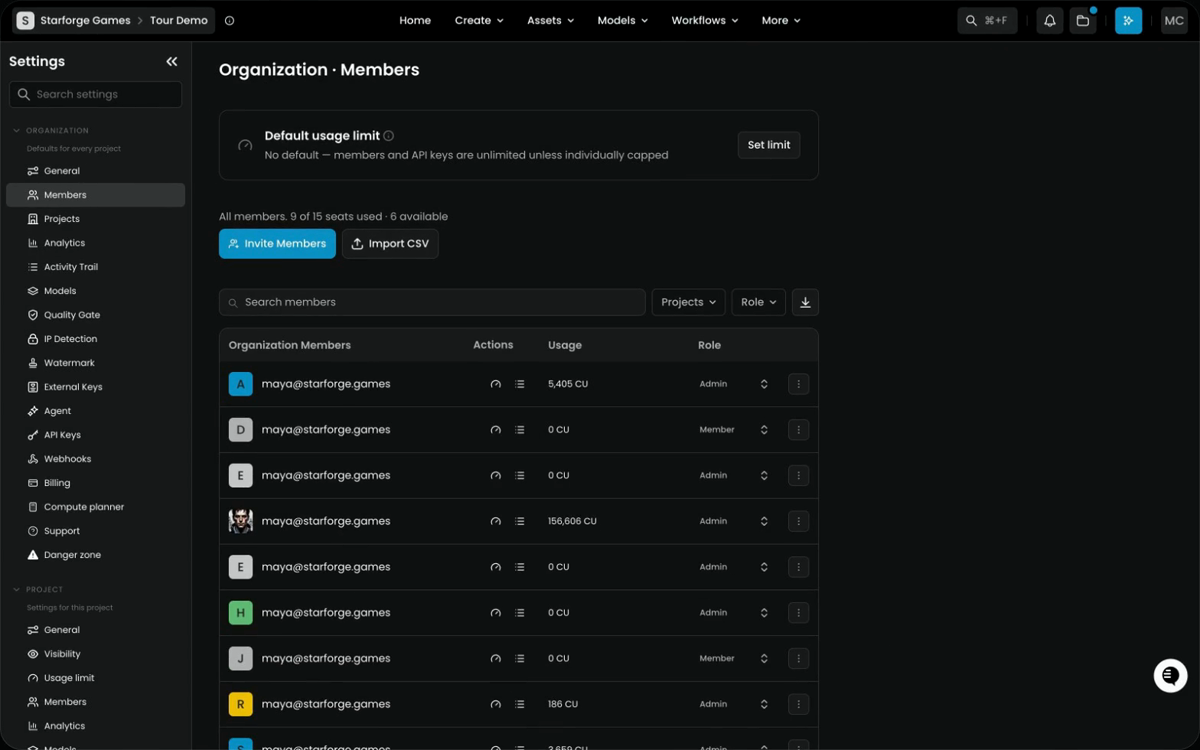
Permissions work in layers too. Start with the organization: open Organization › Members. The page shows how many seats are used and available, the Invite Members and Import CSV buttons, a Default usage limit card, and the list of Organization Members with each person's Usage and Role.
Each person is an Admin or a Member:
| Organization role | What they can do | Best for |
|---|---|---|
| Admin | Run the organization: billing, members, settings, models and project creation | Team leads, administrators, the account owner |
| Member | Work in the projects they are added to, and nothing else; no organization settings | Everyone who makes things, collaborators, clients |
Step 4: Give each person a project role
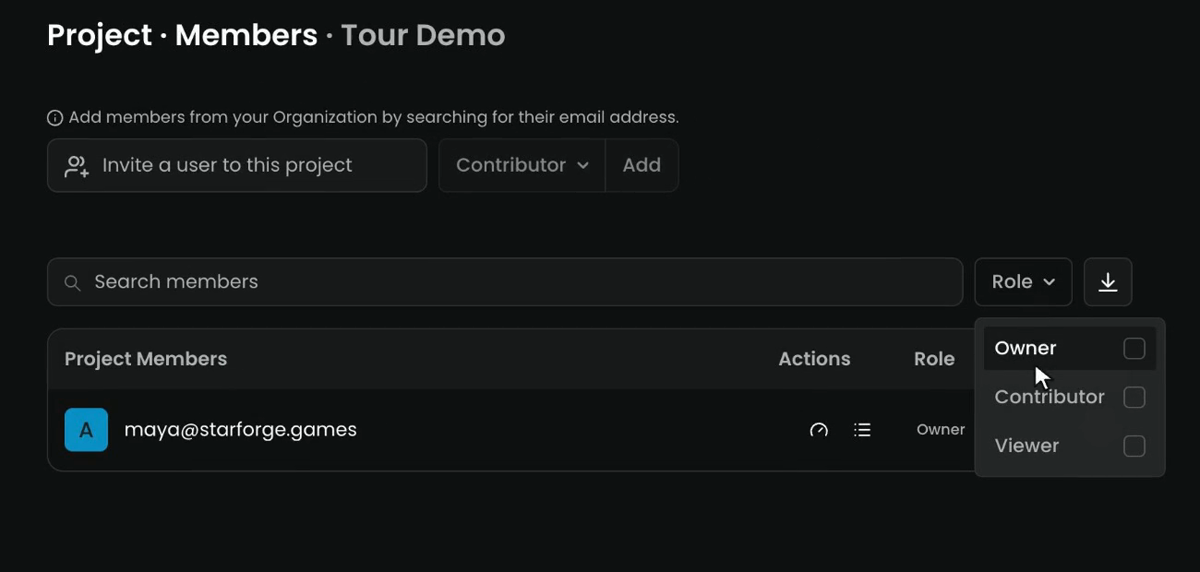
Then each project has roles of its own. Open Project › Members. Here you add people who are already in the organization (Invite a user to this project, pick a role, Add) and set their role in this project:
| Project role | What they can do |
|---|---|
| Owner | Manage the project's members and settings, and see its analytics |
| Contributor | Make things: generate, train, import and edit assets |
| Viewer | Only look at the project and its assets |
So every person has two roles: one in the organization, and one in each project they join. An organization Member can be the Owner of one project and a Viewer in another. The next lesson invites people and sets these roles.
Step 5: See how settings narrow from organization to project
Settings follow the same layers. Take models.
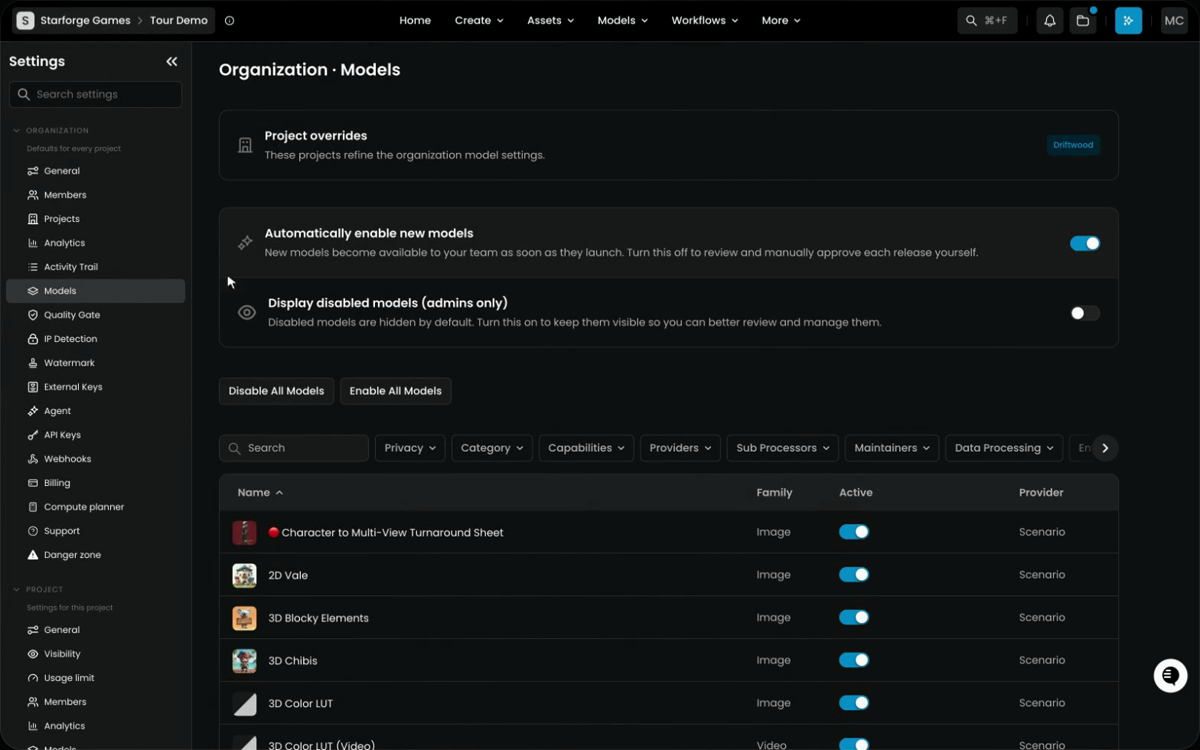
Under Organization, Models is the list your whole team can use. At the top, Project overrides lists the projects that narrow it. Two switches set the default for new releases: Automatically enable new models (new models are available to your team as soon as they launch; turn it off to approve each release yourself) and Display disabled models (admins only). Below are Disable All Models, Enable All Models, filters, and a switch per model in the Active column.
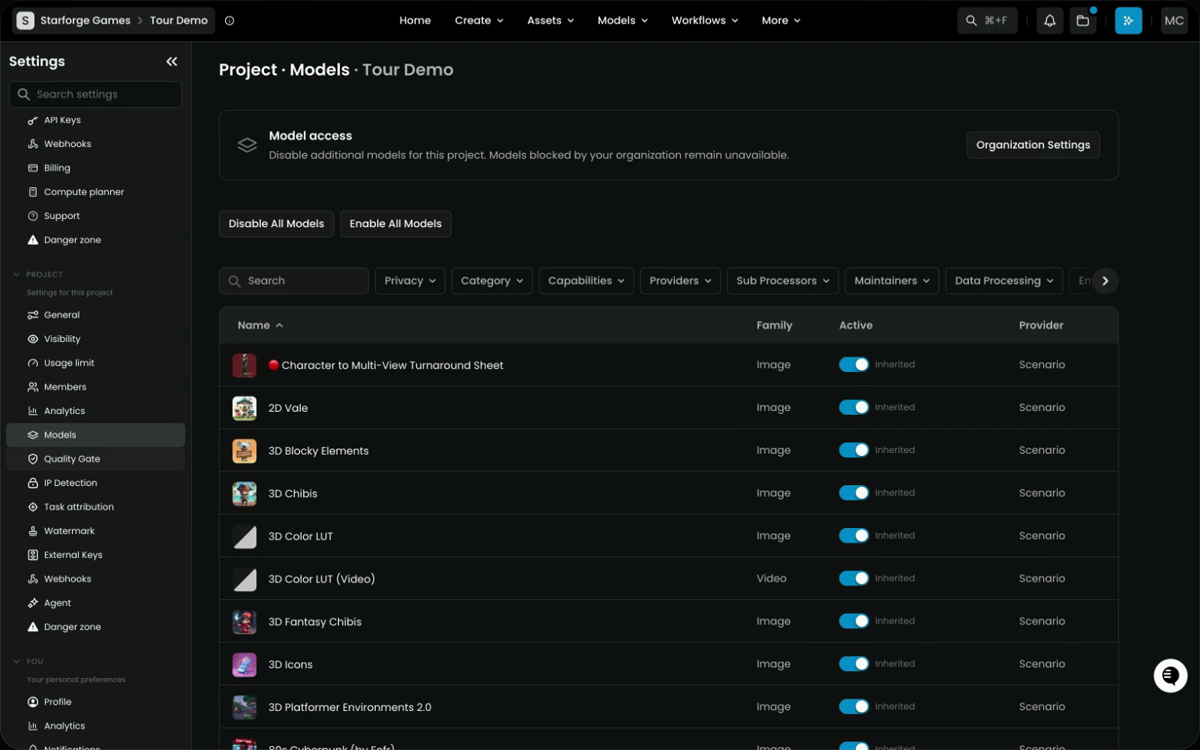
Under Project, Models narrows that list for one project. Its Model access card says it plainly: you can disable more models for this project, but models blocked by your organization stay unavailable. Each model here shows Inherited next to its switch until you change it, and Organization Settings takes you back up a level.
The organization sets the default, and a project can only be stricter, never looser. Lesson 3 covers models in detail.
Step 6: Know where every organization setting lives
Organization settings is where admins decide everything for the organization. The left panel, under Organization:
| Setting | What it holds | Lesson |
|---|---|---|
| General | Organization name, logo and Organization ID | This one |
| Members | Who is in, their organization role, seats, per-member limits | People and access |
| Projects | Every project, and its ID | This one |
| Analytics, Activity Trail | Usage over time, and who did what | Spend and usage |
| Models | Which models your team can use | Model access |
| Quality Gate, IP Detection, Watermark | Content controls on what gets generated | Content and security |
| External Keys | Your own provider keys | Model access |
| Agent, API Keys, Webhooks | The agent, programmatic access and job notifications | Share and roll out |
| Billing, Compute planner | Plan, seats, compute units and forecasts | Spend and usage |
| Support, Danger zone | Help channels, and deleting the organization |
Most of these have a project version too, under Project, which can only be stricter: General, Visibility, Usage limit, Members, Analytics, Models, Quality Gate, IP Detection, Task attribution, Watermark, External Keys, Webhooks, Agent and Danger zone.
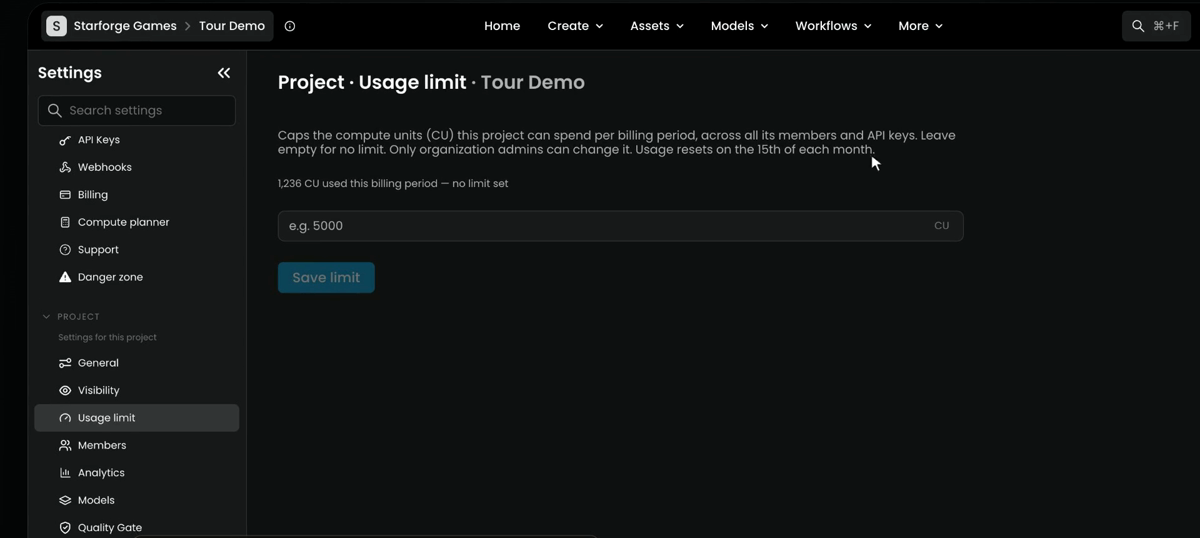
Spend can be capped at every level: per project here, under Project › Usage limit, and per member or per API key. The project limit caps the compute units (CU) the project can spend per billing period, across all its members and API keys. Leave it empty for no limit. Only organization admins can change it.
Step 7: Move work between projects
Work never moves between projects on its own. Each kind of work has its own way across:
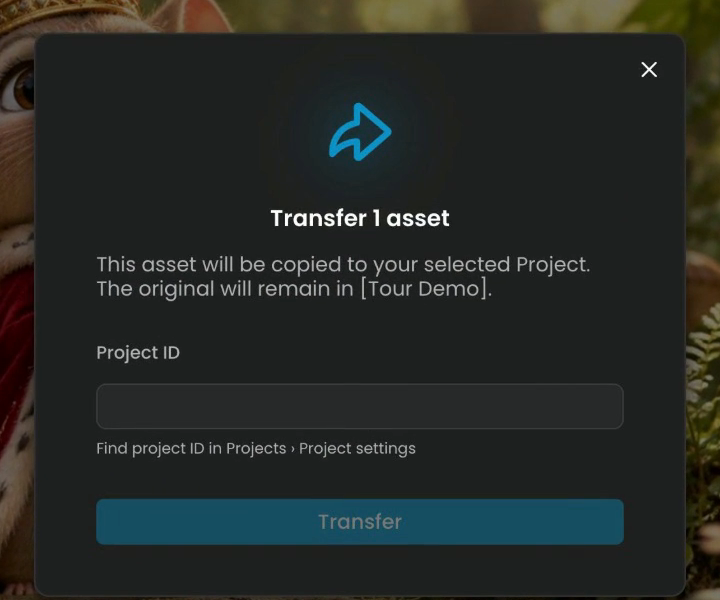
- An asset. Open it and click Transfer at the top right of the viewer. In Transfer 1 asset, paste the Project ID of the other project and click Transfer. A copy goes there, and the original stays where it was. You'll find every project's ID under Organization › Projects in Settings. You can also transfer from an asset's ... menu in the gallery, or select several assets and use Transfer in the bar at the bottom.
- A custom model. Use Transfer Model in the model's menu.
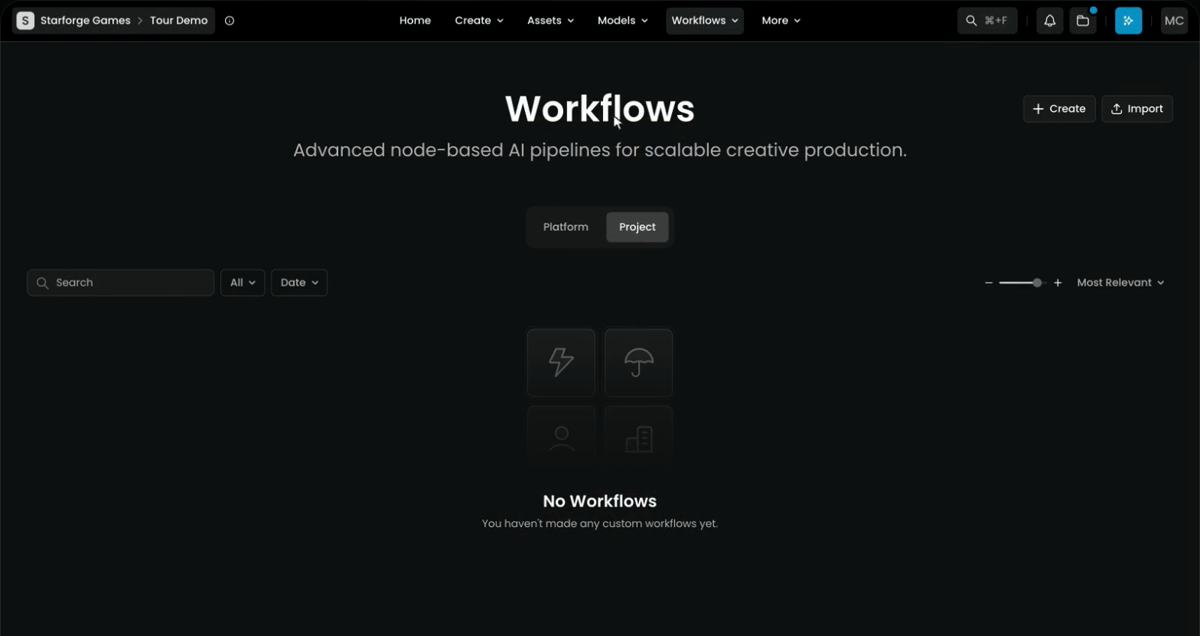
- A workflow. Export it, then Import it in the other project from the Workflows page.
A transferred asset keeps its prompt and the main settings of its generation, but it can't be regenerated in the new project. You can only transfer to projects in the same organization.
Projects in more detail
- Visibility (Enterprise). Under Project › Visibility, a project is Collaborative (everyone in it sees and edits every asset and model, the default) or Solo (each person sees only their own work). Owners can switch at any time, for example Solo for early concepting, then Collaborative for production.
- Project analytics. Owners see the project's own activity under Project › Analytics.
- Deleting a project. Project › Danger zone › Delete project, then type the project's name. It removes the project's models, uploads and outputs for good, with no trash. Transfer or download what you want to keep first. You can't delete the last project in an organization.
- Deleting the organization. Organization › Danger zone. You can't delete one with an active subscription or your only organization.
Common problems
| What you see | What to do |
|---|---|
| A generation landed in the wrong project | Check the pill before you generate; transfer the asset to the right project |
| Someone can't see a project | Add them under Project › Members; they must already be in the organization |
| Someone can see the project but can't generate | Their project role is Viewer; make them a Contributor |
| A project can't turn a model on | The organization has it off; only an Admin can enable it under Organization › Models |
| You don't see Organization settings | You are a Member; ask an Admin |
| A transferred asset can't be regenerated | Expected: the prompt and settings come across, the generation can't be replayed |
What's next
The organization is where admins govern everything, projects hold the work, and every person has a role at both levels. Next, People and access invites your team, sets those roles and turns on single sign-on.