

Control model access
Choose which models the organization and each project can use, and find why a member cannot see one.
- Tutorial
On this page13 sections
- Before you start
- Step 1: Check the picker's filters first
- Step 2: Open the organization's model list
- Step 3: Decide what happens to new models
- Step 4: Filter the list to fit your policy
- Step 5: Build an approved list
- Step 6: Narrow the list for one project
- Step 7: Add your own provider keys
- Step 8: Know who bills what
- Step 9: Give a project its own key
- Supported providers
- Common problems
- What's next
"I can't see this model" is the question every admin hears. This lesson explains why it happens, then sets up the Starforge Games model list for the whole organization, narrows it for one project, and connects your own provider keys under External Keys.
Quick version
- When someone can't see a model, check the picker's filters first, then the organization and the project.
- In Settings › Organization › Models, decide whether new models are enabled automatically.
- Filter the list (for example Enterprise Status › Ready), use Disable All Models, then switch on only the models you allow.
- Narrow it further per project under Project › Models; a project can never turn on what the organization turned off.
- To run a provider on your own account, add your key under Organization › External Keys, or per project.
Before you start
- You need to be an organization Admin to change the model list and external keys.
- Model access and external keys are Enterprise features. On other plans there is no list to manage: every plan, Free included, runs every model on Scenario.
- The list applies everywhere your team works: the web app, workflows, the API and the Scenario MCP. A model switched off here is off in all of them.
- A model has to pass two checks before someone can use it:
| Check | Where it's set | Who changes it |
|---|---|---|
| The organization allows it | Organization › Models | Admins |
| The project hasn't turned it off | Project › Models | Admins |
Step 1: Check the picker's filters first
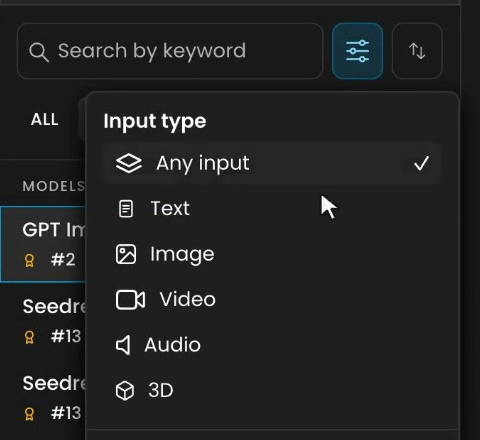
Before you change any setting, check the filters in the model picker. A forgotten filter hides a lot of models. In the Model panel, click the filter icon next to Search by keyword: Input type should be Any input, and the budget and speed filters below it should be clear. The tabs under the search (ALL, image, video, audio, 3D and others) filter by output too.
Step 2: Open the organization's model list
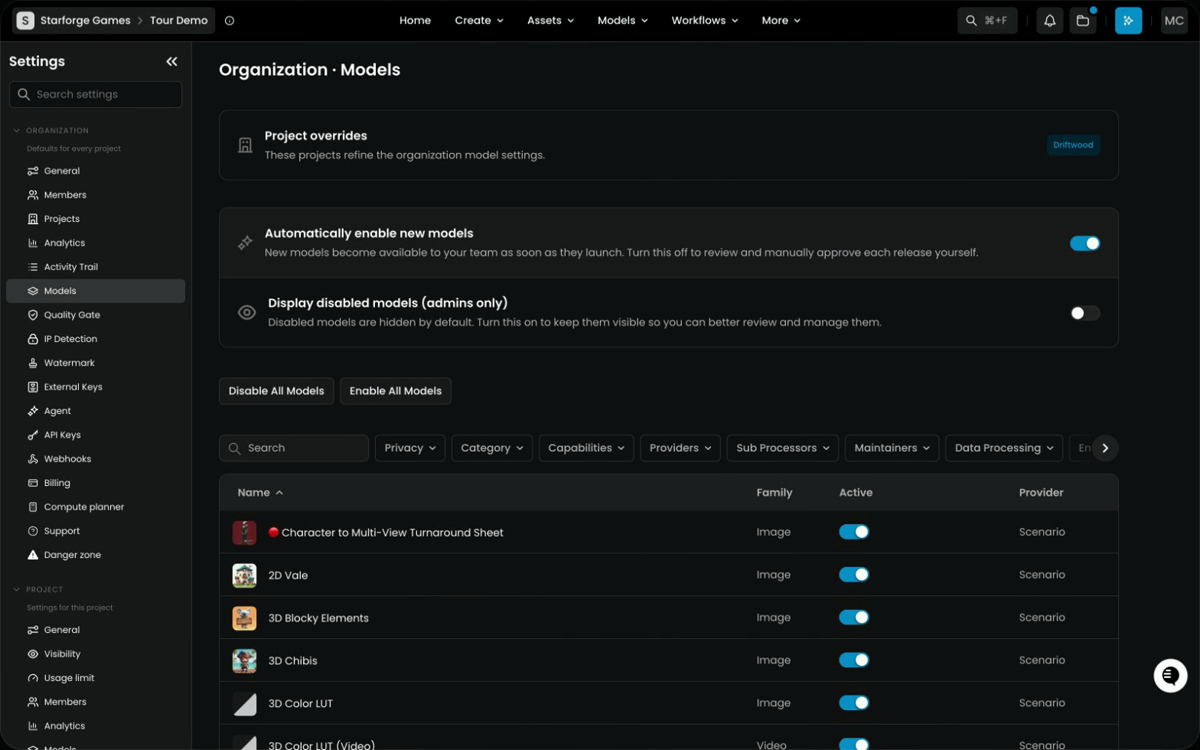
On Enterprise, admins choose the models in organization settings: open the pill, click the gear next to the organization, then Models. The page has three parts:
- Project overrides, at the top, lists the projects that narrow this list.
- Two switches that set how the list behaves (next step).
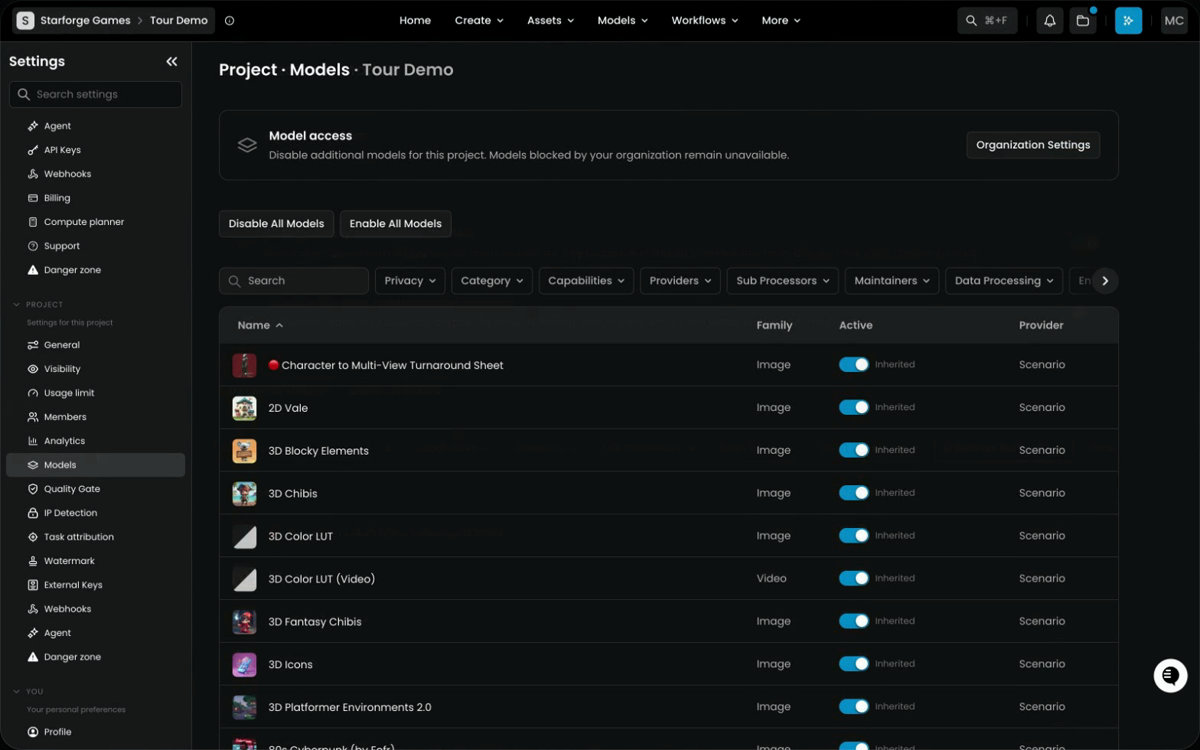
- The model list, with Disable All Models, Enable All Models, a Search box and filters, and a switch for each model in the Active column.
Step 3: Decide what happens to new models
- Automatically enable new models decides what happens when a new model launches. On, it's ready for your team right away. Off, it waits for an admin to approve it.
- Display disabled models (admins only) keeps disabled models visible to admins, so you can review and manage them. Members never see them.
Turn the first one off if your legal or security team must review every model before use.
Step 4: Filter the list to fit your policy
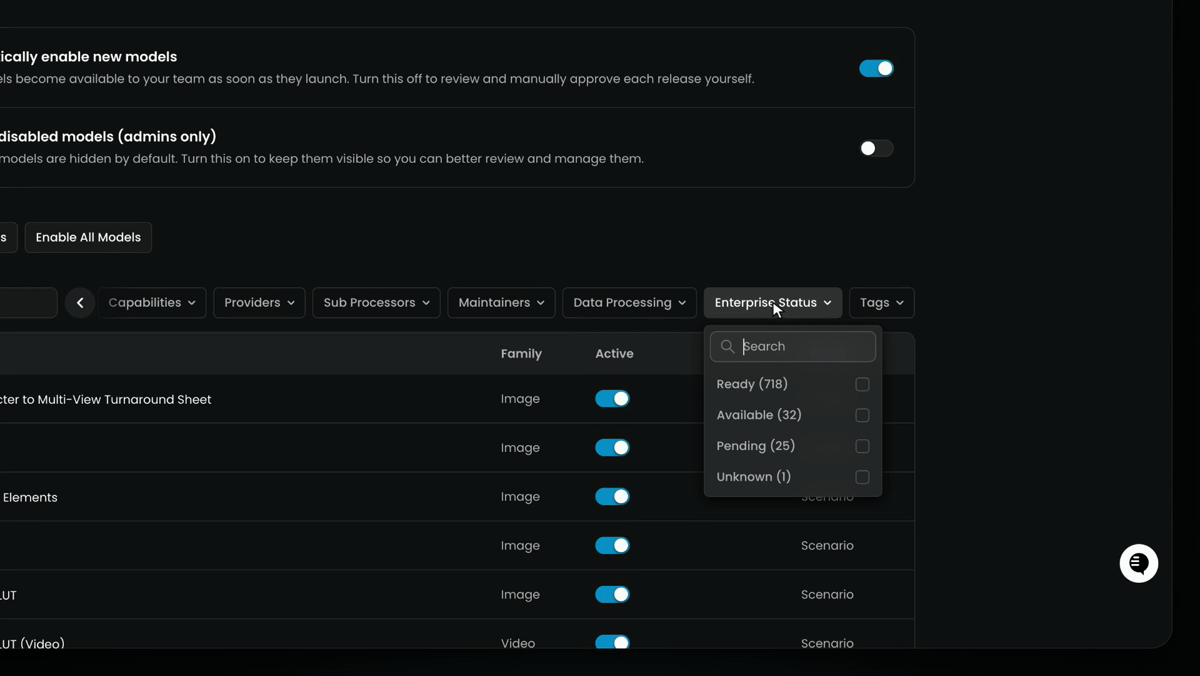
Filter the list by Privacy, Category, Capabilities, Providers, Sub Processors, Maintainers, Data Processing, Enterprise Status or Tags. Click the arrow at the end of the filter bar to see the last ones.
Enterprise Status is the one most security reviews start from:
| Status | What it means |
|---|---|
| Ready | Meets every enterprise security and contract requirement: your inputs and outputs aren't used for training, minimal or zero data retention, data stored on Scenario's own infrastructure |
| Available | Not fully compliant yet, but can be moved to Ready |
| Pending | Talks with the provider are under way |
| Unknown | The provider hasn't confirmed its status yet |
Custom models your team trains in Scenario count as Enterprise Ready.
Step 5: Build an approved list
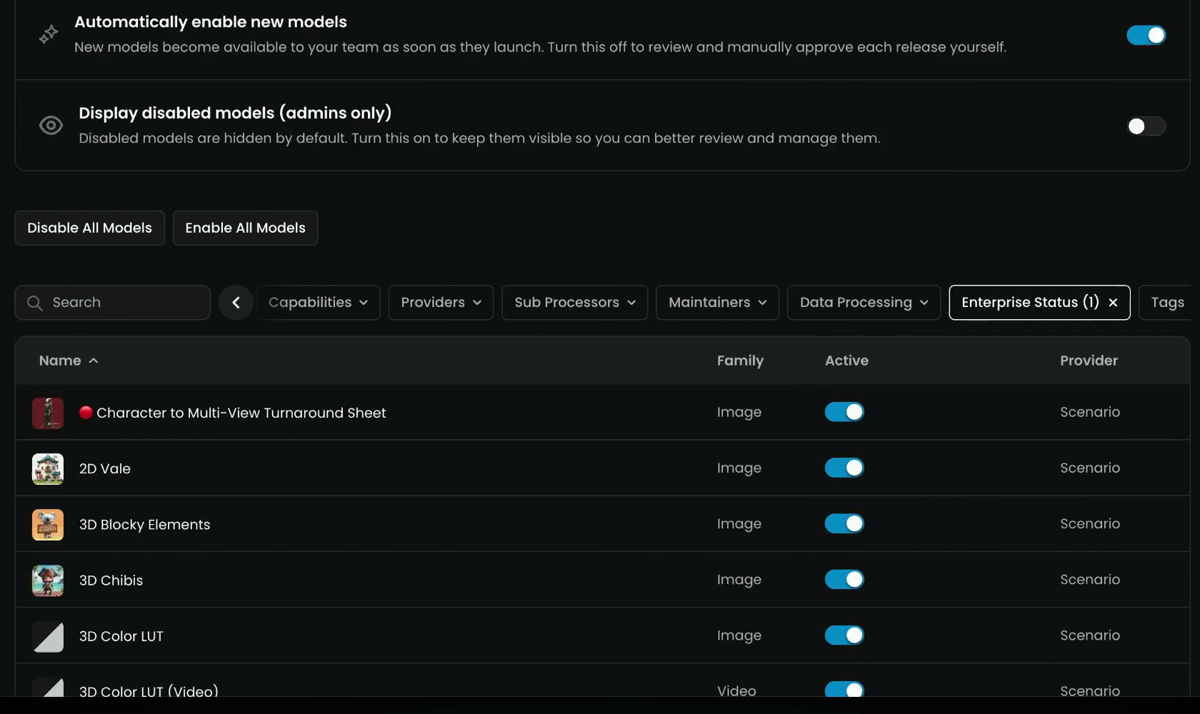
To build an approved list, click Disable All Models, then switch on only the ones you allow, one by one in the Active column. With a filter on, such as Enterprise Status (1), the list shows only the matching models, so you can enable them quickly. Clear the filter with its x.
Step 6: Narrow the list for one project
Each project can narrow that list for its own work under Project › Models. Its Model access card explains the rule: you can disable additional models for this project, but models blocked by your organization stay unavailable. Each model shows Inherited next to its switch until the project changes it. Organization Settings takes you back to the organization's list.
A good pattern:
- The organization: a wider list.
- Production projects: only approved models.
- A sandbox project: for testing new ones.
When new models wait for approval, check the Model Hub for what's new, test them in your sandbox, then enable the ones that work.
Step 7: Add your own provider keys
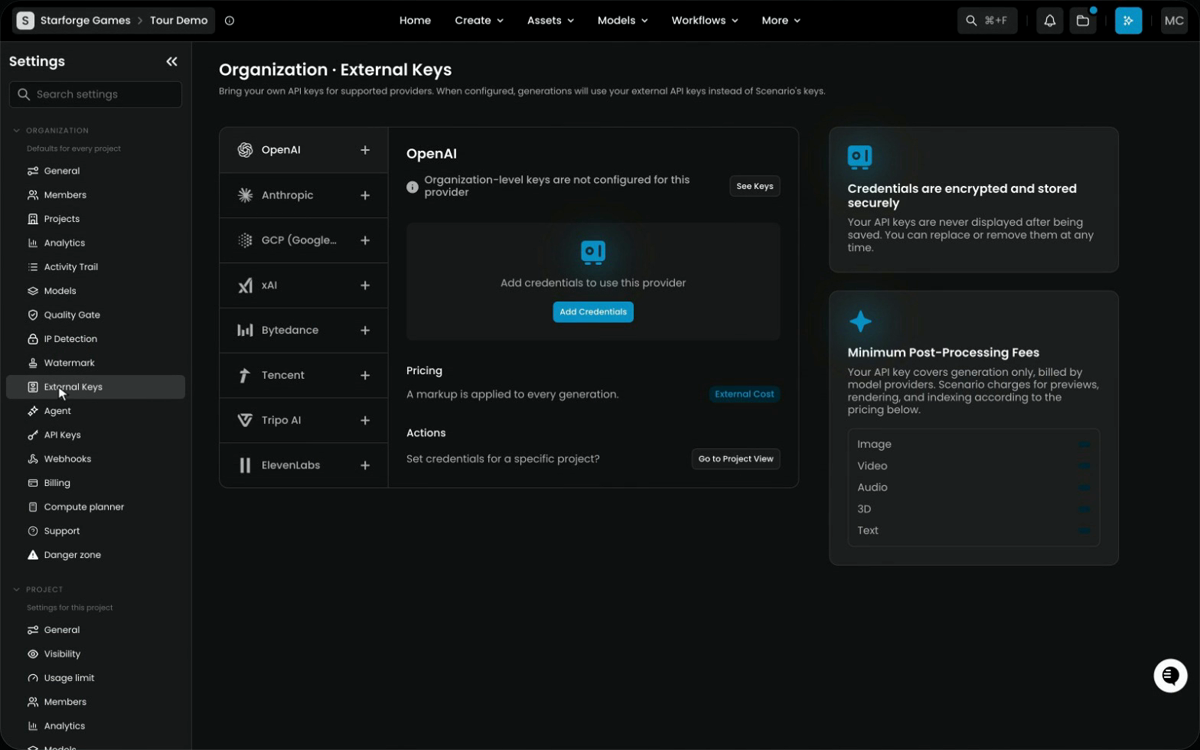
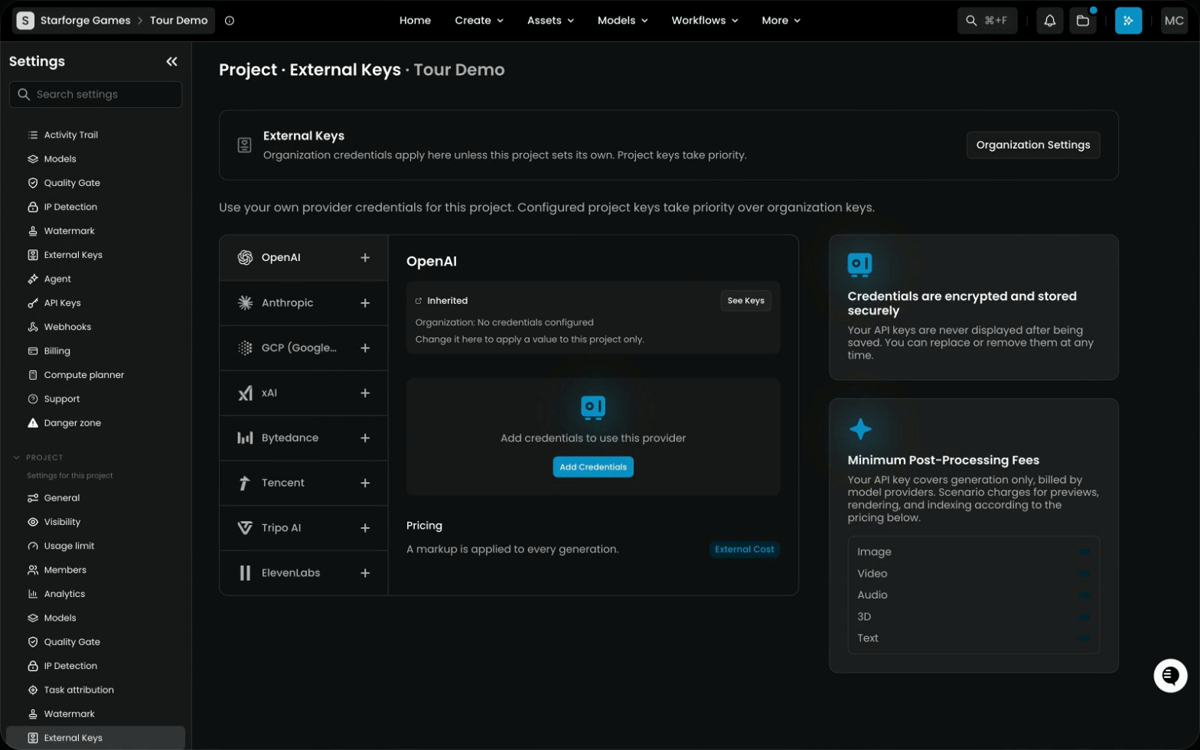
On Enterprise, you can run supported providers on your own API keys, under Organization › External Keys. Generations then use your keys instead of Scenario's, billed to your provider account.
- Pick a provider in the list on the left: OpenAI, Anthropic, GCP (Google...), xAI, Bytedance, Tencent, Tripo AI or ElevenLabs.
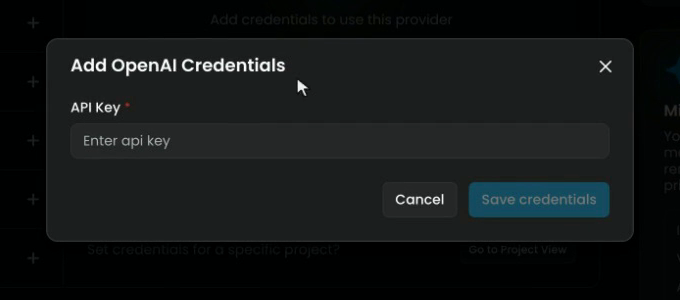
- Click Add Credentials.
- Paste your key in API Key and click Save credentials. It's encrypted, and never shown again; you can replace or remove it at any time.
Make sure the key has generation permissions at your provider. If your provider account is rate-limited or suspended, generations on that provider fail.
Step 8: Know who bills what
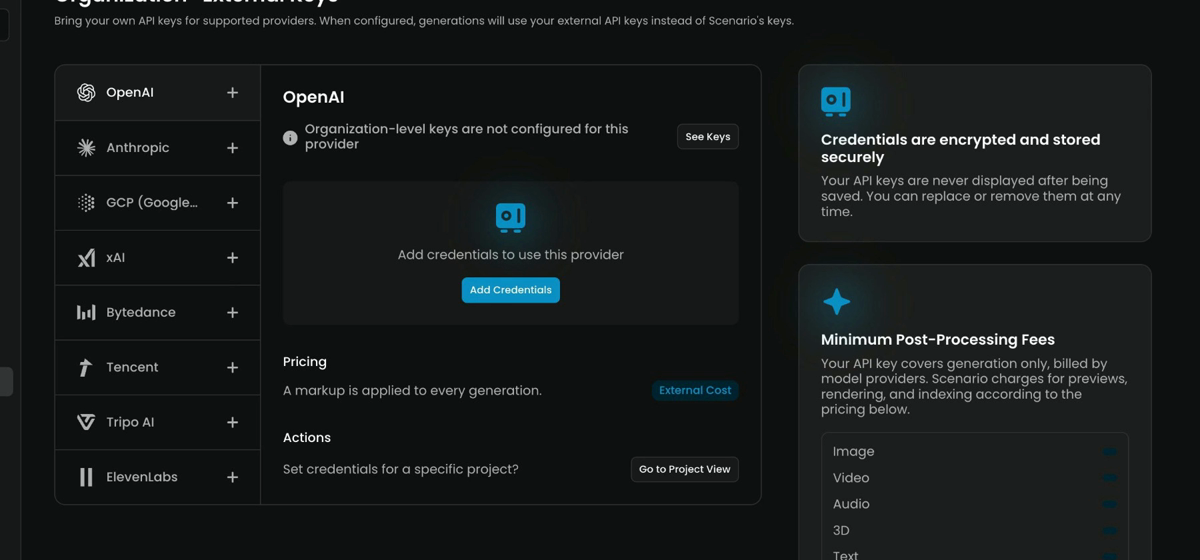
Your provider bills you for each generation. Scenario still charges a fee for previews, rendering and indexing: the Minimum Post-Processing Fees card lists it per output type (image, video, audio, 3D, text), and Pricing shows that a markup is applied to every generation.
Your own keys don't cover Scenario's own services (training, workflows, storage) or Scenario's own models, which have no outside provider.
Step 9: Give a project its own key
A project can also use its own key, under Project › External Keys (or Go to Project View from the organization page). The project's key takes priority over the organization's. Until you add one, the provider shows Inherited with the organization's setting.
Use this when one client or product must be billed to a separate provider account.
Supported providers
| Provider | Models it covers |
|---|---|
| OpenAI | GPT Image and other OpenAI image models |
| Anthropic | Claude models in the LLM and workflow nodes |
| GCP (Google Vertex AI) | The Gemini family |
| xAI | Grok generation and editing models |
| Bytedance | Seedream, Seedance, Dreamina, OmniHuman, Seed Audio |
| Tencent | Hunyuan image and video models |
| Tripo AI | 3D generation |
| ElevenLabs | Music, sound effects and voice |
The model list and external keys work independently: you can use one without the other. Tell your team which models run on your keys, so they know where those charges appear.
Common problems
| What you see | What to do |
|---|---|
| A member can't see a model | Clear the picker's filters; then check Organization › Models and the project's Models |
| A project can't switch a model on | The organization has it off; enable it at the organization level first |
| A new model appeared before review | Turn off Automatically enable new models |
| You can't find a disabled model to review it | Turn on Display disabled models (admins only) |
| Generations fail on one provider | Check the key's permissions and your account's limits at the provider |
| One project bills to the wrong account | Add its own key under Project › External Keys; it takes priority |
What's next
Your team now sees only the models you approved. Next, Spend and usage keeps spend under control with alerts and limits, and shows where it goes.