

Build your first workflow
Add two Text nodes, join them in a Prompt Builder, send the prompt and the character to an Image Generator, and test that one step to make the first anatomy sheet.
- Tutorial
- Step 2 Repeat
On this page17 sections
- Before you start
- Step 1: Open the workflow
- Step 2: Make room
- Step 3: Add the framing rule
- Step 4: Add the style prompt
- Step 5: Add a Prompt Builder
- Step 6: Wire in the two texts
- Step 7: Build the prompt
- Step 8: Add an Image Generator
- Step 9: Wire the prompt and the character
- Step 10: Choose the model
- Step 11: Run this node
- Step 12: Check the sheet
- Step 13: Fix it, then close
- How the Prompt Builder works
- Common problems
- What's next
This lesson makes the first of the four sheets in Anatomy reference sheets: a pencil sketch of the character with the anatomy drawn on top in blue. You add two texts, join them into one prompt with a Prompt Builder, send that prompt and the character to an Image Generator on GPT Image 2.5 Sunburst, and test that one step on its own.
Quick version
- Open Workflows › Workflows, and on the Project tab open Anatomy reference sheets. Click Switch to Edit Mode.
- Add two Text nodes:
1. Full Body + 9:16with the framing rule, and2. Style C - Anatomywith the style prompt. - Add a Prompt Builder named
3. Final Prompt C, wire both texts into it, and build the prompt: style chip, blank line, framing chip. - Add an Image Generator named
4. Output C - Anatomy. Wire the prompt into Prompt and the character into Reference Images, and choose GPT Image 2.5 Sunburst. - Click Run This Node and check the sheet. The workflow saves as you work (Cmd+S, or Ctrl+S on Windows, saves right away); close it with the X when you're done.
Before you start
- What you need: the Anatomy reference sheets workflow from What workflows are, with its 1. Character Illustration node holding your character.
- What it costs: only the Image Generator spends anything in this lesson, one image. The price shows on Run This Node before you click.
- Why two texts and not one prompt: the framing rule is the same for all four sheets, the style is not. Keeping them apart means the rule is written once and every look reuses it. The next lesson builds on this.
The nodes in this lesson
| Node | Kind | What it holds or does |
|---|---|---|
| 1. Character Illustration | Image input, from the previous lesson | The character |
| 1. Full Body + 9:16 | Text input | The framing rule, shared by all four looks |
| 2. Style C - Anatomy | Text input | The style prompt for this look |
| 3. Final Prompt C | Prompt Builder | Joins the style and the rule into one prompt |
| 4. Output C - Anatomy | Image Generator | Redraws the character with GPT Image 2.5 Sunburst |
Step 1: Open the workflow
Open Workflows › Workflows, and on the Project tab, open Anatomy reference sheets. A workflow in your project opens in run-only mode. Click Switch to Edit Mode.

Step 2: Make room
Drag an empty part of the canvas to slide the character over to the left. That leaves room on the right for the next nodes. Scroll to zoom if the nodes look too small or too big.
Step 3: Add the framing rule
Click +, and under Input, choose Text (or press Shift + T). Drag it into place to the right of the character.
Double-click its title and name it:
1. Full Body + 9:16
The number keeps the graph in reading order. Click inside the node and paste the framing rule. It asks for a tall 9:16 frame with the whole body, head to toe:
Output the image in a 9:16 vertical portrait aspect ratio.

If the source image is cropped (bust, half-body, or cut off at any edge), extend it into a COMPLETE FULL-BODY figure: reconstruct the missing torso, hips, legs and feet in a natural continuation of the pose, and frame the whole figure head-to-toe, centered in the 9:16 vertical frame with a small margin of empty space above the head and below the feet. Keep the same character design, proportions, style and camera direction. If the source already shows the full body, keep the pose and framing, just fit it into the 9:16 vertical frame.
The node shows a character count under the text: 598 characters for this rule.
Step 4: Add the style prompt
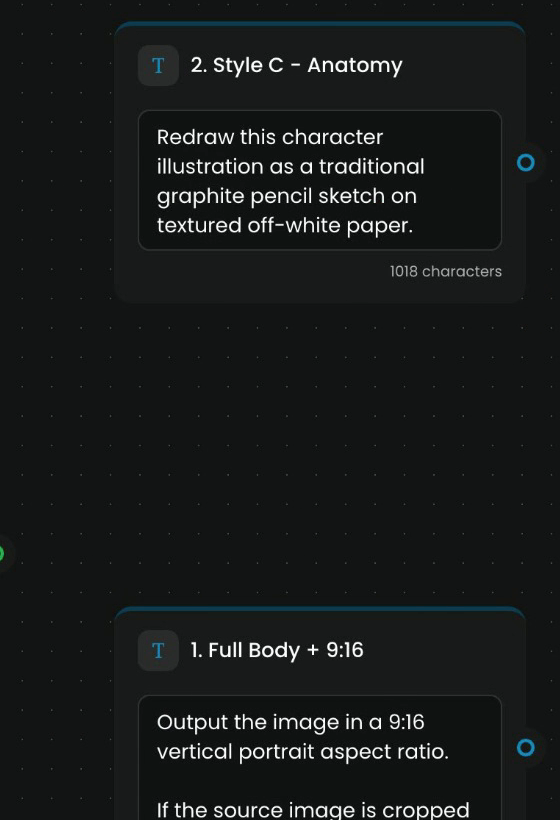
Add a second Text node above the first one and name it:
2. Style C - Anatomy
Paste the style prompt: a pencil sketch of the same pose, with the body drawn in simple blue shapes over the clothes. The next lesson, Prompts that repeat, explains how it's written.
Redraw this character illustration as a traditional graphite pencil sketch on textured off-white paper.

Keep the exact same pose, proportions, silhouette, outfit, camera angle and framing as the source.

PRESERVE EVERY ELEMENT OF THE CHARACTER: capes, cloaks, hoods, belts, straps, armor, gloves, boots, bags, weapons, wings, tails, jewelry and hair must all be drawn, with the same shape, length and placement as in the reference. Do not remove or simplify any part of the design.

Hand-drawn look: confident construction lines, light underdrawing still visible, expressive contour linework, no cross-hatching. Monochrome graphite only — no color, no digital gradients, no background scenery, just clean paper.

Overlay a drawing of the body anatomy drawn in basic geometry (spheres and cylinders etc.) in clean blue pencil line, revealing the body shape hidden by clothes and equipment.

Style: professional character design study sketch from an artist's sketchbook, figure drawing reference, no text, no watermark.
Step 5: Add a Prompt Builder
A Prompt Builder joins several texts into one prompt through a template. Under Utilities, add a Prompt Builder. Click its title once and name it:
3. Final Prompt C
Step 6: Wire in the two texts
Drag from the style's blue output dot to the Prompt Builder's text port on its left edge. Then do the same with the framing rule. Each text shows up as a chip at the top of the node: 2. STYLE C - ANATOMY and 1. FULL BODY + 9:16.
Step 7: Build the prompt
Click in the template box. Click the style chip, press Enter twice for a blank line, then click the framing chip. Underneath, the node shows the whole prompt it will send: the style text, a blank line, then the framing rule.
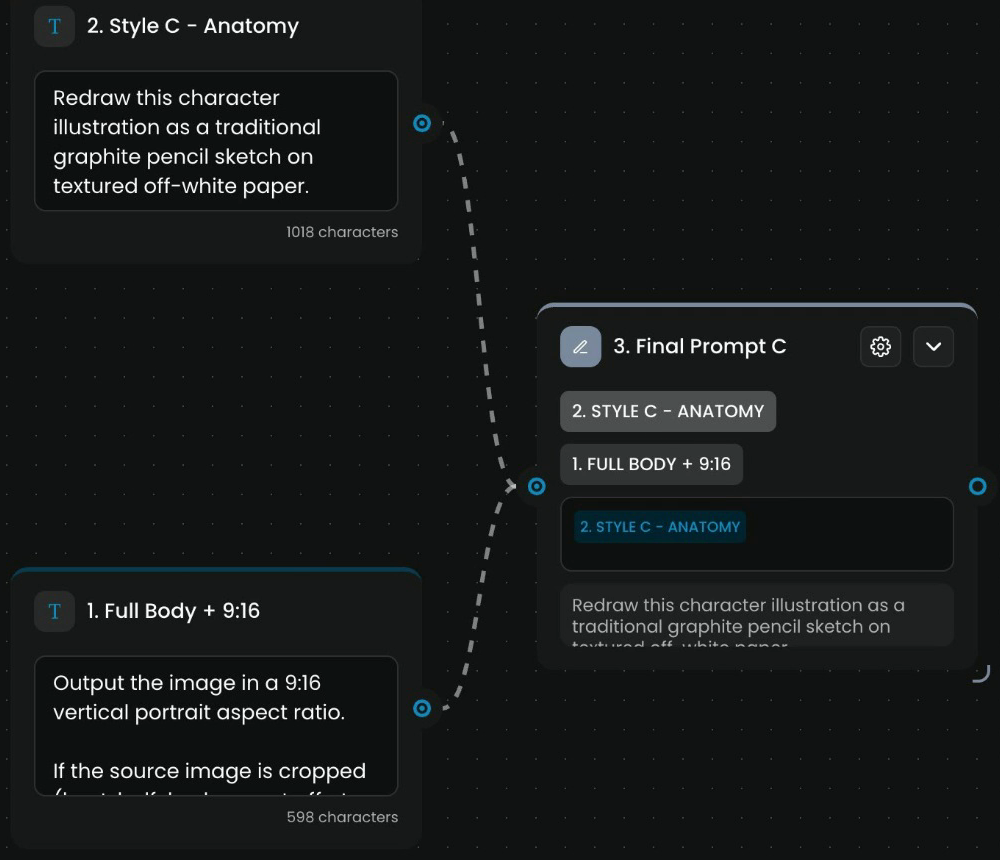
You can also type your own words around the chips: they stay fixed on every run. A chip that isn't placed in the template is not sent.
Step 8: Add an Image Generator
Under Generators, add an Image Generator. Drag it to the right of the Prompt Builder and name it:
4. Output C - Anatomy
Its ports, on the left edge:
| Port | Color | What goes in |
|---|---|---|
| Prompt | Blue | The text the model follows |
| Reference Images | Green | Images the model works from. An Image node with several images passes up to 10 |
On the right edge, its output carries the generated image.
Step 9: Wire the prompt and the character
Wire the Prompt Builder's output into Prompt. Then wire the character's green IMAGE port into Reference Images, so the model redraws her instead of inventing someone new.
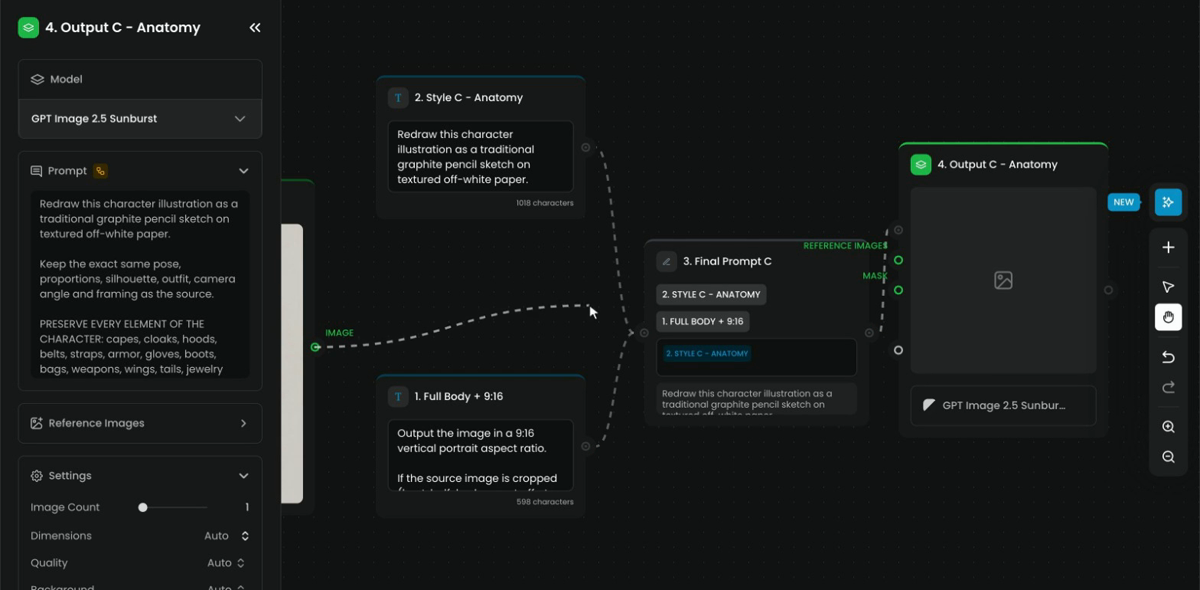
Click the node to open its settings in the panel on the left. Prompt now shows the joined text that comes from the Prompt Builder.
Step 10: Choose the model
Click the model name at the bottom of the node. In Choose a model, search for Sunburst, select GPT Image 2.5 Sunburst, and click Use this model. It redraws an image and keeps the pose.
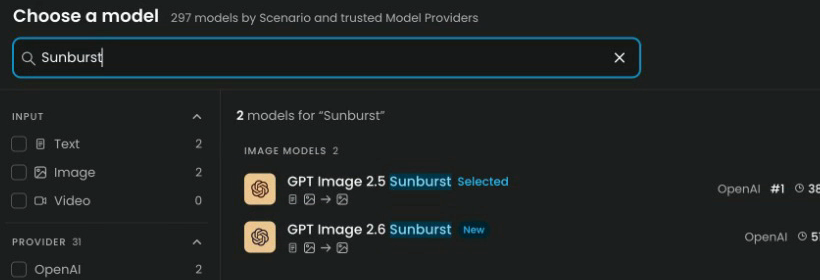
The chooser lists every image model on Scenario, including the models your team trained, with filters by input, provider and capability. Each row shows the provider, a rank and a typical time. Any model fits in the node, and swapping it later doesn't change the rest of the graph.
Step 11: Run this node
The panel on the left now shows the model, the prompt and the reference. Leave the settings at their defaults:
| Setting | What it does | In this lesson |
|---|---|---|
| Image Count | How many images one run makes, from 1 to 10 | 1 |
| Dimensions | The output size | Auto |
| Quality | The model's quality level | Auto |
| Background | The model's background option | Auto |
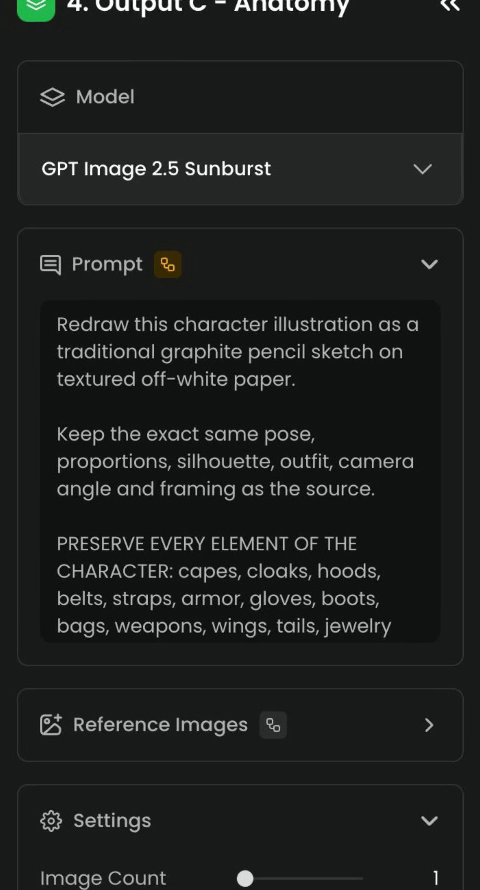
Click Run This Node at the bottom of the panel (Cmd + Enter). It runs only this step, not the whole workflow. The node shows that it's running, then the sheet appears on it.
| Run button | What runs |
|---|---|
| Run This Node | Only this node |
| Run From Here | This node and everything after it |
| Run (top right) | The whole workflow, each node as soon as its inputs are ready |
Step 12: Check the sheet
The first sheet lands on the node. Open it full size with the enlarge button on the image.
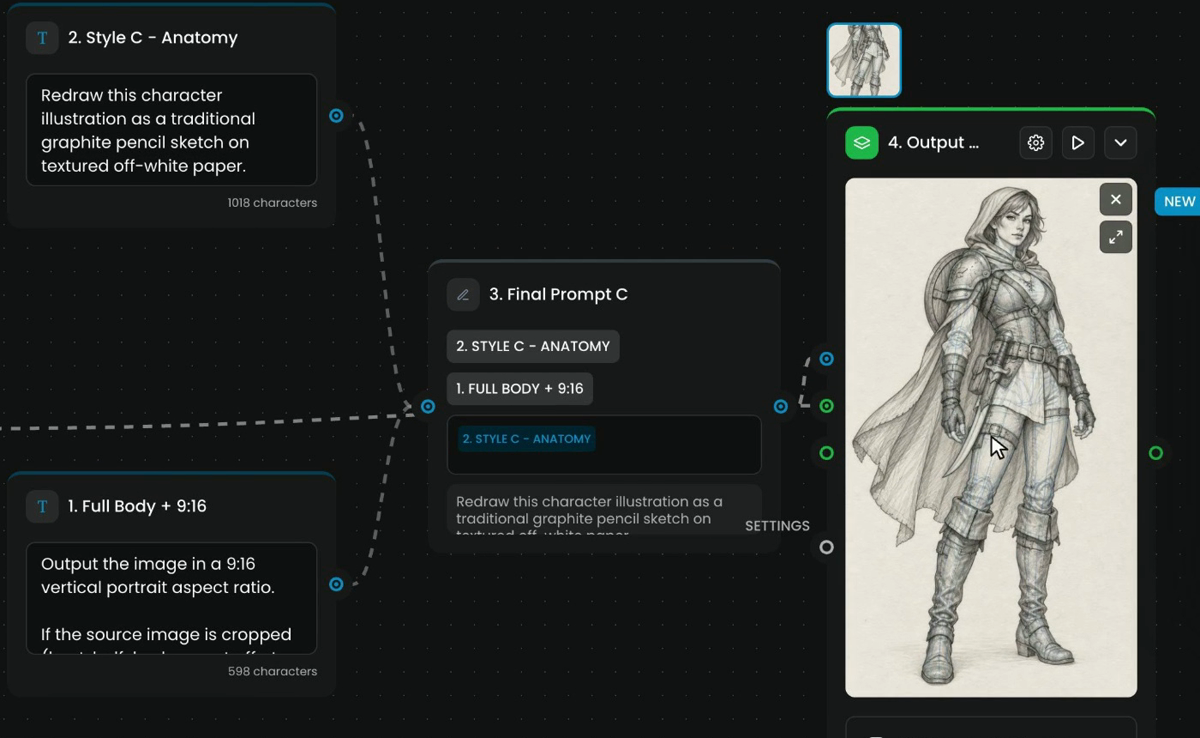
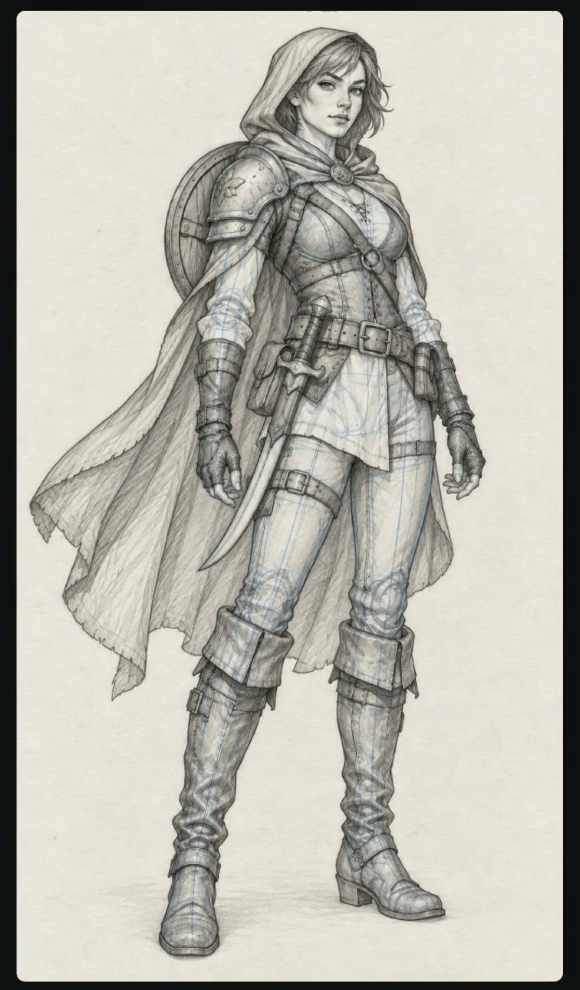
Same pose, every piece of her gear, and blue shapes for the body under the clothes.
the pose, proportions and camera angle match the character; every piece of gear is there (hood, cape, shoulder armor, belts, sword, shield, boots); the drawing is graphite on off-white paper; blue lines show the body's shapes; the frame is tall and shows her head to toe.
a strap, the cape or a weapon is missing; she's a different person or in a different pose; there's color besides the blue lines; the feet or head are cut off; text or a watermark appears.
Step 13: Fix it, then close
If something's missing, fix the prompt now, while a test costs one image, and run the node again. The workflow saves as you work, and Cmd+S (Ctrl+S on Windows) saves right away if you want to be sure. When you're done, close it with the X at the top left.
How the Prompt Builder works
- One output, many inputs. Connect as many text inputs as you need. Each appears as a chip.
- The template decides the order. Place chips in any order, with line breaks and your own fixed words between them.
- It takes a model's text too. A chip can come from an LLM Node's result as well as from a Text node.
- Keep it short enough. Each input holds about 1,000 to 2,000 characters, and the joined prompt about 5,000, depending on the model it goes to.
Common problems
| What you see | What to do |
|---|---|
| You can't add or move nodes | The workflow is in run-only mode. Click Switch to Edit Mode |
| A wire won't connect | The port colors differ. The Prompt Builder's blue output goes into the blue Prompt, the green character into green Reference Images |
| The prompt underneath shows only the style | The framing chip isn't placed in the template. Click in the box, then click the chip |
| The sheet shows a new character | The character isn't wired into Reference Images. Check the green wire |
| Gear is missing from the sheet | Run the node again, or make the PRESERVE list in the style prompt name the missing part |
| She's cropped at the knees | Check that the framing chip is in the template and that 1. Full Body + 9:16 still holds its text |
| The run costs more than you expect | Check Image Count is 1 before you click Run This Node |
What's next
One look is done. In Prompts that repeat, you read how the style prompt is written and add the prompts for the other three sheets. For every node's ports and settings, see the Nodes reference; when a step fails, see Debug a workflow.