

Batches, loops and logic
Run one pipeline over a list with Split Text and Loop, keep part of a list with Slice Items, gather results with Group Items and branch with If-Else.
- Guide
- Step 2 Repeat
On this page15 sections
- Before you start
- Step 1: Open the workflow and make room
- Step 2: Add Output B, the pencil sketch
- Step 3: Add Output A and Output D
- Step 4: Check the estimate and run everything
- Step 5: Duplicate the workflow for a cast
- Step 6: Replace the character with two inputs
- Step 7: Group the inputs into one list
- Step 8: Add a Loop
- Step 9: Wire the loop
- Branch with If-Else
- The other list nodes
- Keep batches under control
- Common problems
- What's next
Four reference sheets of one character are only useful if they match. In this lesson you chain the four generators of the Anatomy reference sheets workflow, so each sheet is made from the one before, run the whole graph with one shortcut, and then run it for a whole cast with Group Items and a Loop. The model on every generator is GPT Image 2.5 Sunburst.
Quick version
- Open the workflow from the Project tab and click Switch to Edit Mode.
- Add three Image Generators (
Option+I): Output B - Pencil, Output A - Gray Sculpt and Output D - Textured. Wire each one's prompt, and use the sheet before it as a reference. - Fit the graph (
Cmd+0), check the estimate next to Run, and run every node (Cmd+Shift+Enter). - For a cast, open the menu and choose Duplicate Workflow. In the copy, replace the character with two Image nodes, gather them with Group Items and wire the list into a Loop.
- Wire the Loop's item into the generators that took the character, and the last sheet into Loop End. Test one item first with Slice Items.
Before you start
- The workflow from the earlier lessons. This lesson picks up Anatomy reference sheets where Prompts that repeat left it: one character image (1. Character Illustration), a framing rule (1. Full Body + 9:16 (empty = keep framing)), four style prompts, four Prompt Builders (3. Final Prompt A to D) and one generator, 4. Output C - Anatomy, from Build your first workflow.
- Where it lives. Workflows › Workflows in the top bar, Project tab. A workflow opens in run-only mode; click Switch to Edit Mode to change it.
- What a run costs. The badge next to Run shows the estimate for one full run before you start. A loop multiplies it by the number of items.
| Sheet | Generator | Prompt | References |
|---|---|---|---|
| Anatomy sketch | 4. Output C - Anatomy | 3. Final Prompt C | The character |
| Pencil sketch | 4. Output B - Pencil | 3. Final Prompt B | The character, then Output C |
| Gray sculpt | 4. Output A - Gray Sculpt | 3. Final Prompt A | Output B |
| Textured sculpt | 4. Output D - Textured | 3. Final Prompt D | Output A, then the character |
Step 1: Open the workflow and make room
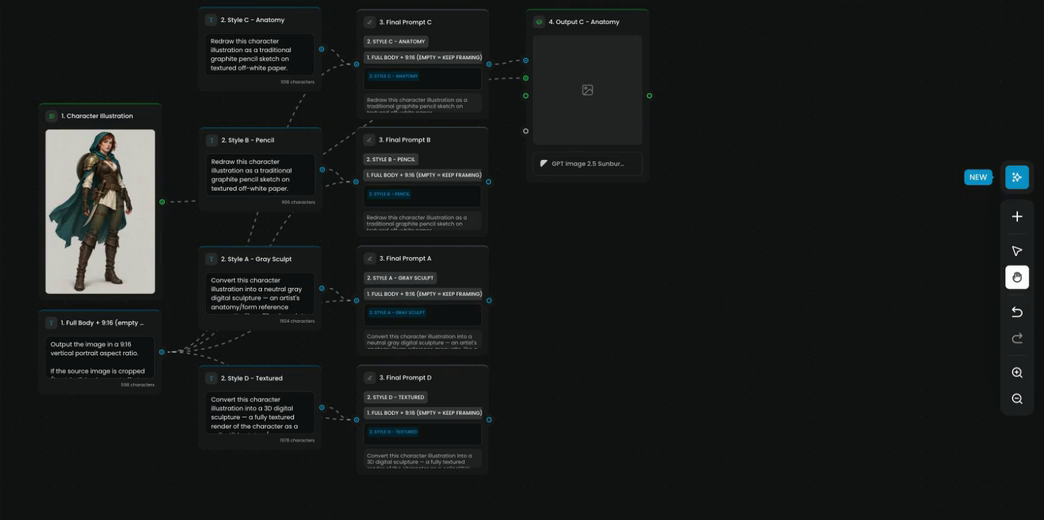
Open Anatomy reference sheets from the Project tab and click Switch to Edit Mode. Press minus (or click the zoom-out button in the right toolbar) to zoom out, then drag the framing rule down, under the character, so the column of nodes is clear.
Step 2: Add Output B, the pencil sketch
Press Option+I for a new Image Generator. It lands on the canvas with the model already set to GPT Image 2.5 Sunburst, the same as the first generator. Drag it next to 3. Final Prompt B and double-click its title to name it 4. Output B - Pencil.
Clicking a generator opens its settings panel on the left:
- Model: the image model this node runs.
- Prompt: filled by a wire from a Prompt Builder, or typed in.
- Reference Images: the images the model works from.
- Settings: Image Count, Dimensions, Quality and Background. Leave them on the defaults shown (1 and Auto).
- Run This Node: runs this generator alone.
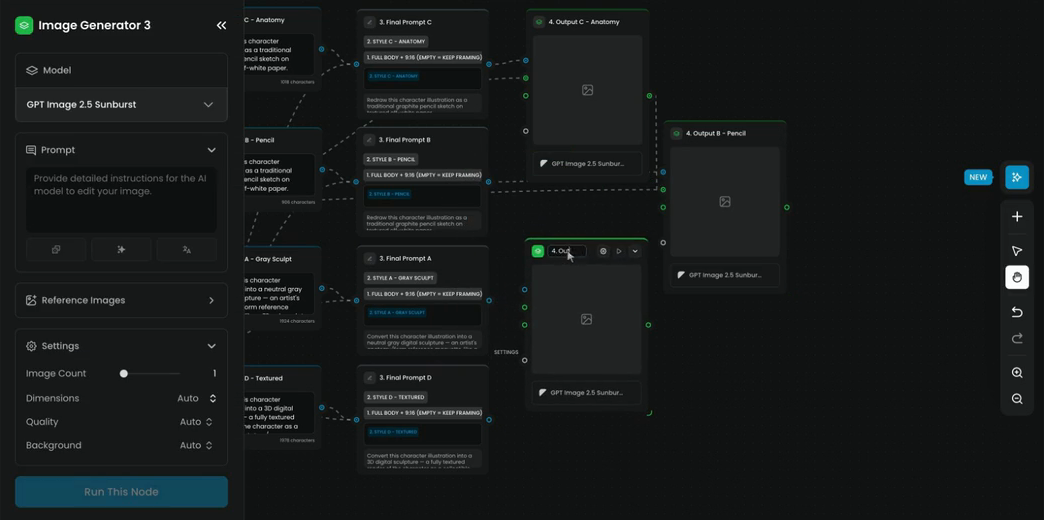
Now wire it:
- Drag from the output of 3. Final Prompt B to the generator's Prompt input.
- Wire the character into its reference input, then wire the result of 4. Output C - Anatomy into the same input. One port takes both images.
Wires follow the colors of the ports: blue for text, green for images. A text wire never connects to an image port.
The prompt, as run: 3. Final Prompt B sends the pencil prompt, a blank line, then the framing rule.
Redraw this character illustration as a traditional graphite pencil sketch on textured off-white paper.

Keep the exact same pose, proportions, silhouette, outfit, camera angle and framing as the source.

PRESERVE EVERY ELEMENT OF THE CHARACTER: capes, cloaks, hoods, belts, straps, armor, gloves, boots, bags, weapons, wings, tails, jewelry and hair must all be drawn, with the same shape, length and placement as in the reference. Do not remove or simplify any part of the design.

Hand-drawn look: confident construction lines, light underdrawing still visible, expressive contour linework, no cross-hatching, a few darker accent strokes for depth, subtle eraser highlights. Monochrome graphite only — no color, no digital gradients, no background scenery, just clean paper.

Style: professional character design study sketch from an artist's sketchbook, figure drawing reference, no text, no watermark.

Output the image in a 9:16 vertical portrait aspect ratio.

If the source image is cropped (bust, half-body, or cut off at any edge), extend it into a COMPLETE FULL-BODY figure: reconstruct the missing torso, hips, legs and feet in a natural continuation of the pose, and frame the whole figure head-to-toe, centered in the 9:16 vertical frame with a small margin of empty space above the head and below the feet. Keep the same character design, proportions, style and camera direction. If the source already shows the full body, keep the pose and framing, just fit it into the 9:16 vertical frame.
Step 3: Add Output A and Output D
Press Option+I again for 4. Output A - Gray Sculpt. Its prompt is 3. Final Prompt A, and its only reference is Output B.
The prompt, as run:
Convert this character illustration into a neutral gray digital sculpture — an artist's anatomy/form reference maquette, like a ZBrush sculpt rendered with a matte gray matcap material.

Keep the exact same pose, proportions, silhouette, camera angle and framing as the source.

PRESERVE EVERY ELEMENT OF THE CHARACTER. Do not delete, simplify or omit anything that exists in the source image: capes, cloaks, coats, hoods, scarves, skirts, belts, straps, harnesses, armor pieces, pauldrons, gloves, boots, bags, weapons, tools, wings, tails, horns, jewelry, hair strands and any other accessory or equipment must all be present and sculpted as part of the statue, with the same shape, size, length, flow and placement as in the reference. Sculpt hair and flowing fabric (cape, cloak, coat tails) as solid gray sculpted volumes with the same drape and direction of movement. If an element is unclear in the source, sculpt a plausible version of it rather than removing it. Nothing may be replaced by bare body.

Under the outfit, the body reads as a simple, modest, opaque full-coverage form-fitting bodysuit (long sleeves, full legs, high neckline) sculpted as part of the statue, so the underlying muscle structure and body forms read clearly through smooth, seamless surfacing. Fully clothed, non-revealing, no skin exposure beyond head and hands, no suggestive posing — a museum-style study figurine.

Neutralize only SURFACE APPEARANCE, never geometry: remove all color, hair color, fabric texture, patterns, prints, logos and background detail, and render every element — body, outfit, cape, hair, gear — in one uniform mid-gray clay material with soft studio lighting, gentle specular matcap shading and a subtle rim light, on a plain neutral dark gray backdrop.

Style: professional anatomy study reference, sculpting maquette, clean topology and clearly defined muscle groups and form volumes, no text, no watermark.

Output the image in a 9:16 vertical portrait aspect ratio.

If the source image is cropped (bust, half-body, or cut off at any edge), extend it into a COMPLETE FULL-BODY figure: reconstruct the missing torso, hips, legs and feet in a natural continuation of the pose, and frame the whole figure head-to-toe, centered in the 9:16 vertical frame with a small margin of empty space above the head and below the feet. Keep the same character design, proportions, style and camera direction. If the source already shows the full body, keep the pose and framing, just fit it into the 9:16 vertical frame.
Then add 4. Output D - Textured. Its prompt is 3. Final Prompt D, and it takes two references: Output A for the shape, and the character for her real colors.
The prompt, as run:
Convert this character illustration into a 3D digital sculpture — a fully textured render of the character as a collectible statue / game-ready model, like a ZBrush sculpt with the original color textures and materials applied.

Keep the exact same pose, proportions, silhouette, camera angle and framing as the source.

KEEP THE ORIGINAL COLORS AND TEXTURES. Match the character's palette exactly as seen in the reference: skin tone, hair color, eye color, and every color of the outfit, cape, armor and accessories. Reproduce the material qualities of each part — matte or worn fabric with visible weave, brushed or scratched metal with real specular highlights, glossy leather, rough stone, translucent gems, glowing emissive parts — so each surface reads as its real material, not as clay.

PRESERVE EVERY ELEMENT OF THE CHARACTER. Do not delete, simplify or omit anything that exists in the source image: capes, cloaks, coats, hoods, scarves, skirts, belts, straps, harnesses, armor pieces, pauldrons, gloves, boots, bags, weapons, tools, wings, tails, horns, jewelry, hair strands and any other accessory or equipment must all be present and sculpted, with the same shape, size, length, flow and placement as in the reference. Sculpt hair and flowing fabric as solid volumes with the same drape and direction of movement. If an element is unclear in the source, sculpt a plausible version of it rather than removing it.

The figure is fully clothed and modest — no skin exposure beyond what the outfit already leaves visible, no suggestive posing. A display statue.

Render it as a clean 3D render: crisp sculpted geometry, high-detail surface work, soft neutral studio lighting with a subtle rim light, soft contact shadows, on a plain neutral dark gray backdrop. No painted-illustration look, no 2D shading — it must read as a physical sculpted and painted figure.

Style: professional character turnaround render, collectible figure product shot, no text, no watermark.

Output the image in a 9:16 vertical portrait aspect ratio.

If the source image is cropped (bust, half-body, or cut off at any edge), extend it into a COMPLETE FULL-BODY figure: reconstruct the missing torso, hips, legs and feet in a natural continuation of the pose, and frame the whole figure head-to-toe, centered in the 9:16 vertical frame with a small margin of empty space above the head and below the feet. Keep the same character design, proportions, style and camera direction. If the source already shows the full body, keep the pose and framing, just fit it into the 9:16 vertical frame.
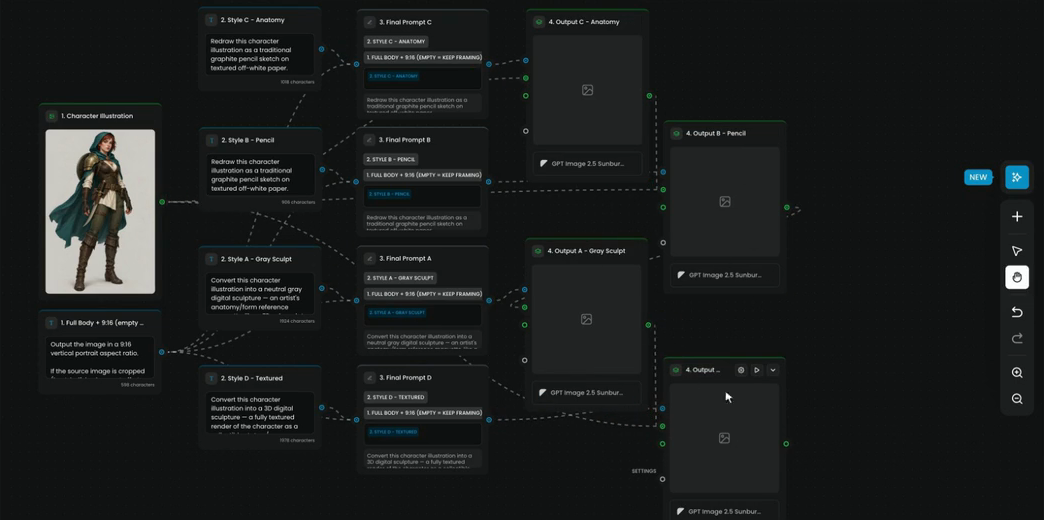
This is the chain: each sheet is made from the one before, so no detail drifts between them. A strap that stays on the anatomy sketch stays on the pencil sketch, and so on through the gray and textured sculpts. That is what makes the four sheets match.
Step 4: Check the estimate and run everything
Press Cmd+0 to fit the whole graph on screen. The badge next to Run now shows what one full run costs.
Press Cmd+Shift+Enter to run every node. The run starts at once, with no confirmation, so read the badge first. Clicking Run in the top right does the same.
Each node shows its state while the workflow runs: Running on the node that is working, Waiting on the ones whose inputs are not ready yet. The sheets arrive in order, C, then B, A and D, because each one waits for its reference.
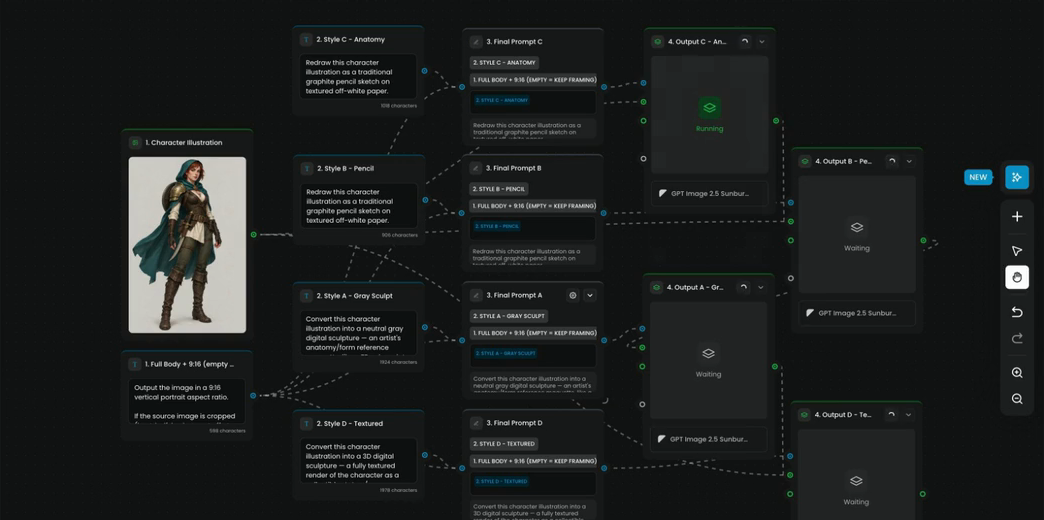
A couple of minutes later all four sheets are on their nodes: the same pose and the same gear in all four.
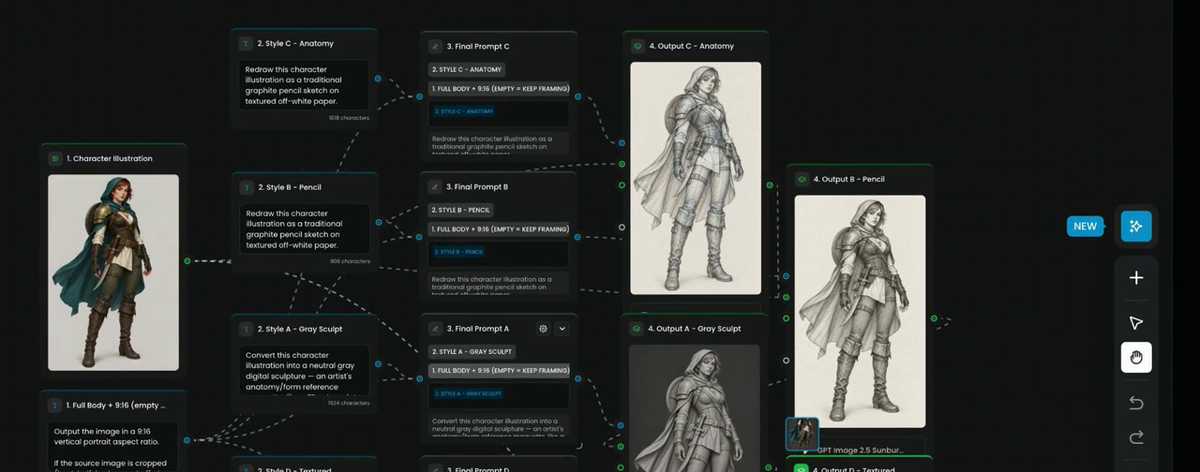
The workflow saves as you work, results included, and Cmd+S (Ctrl+S on Windows) saves right away: the four sheets stay on their nodes, and the next lesson uses them.
all four sheets show the same pose, proportions, cape, straps and gear; the pencil and gray sheets keep every part of the outfit; the textured sculpt has the character's own colors.
a sheet dropped or added a part of the outfit, the framing changed between sheets, or one sheet looks like a different character. Fix the prompt or the references of the first sheet that drifted, then run from there.
Step 5: Duplicate the workflow for a cast
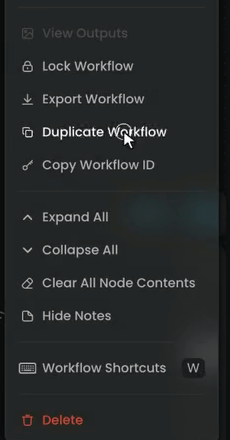
To run the same pipeline over several characters, work in a copy so the original stays as it is. Open the ... menu at the top right and choose Duplicate Workflow. The copy opens as Anatomy reference sheets (copy) in run-only mode; click Switch to Edit Mode.
Step 6: Replace the character with two inputs
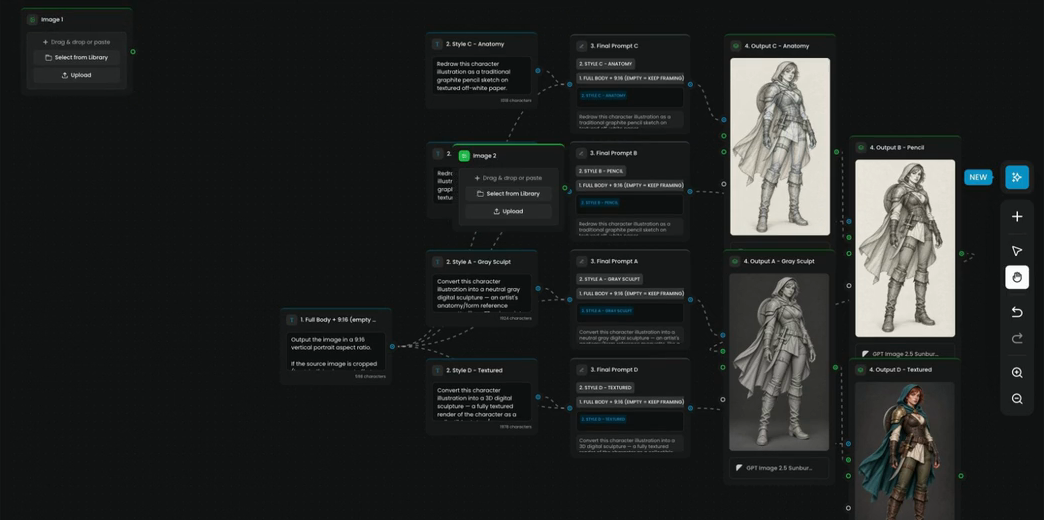
- Click the 1. Character Illustration node and press Delete. Its three reference wires go with it.
- Press
Shift+Itwice to add two Image nodes. Each one offers Drag & drop or paste, Select from Library and Upload. - In each, choose Select from Library and pick a character: the ranger from the earlier lessons in Image 1, and a new one, Queen Pip, in Image 2.
Step 7: Group the inputs into one list
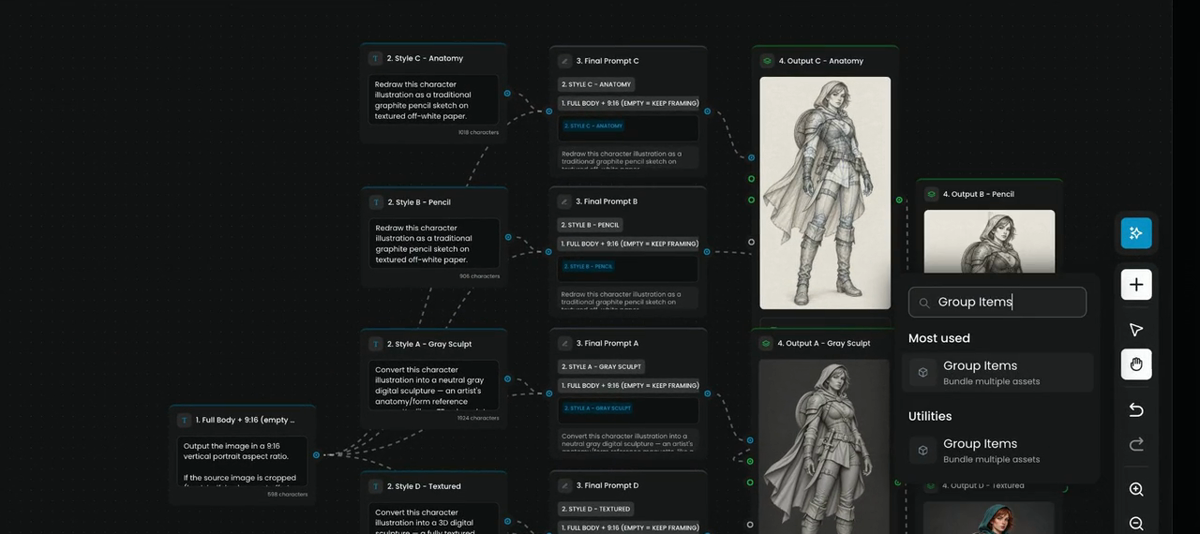
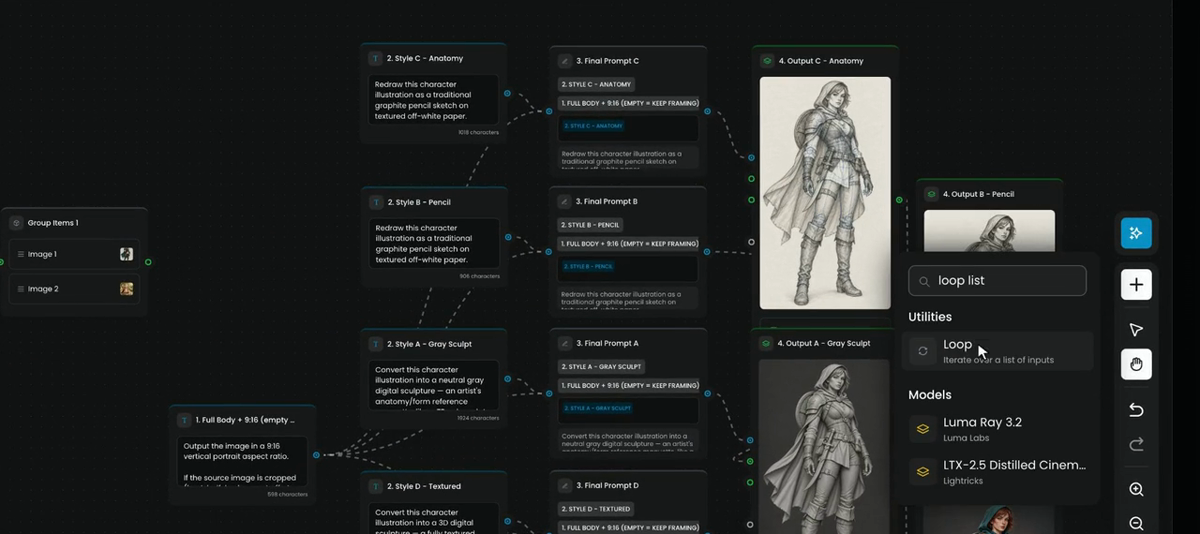
Open the node list with + in the right toolbar, type Group Items in the search bar and add it. Group Items ("Bundle multiple assets") takes separate images and passes them on as one list, in slot order.
Wire Image 1 and Image 2 into it. They now travel as one list.
Step 8: Add a Loop
Open the node list again and search for Loop ("Iterate over a list of inputs"). Add it, wire the output of Group Items 1 into its Input List, and click Add Loop End. The Loop gets a partner node, Loop 1 (End): "All results from the loop end up here."
Step 9: Wire the loop
- Wire the Loop's item output to every place the character went before: the reference inputs of Output C, Output B and Output D.
- Wire the result of Output D - Textured into Loop 1 (End), to collect the results.
Everything between the Loop and its end now runs once per character. The Loop shows which item it is on (Next Iteration: #1 of 2), and its Concurrent Runs switch lets items run at the same time instead of one after the other.
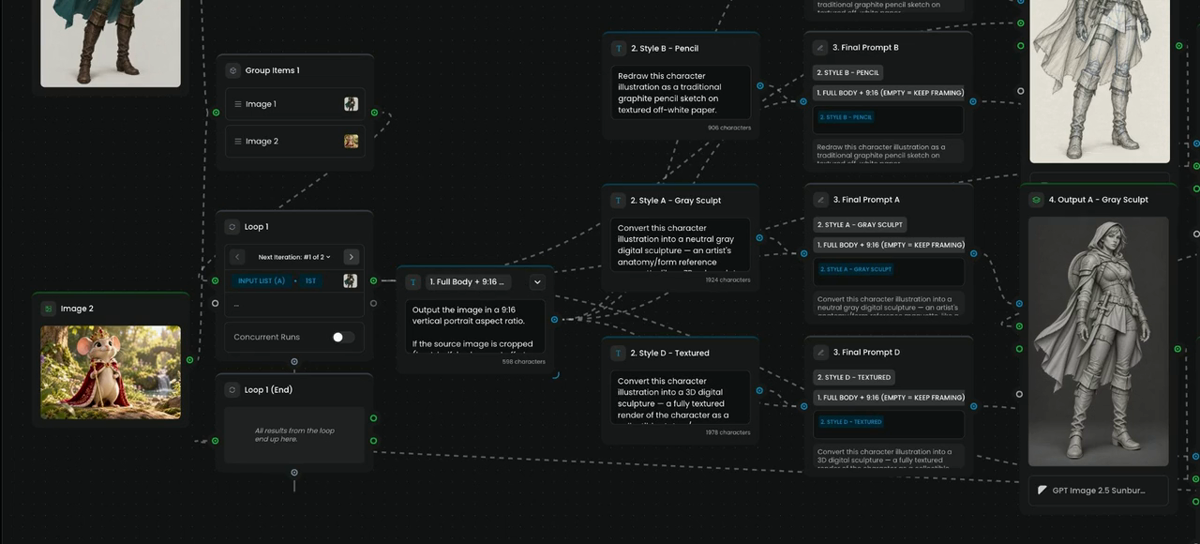
The estimate next to Run doubles: two characters cost two runs. For a long list, test on one item first with Slice Items (below) before the full run.
When you are done, close the copy with the X at the top left. The original workflow stays as it was.
Branch with If-Else
When two cases need different steps, If-Else sends each run down one branch. The framing rule in this workflow is the simple version of the same idea: leave it empty and every sheet keeps the image's own framing.
If-Else checks its cases from top to bottom and runs the first one whose conditions are met. If none is met, the run follows Else.
- Inputs: connect the nodes whose results you want to check.
- Case outputs: one per case, Case 1, Case 2 and so on.
- Setting up a case: open the node's settings panel and choose a field (a result from a connected node), an operator and, when it needs one, a value. Add Condition requires more than one check in a case, with an AND / OR toggle; Add A New Case adds another branch.
- Operators: is empty, is not empty, contains, does not contain, = and !=.
You write no expressions in the node. Rename the source node first: its title is how the field shows in the condition. Put the most specific case first, since the first case met wins, and always connect Else so every run ends somewhere.
The other list nodes
| Node | What it does | Use it for |
|---|---|---|
| Group Items | Bundles separate assets into one list, ordered by input slot | Gathering parallel branches or a few chosen images |
| Split Text | Splits one text into a list by Comma, Space, Semicolon, Period, Newline or Custom; shows the items as chips | A list of names, products or prompts |
| Slice Items | Passes on part of a list | Testing on one or two items; chunks of a long list |
| Loop | Runs the nodes between it and Loop End once per item | Any pipeline that must repeat per item |
| Approval | Pauses the run until someone approves or rejects | A quality gate before an expensive step |
An Image input node can also hold up to 10 images with Enable Multiple Images turned on, and passes them all on.
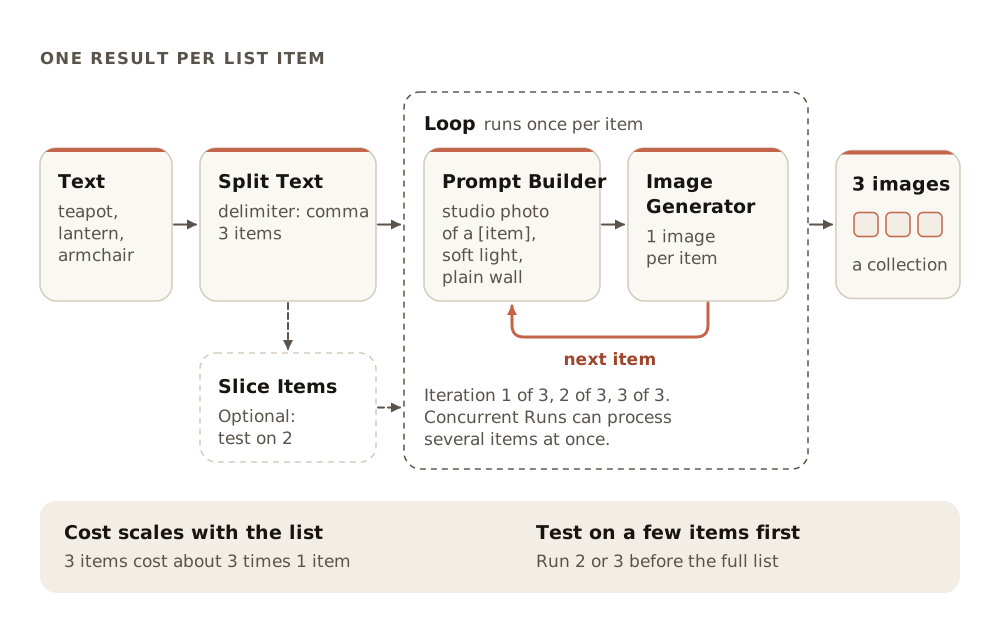
The classic pattern from text: a Text node with cat, dog, bird, Split Text on Comma, a Loop, then a Prompt Builder (A photo of a [current item]) and an Image Generator inside it. Three items in, three images out.
Slice Items modes
| Mode | What passes |
|---|---|
| Default | Number of Items items starting at From Item. From Item is zero-based (0 is the first item); a negative value counts from the end (-1 is the last item) |
| Randomize | A random sample of Number of Items. Lock the seed to get the same sample every run |
| Choose | The run pauses and a person picks exactly Number of Items items, with your Message as the instruction. Inside a Loop, each iteration asks for its own pick |
With a list of 10: Default, From 0, Count 3 gives items 0, 1 and 2; Default, From -1, Count 1 gives the last item. If the range runs past the end, you get fewer items, with no error.
Keep batches under control
- Test small. Run one to five items first, and check them with the same criteria you will use on the full batch.
- Keep the loop body lean. Anything that does not change per item stays outside the Loop and is wired in, so it runs once.
- Put the expensive step after a filter. Generate cheap stills for every item, keep the good ones with Slice Items in Choose mode or an Approval node, then upscale or animate only those.
- Chunk long lists. Process a long collection in chunks of 10 to 50 with Slice Items.
- Leave a note. A sticky note inside the loop explains the logic to the next person.
Common problems
| What you see | What to do |
|---|---|
| A sheet doesn't match the others | Check its references: each sheet must take the one before it, and Output D also takes the character |
| The run started before you checked the cost | Cmd+Shift+Enter runs at once. Read the badge next to Run first, and stop any nodes still waiting if needed |
| The Loop does nothing | Its Input List is not connected, or the nodes that should repeat are not between the Loop and Loop End |
| Only one character came out | The Loop's item is not wired into every node that took the character before, or Output D is not wired into Loop End |
| The estimate is higher than planned | Every item multiplies the run. Test with Slice Items on one item, then raise the count |
| Split Text gives one item | The delimiter does not match the text. Check for semicolons, new lines or extra spaces |
| If-Else always takes Else | Check the case order and that each condition reads the field from the node you expect, with the right operator |
| Slice Items returns the wrong items | In Default mode the first item is 0, not 1 |
What's next
The workflow now makes four matching sheets for any number of characters. In Image and Video Studio you tidy the canvas into named, colored groups and combine the four sheets into one reference sheet. For every node and port, see the nodes reference.