

Compose with Image Studio and Video Studio
Layer images into one composite with Image Studio, and assemble video, image and audio tracks into one clip with Video Studio.
- Guide
- Step 2 Repeat
On this page15 sections
- Before you start
- Step 1: Open the workflow and make room
- Step 2: Group the style prompts
- Step 3: Name and color the group
- Step 4: Group the rest
- Step 5: Leave a note
- Step 6: Add Image Studio
- Step 7: Wire in the four sheets
- Step 8: Set the canvas first
- Step 9: Place each layer with exact numbers
- Step 10: Run just this node
- Image Studio in detail
- Video Studio
- Common problems
- What's next
The Anatomy reference sheets workflow works. In this lesson you make it readable for the next person, with named and colored groups and a sticky note, then put the four sheets side by side on one reference sheet with the Image Studio composer node. Image Studio doesn't generate anything: it places images you already have, so the layout is exact and repeats on every run.
Quick version
- Open the workflow from the Project tab, click Switch to Edit Mode and fit the graph (
Cmd+0). - With the Select tool, drag a box around each column and press
Cmd+G. Name and color each group from its ... menu, and number them in reading order. - Press
Shift+Nfor a sticky note that says what the workflow does and what to edit. - Add Image Studio from Composers and wire in the four sheets in reading order.
- In Edit Image, set the Canvas size first, then place each layer with exact X and Y values. Save & Close.
- Select the node and press
Cmd+Enterto run only it.
Before you start
- The workflow from the earlier lessons, with its four sheets already generated: 4. Output C - Anatomy, 4. Output B - Pencil, 4. Output A - Gray Sculpt and 4. Output D - Textured. See Batches, loops and logic.
- Where it lives. Workflows › Workflows in the top bar, Project tab.
- Two kinds of tidy. Groups and sticky notes change nothing in a run; they make the graph easy to read. A composer node is part of the run: its layout applies to every image that flows through it.
| Composer | In the node list | Takes | Gives |
|---|---|---|---|
| Image Studio | "Combine multiple images" | Image layers | One composed image |
| Video Studio | "Layers, transitions, effects" | Video, image and audio layers | One clip, plus its First Frame and Last Frame as images |
Step 1: Open the workflow and make room
Open Anatomy reference sheets from the Project tab and click Switch to Edit Mode. The four sheets are still on their nodes: the workflow saves as you work, results included.
Press Cmd+0 to fit the graph, then minus for some room. Nudge two of the sheets down so nothing overlaps.
Step 2: Group the style prompts
Choose the Select tool (the arrow in the right toolbar) and drag a box around the four style prompts. A Create Group button appears over the selection; click it or press Cmd+G.
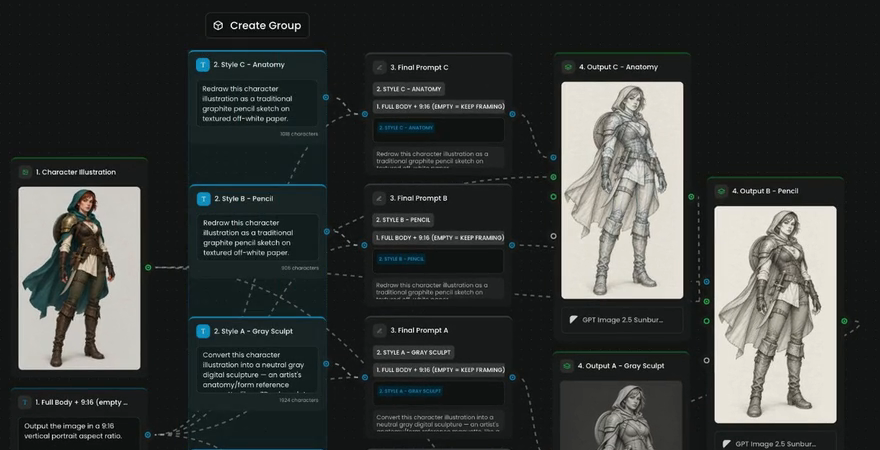
Step 3: Name and color the group
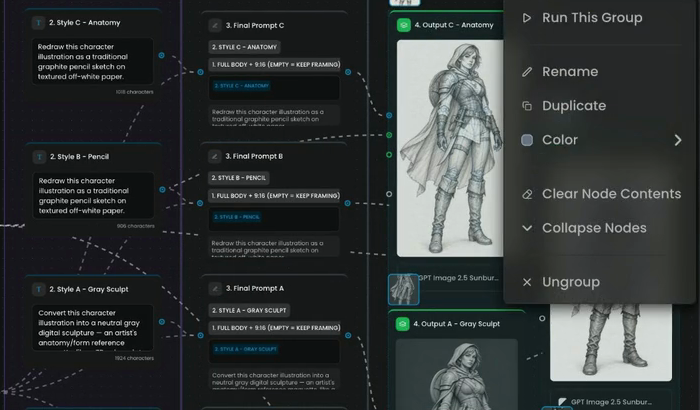
Hover the group to show its toolbar, and open its ... menu:
- Run This Group runs only the nodes inside.
- Rename changes the label at the top of the group. You can also click the label.
- Duplicate copies the group and its nodes.
- Color gives the group a color.
- Clear Node Contents empties the prompts, inputs and results of the nodes inside.
- Collapse Nodes folds the nodes down to their title bars.
- Ungroup removes the group and keeps the nodes.
Name this one 2. Style Prompts and give it a color. Group labels show in capitals on the canvas.
Step 4: Group the rest
Do the same for the other columns, each with its own color:
- The four Prompt Builders:
3. Prompt Assembly. - The four generators:
4. Outputs. - The character and the framing rule:
1. Input.
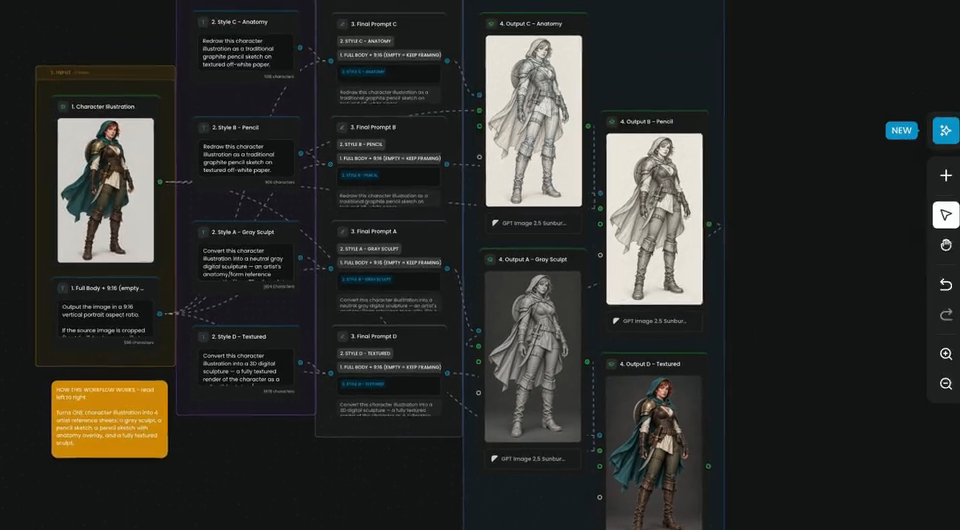
Number the groups so the reading order is obvious: input, style prompts, prompt assembly, outputs, from left to right.
Step 5: Leave a note
Press Shift+N for a sticky note. Say what the workflow does and what to edit, for example how to read it (left to right), what goes in, and the four sheets that come out. Sticky notes don't process anything; they are there for the next person.
The note, as typed:
HOW THIS WORKFLOW WORKS - read left to right

Turns ONE character illustration into 4 artist reference sheets: a gray sculpt, a pencil sketch, a pencil sketch with anatomy overlay, and a fully textured sculpt.

1. INPUT: drop your character image. The Full Body + 9:16 text forces a full-body 9:16 frame; delete its text to keep the original framing.
2. STYLE PROMPTS: one prompt per look. Edit these to change a look.
3. PROMPT ASSEMBLY: each builder joins one style with the framing rule. Nothing to edit.
4. OUTPUTS: four generators, each built from the sheet before it. Press Run.
Step 6: Add Image Studio
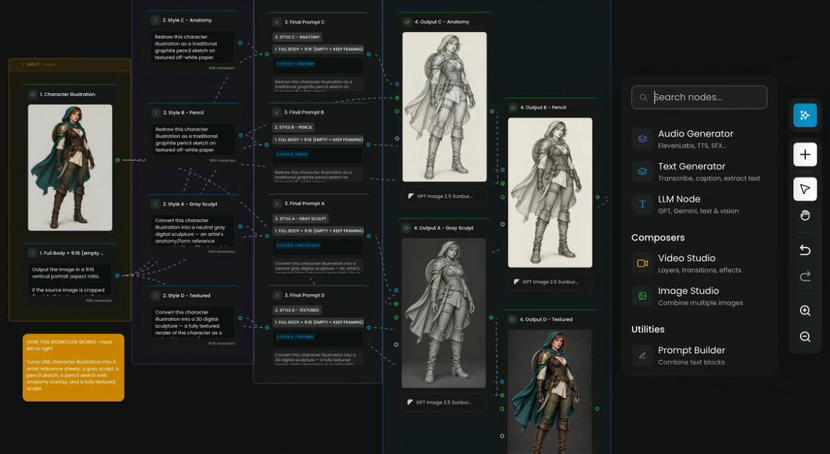
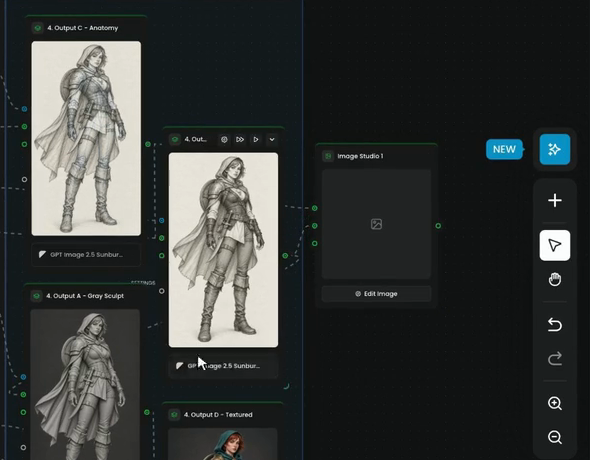
Open the node list with + in the right toolbar. Under Composers there are two nodes: Video Studio for clips, and Image Studio for images. Add Image Studio.
Step 7: Wire in the four sheets
Wire the four sheets into Image Studio 1 in reading order: anatomy, pencil, gray sculpt, textured. A new layer port appears each time you connect one. The order of the wires is the order of the layers: the first input is the bottom layer, and each later one goes on top.
Step 8: Set the canvas first
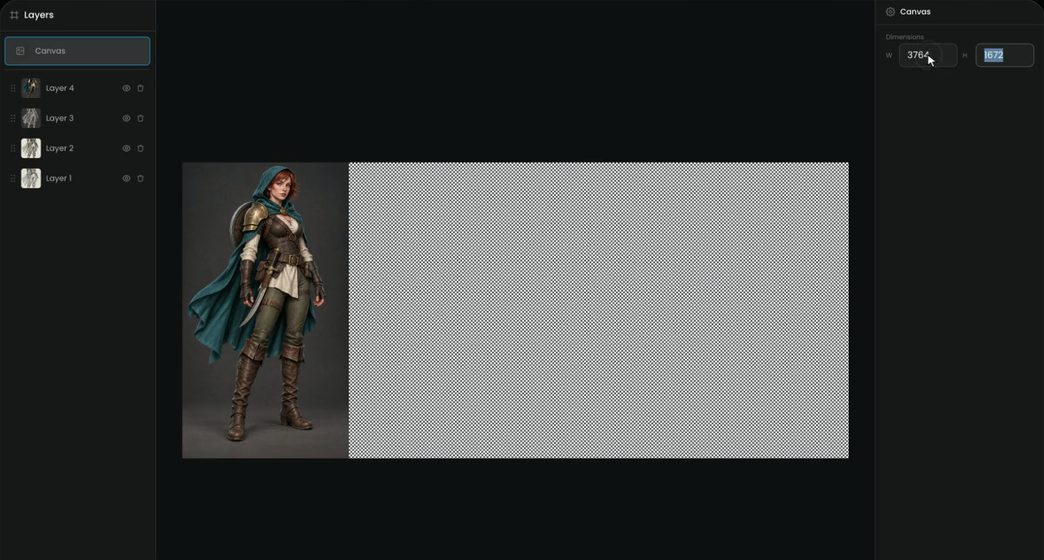
Click Edit Image on the node. The editor has the Layers list on the left (Canvas, then Layer 1 to Layer 4), the preview in the middle and the settings of the selected item on the right.
Select Canvas and set its Dimensions first. Here each sheet is 941 × 1672, so four sheets side by side need W 3764 (4 × 941) and H 1672. If you skip this, the canvas keeps the size of the first layer and the other sheets fall outside it.
Step 9: Place each layer with exact numbers
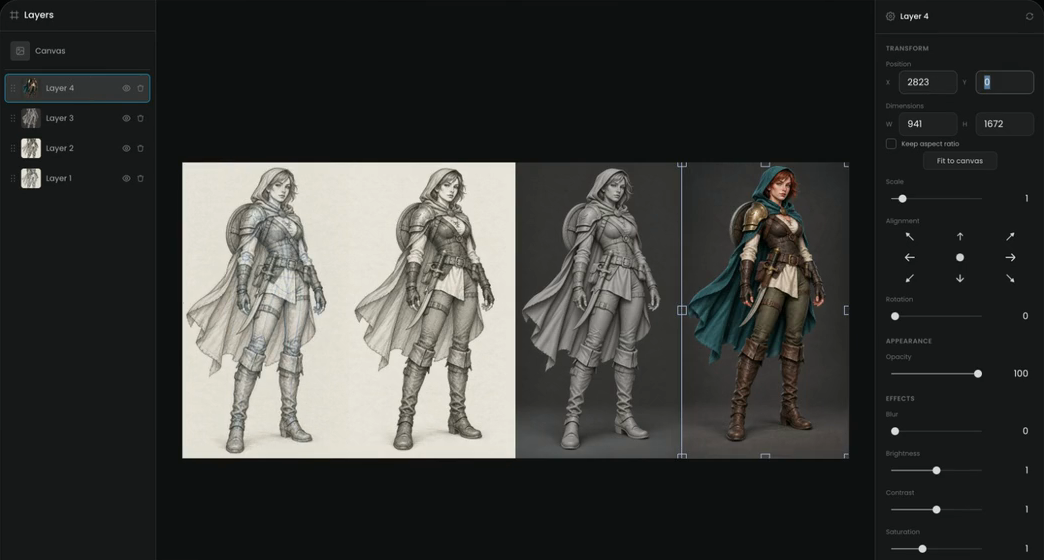
Select each layer and type its position under Transform:
| Layer | Sheet | X | Y |
|---|---|---|---|
| Layer 1 | Anatomy sketch | 0 | 0 |
| Layer 2 | Pencil sketch | 941 | 0 |
| Layer 3 | Gray sculpt | 1882 | 0 |
| Layer 4 | Textured sculpt | 2823 | 0 |
Each sheet sits one width to the right of the last. Typed numbers, not dragging, are what make every run land in the same place.
The settings panel of a layer has more than position:
- Transform: Position (X, Y), Dimensions (W, H) with Keep aspect ratio, Fit to canvas, Scale, an Alignment grid of nine points, and Rotation.
- Appearance: Opacity, 0 to 100.
- Effects: Blur, Brightness, Contrast, Saturation, Grayscale and Border radius.
Click Save & Close. Cancel leaves without keeping the changes.
Step 10: Run just this node
Select the Image Studio node and press Cmd+Enter to run only the selected node. The four sheets are already made, so nothing else runs. A few seconds later you have one reference sheet, ready to share.
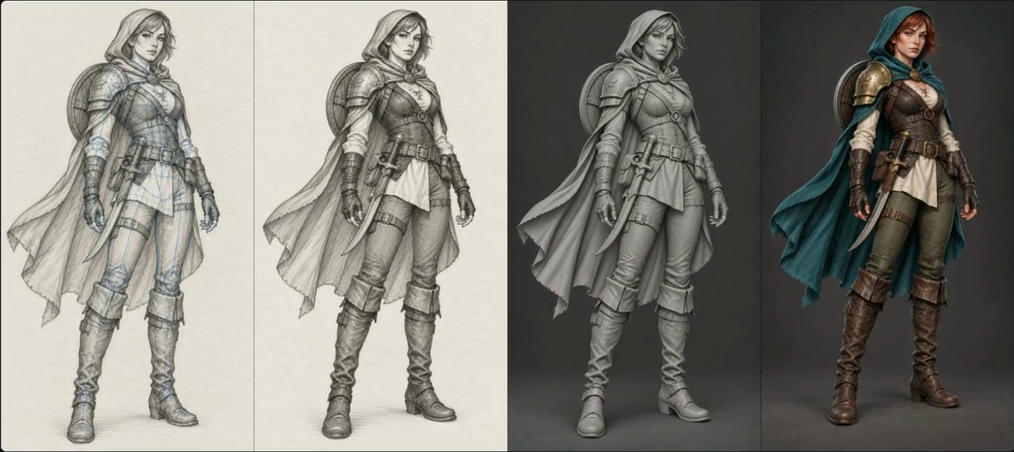
The sheet stays on the node, like every result, and the workflow saves as you work.
the canvas is exactly four sheets wide; the sheets sit edge to edge in reading order with no gap or overlap; nothing is cropped at the right edge; the groups are named, numbered and colored, and the note says what to edit.
the last sheets are missing or cut off (the canvas wasn't set first); a sheet overlaps another (a wrong X); the layers are in the wrong order (rewire them in reading order).
Image Studio in detail
Because Image Studio lives inside the workflow, the layout you build applies to every image that flows through it. Run the workflow on a new character, or inside a Loop over a cast, and every sheet lands in the same place at the same size.
- Layer order: the connection order sets the stack. Input 0 is the bottom.
- Work at the final size. Set the canvas to the size you deliver. Scaling a finished composite up softens every layer.
- Keep input sizes the same from run to run, or a layer shifts when one input arrives bigger.
- Use transparent cut-outs for a subject over a background: remove the background first, so it arrives as a PNG with transparency.
Good uses: several generated views side by side, a subject over a generated background, a logo or border at fixed coordinates, a product with text and background.
Video Studio
Video Studio works the same way for clips: a timeline inside a node, with audio as a layer.
| Input | Takes |
|---|---|
| Video Layer | A video, a still image or a silent video. The first one is the main timeline |
| Image Layer | An image overlay, such as a logo or title |
| Audio Layer | Music or a voice track |
It gives three outputs: Output (the clip), First Frame and Last Frame (images). Feed Last Frame into the first frame of a next Video Generator to continue a shot.
The editor has the layers on the left, the preview with the timeline in the middle and the properties on the right: the same Transform, Opacity and effects as Image Studio, applied over the whole clip.
- Match durations. If the background clip is shorter than the foreground, the foreground ends up over nothing.
- Keep the layer count low. Compose stable parts in one Video Studio and feed the result into another as one layer.
- Match tone between clips from different models with Brightness, Contrast and Saturation.
- Play it at normal speed before you run, to catch timing problems.
Common problems
| What you see | What to do |
|---|---|
| Only the first sheet shows, the rest are off the canvas | Select Canvas and set its size before placing layers |
| Sheets overlap or leave gaps | Type each X as a multiple of the sheet width; don't drag |
| The sheets are in the wrong order | The wire order is the layer order. Rewire them in reading order |
| The whole workflow ran instead of the composer | Select only the Image Studio node, then press Cmd+Enter |
| A layer shifts on a new run | An input arrived at a different size. Keep the same dimensions on every generator |
| A cut-out has a box or halo around it | It still has its background. Remove the background before the composer |
| A video ends early on one layer | A layer is shorter than the main track. Trim the others or extend the short one |
| A clip won't connect to an image layer | Use First Frame or Last Frame when you need a still from a clip |
What's next
The workflow is finished and easy to read. In Publish a workflow as an App you hand it to the team as an App, so anyone can run it without touching the graph. For every node and port, see the nodes reference.