

Cut, join, caption and convert video with the video tools
The video tools that do exact, repeatable jobs: join clips, pull frames, caption, cut and split, resize, extract audio and transcripts, key out a green screen and split a video into layers.
- Guide
- Step 1 Learn
Joining two clips, pulling out a frame or burning in captions should give the same result every time. The video tools do that: they join, caption, cut, resize and convert videos you already have, without generating anything new. This guide shows where they live, walks through three of them with one example each, and lists the settings that matter for every tool.
Quick version
- Find the tools under Models › Tools, or in the model library of Create › Videos under Capabilities › Tools.
- Load the video and set the few settings the tool has (times, sizes, formats, a style).
- Run it. Each run makes a new file and leaves your original as it is.
- Check the output's duration, size, format and audio before you use it.
- Put the tools you repeat into a workflow, around the paid steps.
Before you start
- What a video tool is. A model that does an exact job with settings you give it: a start and end time, a width and height, a transition, a caption style. It doesn't read a prompt and doesn't invent pixels, so the same settings give the same result every time.
- Your original is never changed. Every run makes a new file. You can always go back to the source and try other settings.
- They cost a few credits. The price shows on Generate before you run one: joining two clips cost 2 credits, captioning a 7-second clip 8.
- Times are in seconds. 1:30 to 2:15 is 90 to 135.
- You need a video in your library: one you generated, or one you uploaded.
Step 1: Find the tools
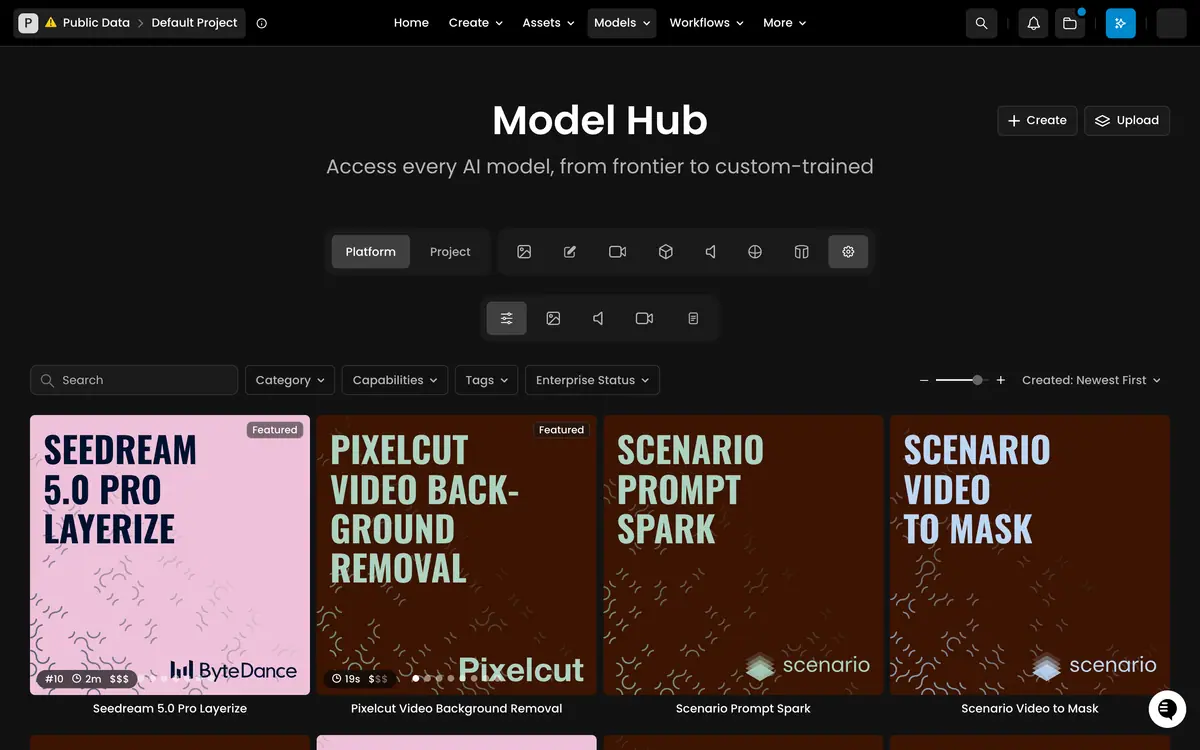
Open Models in the top menu and choose the last tab, Tools. It lists every tool, with Category, Capabilities, Tags and Enterprise Status filters.
The tools run straight from Create, not only in workflows. In Create › Videos, click the Model card, then View all models, and tick Tools under Capabilities: the list shows the tools that return a video, with their typical time and cost.
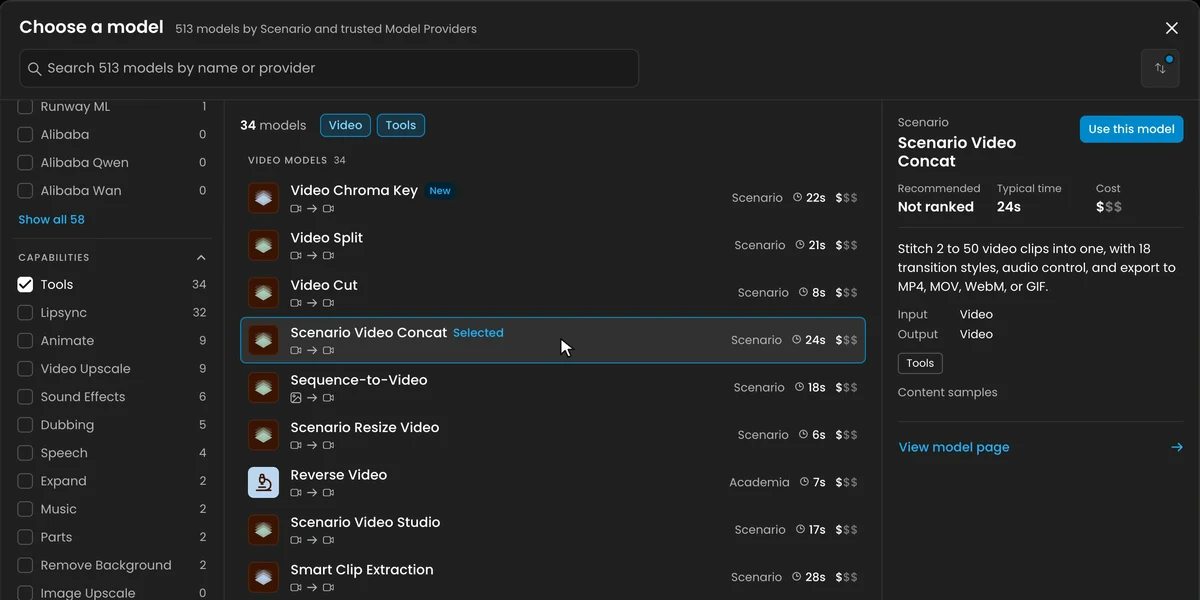
Tools that return images, audio or text are filtered out of the video library: Video to Image Sequence, Audio Extract and Speech to Text. Click Clear filters, or search for the tool by name, to find them. Most tools also work as nodes in Workflows (Step 5).
Step 2: Join two clips
Scenario Video Concat joins 2 to 50 clips in the order you add them.
- Pick Scenario Video Concat in the library.
- Under Videos, add the clips in the order they play. Here: the 15-second kitchen clip from Write video prompts, then a 5-second clip of the same girl and chameleon in a park.
- Under Transitions, click Add Transitions, pick a Type and set its Duration, from 0.1 to 5 seconds. Add one transition per join: three clips take two.
- Under Settings, Preserve Audio keeps each clip's sound, and Output Format gives MP4, MOV, WebM or GIF.
- Click Generate.
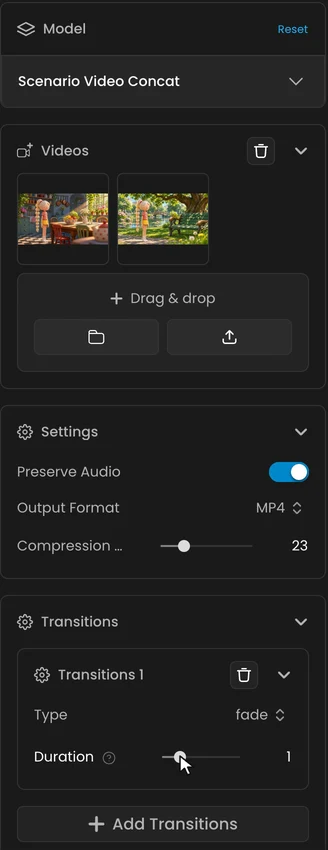
There are 17 transitions besides a hard cut: fades (to black, to white), dissolve, wipes and slides in four directions, circle open and close, pixelize, radial and zoom in. Without a transition, the clips are joined with hard cuts.

For titles over the picture, layered audio or more than a simple sequence, use Scenario Video Studio (see the table below).
Step 3: Pull frames from a clip
Video to Image Sequence turns a clip into still images, for example to start the next shot from the last frame of this one.
- Click Clear filters in the library and pick Video to Image Sequence. Create switches to Images, since the tool returns images.
- Load the clip under Video.
- Choose how many frames to keep: Extract All Frames saves every frame; Frame Interval keeps one frame in every few instead (24 by default, one per second at 24 fps).
- Click Generate (2 credits here).
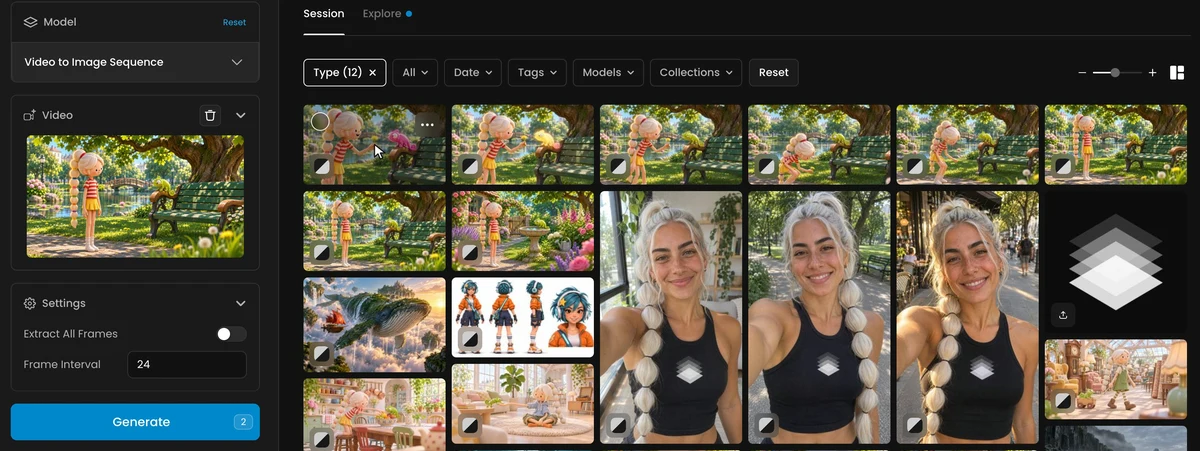
On this 5-second clip, Frame Interval 24 returned six frames, from the first to the last. On a clip of another length the last frame can fall between two intervals: turn on Extract All Frames when you need the very last one. Use it as the first frame of the next shot so the cut matches. See Build a sequence of shots.
Step 4: Add captions
Scenario Caption Studio transcribes the speech, can translate it into 18 languages, and renders the captions in a style you choose.
- Pick Scenario Caption Studio and load the video under Input Video. It transcribes the speech for you.
- Under Style, pick a Style Preset, or describe the look in plain words under Style Prompt.
- Under Segment Limits, set Max Words Per Caption: 1 shows one word at a time, karaoke style.
- Under Translation, set Target Language to translate the captions, or leave it on Auto to keep the spoken language.
- Under Output Settings, turn on Output SRT to also get the captions as a file. Output Subtitles burns them into the picture (Burn Into Video) or adds a track viewers can switch on and off.
- Click Generate.
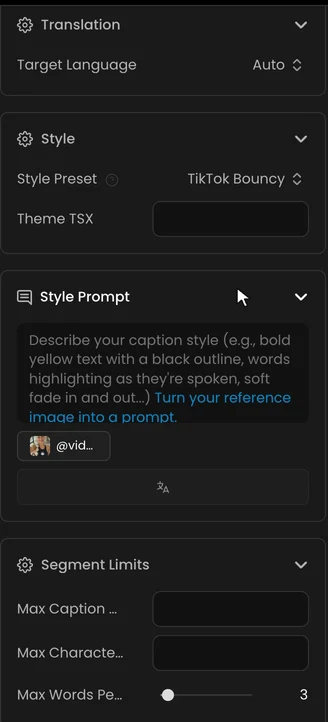
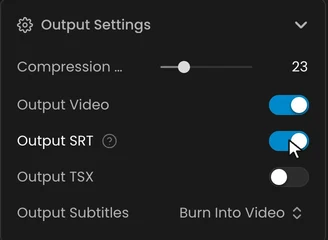
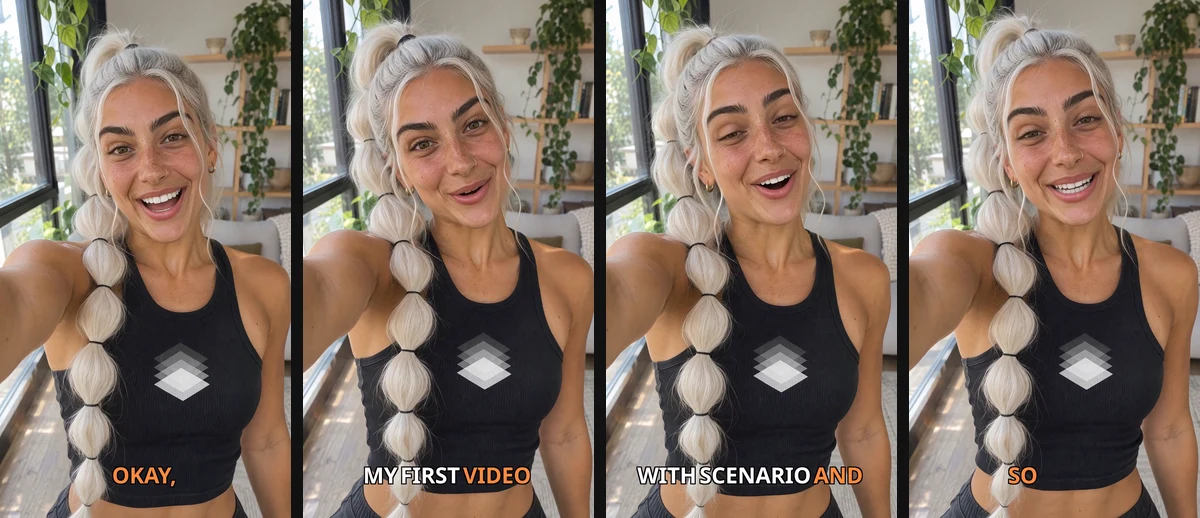
The example is a 7-second selfie clip made with Minimax H3, where she says one sentence. With the TikTok Bouncy preset, 3 words per caption, a font size of 110 px and "Scenario" as a hint under Transcription Prompt, the captions matched her words exactly. At the default size and length, they were too small for a vertical video.
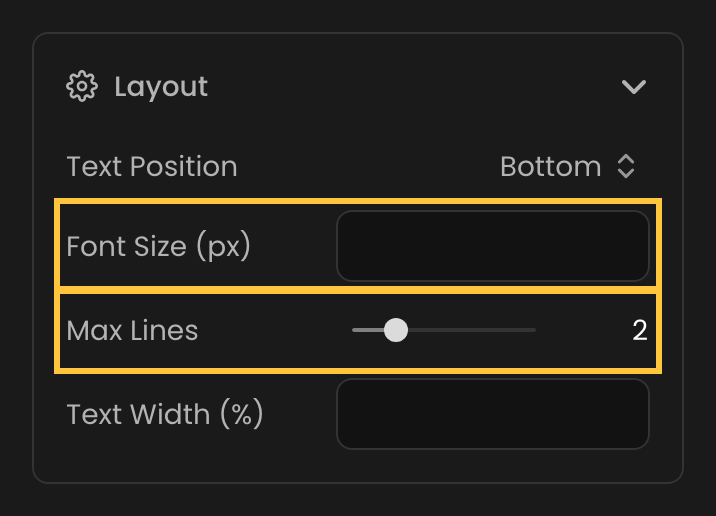
Under Layout, set Text Position, Font Size (px), Max Lines and Text Width (%) so captions don't cover the subject.
Your own text instead of the speech
Caption Studio doesn't have to listen to the audio. Under Text Segments, add a line with its Start (s) and End (s), for a title or a hook over the clip. When text segments are set, it uses them and skips both the transcription and any Subtitles (SRT) file.
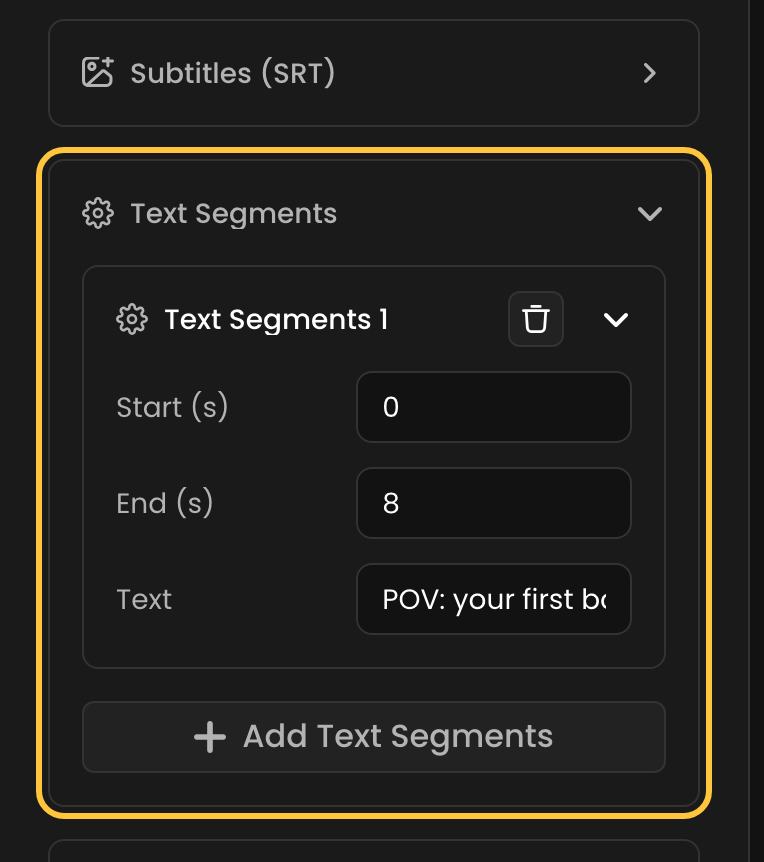
The segment's Text, as run:
POV: your first boss fight
Full guide: Transcribe and subtitle.
All the video tools
| Job | Tool | Key settings |
|---|---|---|
| Join clips | Scenario Video Concat | 2 to 50 clips; 17 transitions or a hard cut, 0.1 to 5 s each; keep audio; MP4, MOV, WebM or GIF |
| A clip to frames | Video to Image Sequence | Extract All Frames, or one frame in every N (Frame Interval, 24 by default) |
| Styled, translated captions | Scenario Caption Studio | 7 presets or a style prompt, 18 target languages, words per caption, your own SRT or text segments, burn-in or soft track |
| Burn in subtitles | Auto Subtitles | Font, colors, outline and shadow or a box; transcribes, and can translate to English only |
| Keep one section | Video Cut | Start and end time in seconds, frame-accurate; keep audio (on by default); MP4, MOV, WebM or GIF |
| Split into parts | Video Split | Cut points in seconds (N points give N+1 clips); keep audio; strict mode; MP4, MOV, WebM or GIF |
| Play backwards | Reverse Video | No settings; picture and sound reversed |
| Change size or format | Scenario Resize Video | Width, height, fit (contain, stretch, cover), maximum file size, frame rate 1 to 120, MP4, MOV, WebM or GIF, keep audio |
| Transcript and SRT | Speech to Text (Audio to Text) | Model size, language, transcribe or translate to English, voice activity filter |
| Pull out the soundtrack | Audio Extract | MP3, WAV or AAC; optional loudness normalization |
| Images to a clip | Sequence-to-Video | Frame rate 1 to 120, MP4 or GIF, compression, loop count, ping-pong, optional audio; up to 1,000 images |
| Best moments from long footage | Smart Clip Extraction | Clip length range, up to 200 clips, start and end time, scene threshold, quality filter |
| Remove a green or blue screen | Video Chroma Key | Key color, tolerance, softness, spill and edge; WebM or MOV with transparency, or MP4 over a color; clips up to 60 s |
| Split a clip into layers | Video to Layers | An instruction naming the subjects; each subject on its own layer plus a clean background, up to 10 layers |
| Cut out a subject | Pixelcut Video Background Removal, SAM 3.1 Video | Background removal with transparency; SAM 3.1 Video tracks the subjects you name and returns their masks |
| A grayscale mask from a clip | Scenario Video to Mask | Source channel, threshold 0 to 255, invert |
| Layer and compose | Scenario Video Studio | Up to 50 image, video and audio layers with position, scale, opacity, blend modes, masks, transitions; canvas size and frame rate |
The recipes below cover the other jobs that come up most.
Trim before you pay for an edit
Edit, upscale, lip sync and translation models bill by input length. Cut the source first with Video Cut:
- Start time and End time, in seconds. The cut is frame-accurate.
- Preserve audio is on by default. Turn it off only for a silent clip: you can't get the audio back later without the source.
- Output format: MP4, MOV, WebM or GIF. Left empty, the source format is kept.
Split a clip by scene
Video Split takes a list of Cut points in seconds, from earliest to latest. One cut point gives two clips; three give four. With Strict mode on, the run fails if the points are unsorted, duplicated or past the end of the clip; with it off, the tool fixes them for you. Leave it off when you work by hand.
A good order for long footage: split into rough sections with Video Split, then set the exact in and out points of each part with Video Cut.
Play a clip backwards
Reverse Video has no settings. Picture and sound both play backwards, so speech and music sound reversed too. To reverse only part of a clip, cut it first. For a back-and-forth loop, place the original and the reversed copy one after the other. Splashes, smoke, falling objects and crowds read well in both directions.
Make a vertical version
Run Scenario Resize Video with width 1080, height 1920 and fit set to cover. Fit only matters when you set both width and height:
| Fit | Result |
|---|---|
| cover | Fills the frame and crops the overflow from the center, with no way to shift the crop. For an off-center subject, use a generative reframe (Luma Video Reframe, see Edit video) |
| contain (default) | Keeps the whole frame and returns a smaller video, without bars. A 1280 x 720 clip in a 720 x 1280 box comes out at 720 x 406 |
| stretch | Forces the exact size and distorts the picture; rarely what you want |
Resize Video also changes the format (MP4, MOV, WebM or GIF), the frame rate (1 to 120) and can drop the audio, all in the same run. maxSizeMb shrinks the output until it fits under a file size, alone or with a width and height. It takes one video per run.
Add simple subtitles
Auto Subtitles burns in captions in the spoken language, with few settings: font, colors, and an outline with a shadow or an opaque box. It can translate to English only; use Caption Studio for other languages. Keep the clean version: burned-in text is permanent.
Get a transcript
Speech to Text returns a plain transcript and a timed SRT file. Set Language when you know it: auto-detect can drift on short or mixed clips. Model size goes from Tiny (fast) to Large-v3 (most accurate); Small or Medium suits most work. Task set to translate returns English only. An initial prompt with product names or unusual words helps the spelling.
Pull out the soundtrack
Audio Extract saves the audio of a clip as MP3, WAV or AAC, with optional loudness normalization. It fails on a clip with no audio track; some generated clips are silent.
Turn a sprite sequence into a preview
Sequence-to-Video takes ordered frames and returns an MP4 or a GIF. At 24 fps, 120 images make a 5-second clip. For a looping sprite preview, choose GIF, a low frame rate (8 to 12) and a loop count of 0 to loop forever. GIF has no audio and fewer colors, so use MP4 for anything else.
Find the usable shots in long footage
Smart Clip Extraction detects cuts, drops static, shaky, blurry or duplicate shots, and returns the best ones as separate clips. Start Time and End Time skip an intro or the credits.
| Setting | Default (camera footage) | For AI-generated compilations |
|---|---|---|
| Clip length | 5.5 s minimum, 14 s maximum | Default |
| Maximum clips | 20 (up to 200) | Default |
| Scene threshold | 27 | 12 to 18, so it catches the cuts |
| Filter strength | 1 | 0.25 to 0.4, so clean generated shots are kept |
Key out a green screen
Video Chroma Key removes a green or blue background from clips up to 60 seconds. Set the key color, then tolerance, softness, spill and edge until the edges are clean. Export WebM or MOV to keep the transparency, or MP4 over a solid color.
Make a mask from a clip
Scenario Video to Mask turns a clip's brightness into a grayscale mask clip. Leave threshold empty for soft tones, set it (0 to 255) for hard black and white, and turn on invert to swap light and dark. It reads brightness only: it doesn't track or cut out a subject. For that, use SAM 3.1 Video or Pixelcut Video Background Removal, or see Edit video.
durations, dimensions, frame rate and format match what you set, audio is there when you kept it, a transition sits where you put it, captions are in sync and spelled correctly, and your original is unchanged.
a cut lands a frame early or late on an action, a resize cropped the subject, a GIF lost too many colors, or captions drift from the speech or are too small to read.
Step 5: Make it repeatable
The tools give the same result every time, so they make good workflow steps. A common chain: split, cut, then transcribe, each step making a new file while the source stays available.
- 1Video Cuttrim before paying
- 2Paid editedit, upscale, lip sync
- 3Caption Studioafter the final cut
- 4Resize Videoone run per delivery format
Batch and loop nodes can run the same step on a list of clips. See Batches, loops and logic.
Common problems
| What you see | What to do |
|---|---|
| A tool isn't in the library | Tools that return images, audio or text are filtered out of the video library. Click Clear filters, or search by name |
| The joined clip is shorter than the clips added up | Each transition overlaps the two clips by its duration. Use a hard cut (Type none) to keep every frame |
| Captions too small on a vertical video | Raise Font Size (px) and lower Max Words Per Caption |
| A name is misspelled in the captions | Add it under Transcription Prompt and run again |
| The last frame is missing from the frames | Frame Interval skipped it. Turn on Extract All Frames |
| Cover cropped off the subject | Cover always crops from the center. Use a generative reframe, or reframe before you resize |
| Contain returned an odd size | Contain fits inside the box without bars. Check the output size; use cover or a reframe for the exact box |
| Fit made no difference | Set both width and height; with one, the aspect ratio is always kept |
| Video Split failed | Strict mode is on and a cut point is unsorted, repeated or past the end. Fix the list or turn strict mode off |
| Smart Clip Extraction returned zero clips | Lower the filter strength first, then the scene threshold. Very dark footage can be rejected even at the lowest setting |
| Audio Extract failed | The video has no audio track. Some generated clips are silent |
| Subtitles translated to the wrong language | Auto Subtitles and Speech to Text translate to English only. Use Scenario Caption Studio for other languages |
| Caption Studio showed the wrong text | Text Segments win over an SRT without an error. Remove the one you don't want |
| Reversed speech sounds wrong | Reverse Video reverses the audio too. Cut the part you need first, or drop the audio with Resize Video |
| A preview shows black where it should be transparent | The preview is MP4. Download the WebM or MOV file |
What's next
Use the tools around the paid steps in Edit video and Upscale and finalize video. To put a voice on a clip, go to Lip sync and talking avatars; to join shots into a story, see Build a sequence of shots.