

Make isometric tiles and buildings from sketches
Turn rough layout sketches into a matching set of isometric buildings, upgrades and ground tiles that share one projection, light and palette.
- Playbook
Run it in ScenarioGPT Image 2.5 Sunburst Scenario Texture
See it made
Run it in Scenario
One rough sketch taken to a finished isometric building, grown into an upgrade and joined by a second building, plus the ground tiles they stand on. For city-builders, mobile strategy and tactics games, where every building shares one diamond grid, camera corner and light.
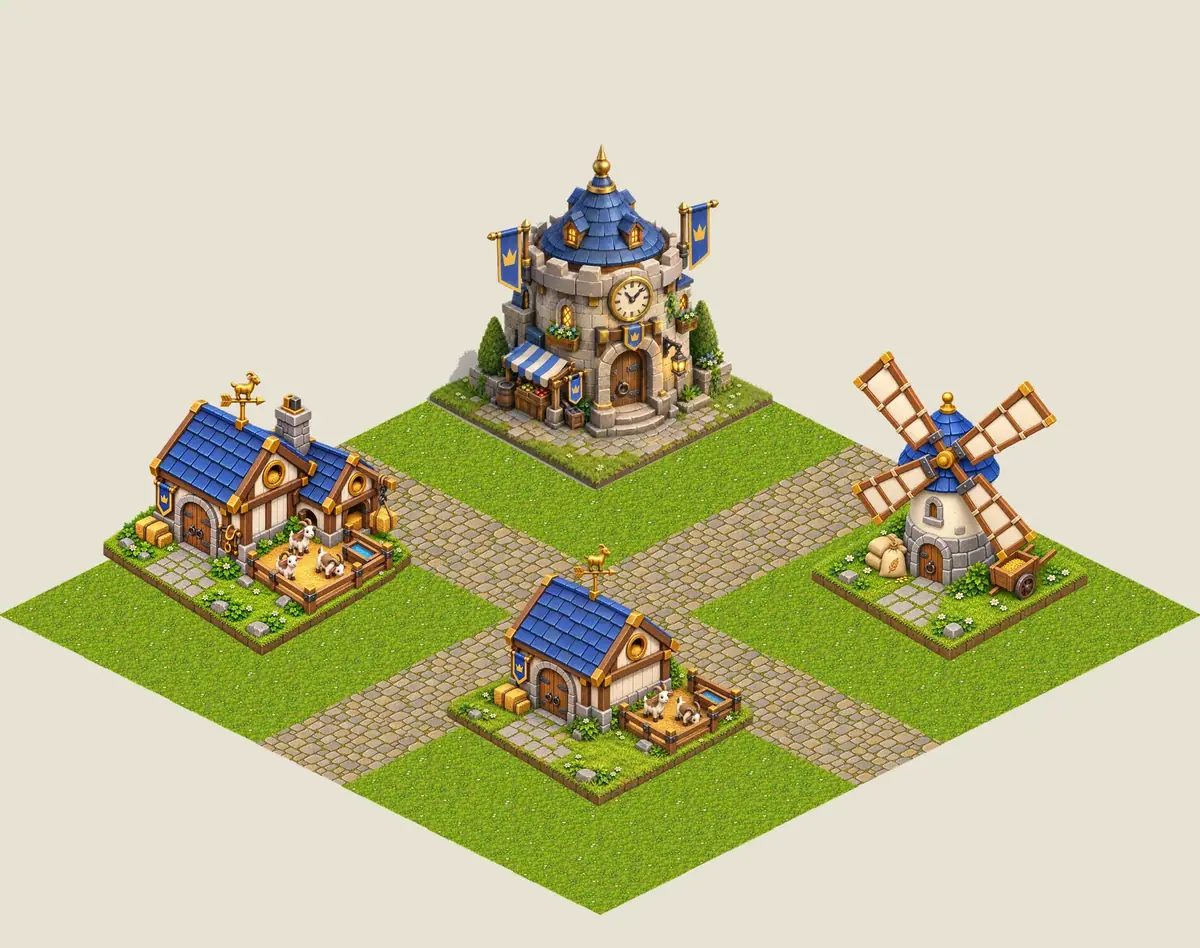
The brief
| Field | Brief |
|---|---|
| Goal | A starter block for Pipsqueen, a mobile strategy game by the invented studio Brightkeep Games: Goat Stable (2 levels), Windmill, grass and cobblestone ground tiles |
| Format | Buildings 1024x1024 transparent PNG; tiles 256x128 diamonds |
| Fixed | 2:1 isometric projection, camera from the front corner, light from the top left, scale of doors and windows, chunky stylized 3D look, royal blue and gold accents |
| May vary | Building shape and details |
| Accept when | Buildings and tiles placed together read as one game; every building sits on a diamond footprint that fits the grid |
The style comes from Pipsqueen's approved town hall, the game's building anchor. The same anchor and the stable are reused in Game UI kit.
Approach
- 1SketchFootprint, roof, door, landmarks
- 2First buildingGPT Image 2.5 Sunburst, sketch plus style anchor
- 3More buildingsApproved building as the anchor
- 4Ground texturesScenario Texture, Erase Seam on
- 5Cut tilesRotate, squash to a 2:1 diamond
Three decisions make a set hold together.
- A sketch fixes the layout (Use a blockout as the guide). A few lines give the model the footprint, the roof direction and where the door goes. The model follows shapes far more reliably from a drawing than from a paragraph. The sketch in this run was drawn in code as a stand-in for a hand sketch; a phone photo of a pencil drawing works the same way.
- An approved building is the anchor (Lock a style anchor). Every later building is generated with it attached and the instruction to match its projection, camera corner, light and scale, and not to copy the building itself. See Give references a role.
- Tiles come from tileable textures, cut in code (Do the exact part in code). A square tileable texture rotated 45 degrees and squashed to half height becomes an exact 2:1 diamond. The geometry is exact because code does it; the model only paints the surface. See Let code own what must be exact.
Models, as of October 2026:
- Buildings: GPT Image 2.5 Sunburst with Background set to transparent.
- Ground textures: Scenario Texture with Erase Seam on.
- Alternative: PATINA Material when you need full PBR maps for a 3D engine rather than painted 2D tiles.
Steps
-
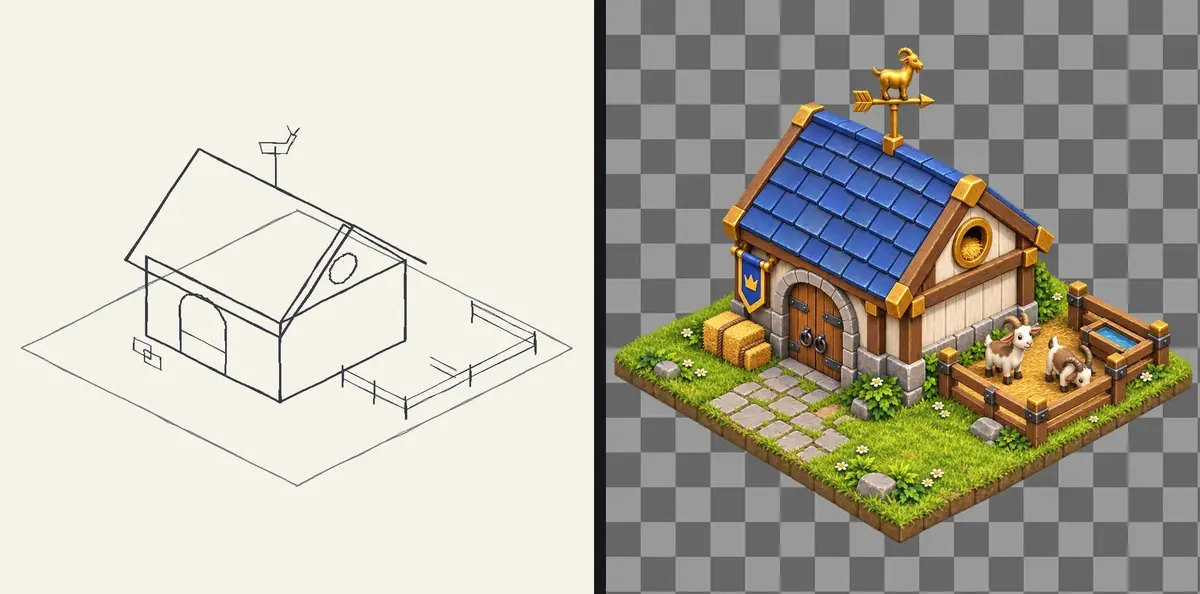
Sketch the building on its tile. Draw the diamond footprint first, then the walls, roof, door, windows and any landmark (here: an arched double door, a round hay-loft window, a goat weathervane, a fenced pen with a trough and two hay bales). Keep lines simple. Upload it to your library.
-
Generate the first building from the sketch. Open Create, choose Images, pick GPT Image 2.5 Sunburst. Under Reference Images, add the sketch first and the style anchor second (here, the town hall). Set Dimensions to 1:1 (1024x1024), Quality to
highand Background totransparent. Use the prompt below and click Generate. The price shows on the button before you run. -
Approve it. Check the diamond edges against a 2:1 guide, the light direction and the transparent background. The stable now joins the town hall as a reference for the set.
-
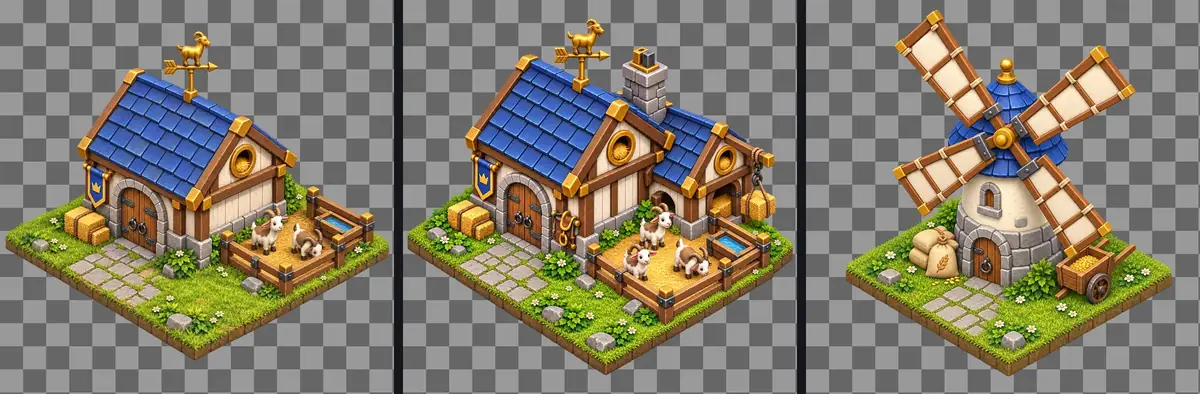
Grow the upgrade from the approved building. Attach only the level 1 stable and describe what changes (prompt below).
-
Add new buildings the same way. For the windmill, the prompt opened with "The reference image is a building from the same mobile strategy game: match its 2:1 isometric projection, camera corner, top-left light, scale of doors and windows, chunky stylized 3D look and palette. Do not copy the building," then described the windmill.
-
Make the ground textures. Open Create, choose Textures, pick Scenario Texture. Attach the town hall under Reference Images so the palette matches, set Dimensions to 1024x1024, turn on Erase Seam, and prompt one surface per run (prompt below).
-
Cut the tiles in code. Tile each texture 3 by 3, rotate 45 degrees, crop one period, scale it to 256 pixels wide and 128 high, and mask the diamond. Lay the tiles and buildings on one grid to check them together.
The level 1 prompt as run:
Reference 1 is a rough layout sketch: follow its shapes, proportions and
placement exactly (a barn on one isometric ground tile, gable roof with the
ridge running from front-left to back-right, a big arched double door on the
left wall, a round hay-loft window in the right gable, a goat weathervane on
the roof ridge, a small fenced pen with a water trough on the right of the
tile, two hay bales by the door). Reference 2 is the style anchor of the
game: match its chunky stylized 3D look, soft global illumination, tactile
materials, warm saturated palette and blue-and-gold accents. Do not copy the
building.

Game asset: the Goat Stable, level 1, home of Queen Pip's battle goats, for a
mobile strategy game. True 2:1 isometric projection, camera from the front
corner, light from the top left. Painted timber walls on a rounded stone base,
blue slate roof, gold trim, a blue banner with a small gold crown by the door,
a chunky gold goat weathervane, a round hay-loft window stuffed with hay. The
building sits on one grass diamond tile with a short cobblestone path to the
door, tile edges matching the sketch's tile. Single building, centered,
transparent background, no cast shadow outside the tile, no text. Style:
chunky stylized 3D at the standard of the world's top mobile strategy
studios: thick silhouettes, big heads and hands, soft global illumination,
tactile materials (painted wood, brushed steel, felt cloth), warm saturated
palette, readable at phone size.
The upgrade prompt as run (style paragraph appended):
The reference image is the level 1 Goat Stable of a mobile strategy game.
Draw its level 2 upgrade: the same building grown, not replaced. Keep the
same 2:1 isometric projection, camera corner, top-left light, scale of doors
and windows, chunky stylized 3D look, painted timber walls on a rounded stone
base, blue slate roof, gold trim, arched double door, round hay-loft window,
blue crown banner and gold goat weathervane. Add a second wing on the right
side with a hay loft and a pulley hoist, a taller stone chimney, a larger
fenced pen with three goats, and a gold saddle rack by the door. The footprint
grows to fill one 2 by 2 block of grass tiles with straight diamond edges.
Single building, centered, transparent background, no text.
The grass texture prompt as run (cobblestone: the same with "rounded warm-grey cobblestones with thin moss lines in the gaps"):
Stylized ground texture for a mobile strategy game: short lush grass with
small clover patches and a few tiny white and yellow flowers, soft painted
shading, warm saturated palette, viewed straight from above, even lighting.
With the Scenario MCP: run model_openai-gpt-image-2-5-sunburst with referenceImages: [sketch_id, anchor_id] and background: "transparent", then reuse the returned asset id as the only reference for the upgrade and new buildings.
Textures are model_scenario-texture with eraseSeam: true. Download buildings with format: "png" to keep the alpha channel.
Check the result
every building follows its sketch; the diamond edges of each footprint run at the same angle as the tiles; light comes from the top left on every roof; doors are the same height across buildings; tiles repeat with no visible line.
a building turns to a different camera corner, the footprint is a square or a different angle, a sign or banner carries invented letters, or a tile shows a seam when repeated.
- Sketch followed. Footprint, roof direction, arched door, round window in the gable, weathervane on the ridge, the pen on the right and the hay bales all landed where they were drawn.
- Upgrade grown, not replaced. Level 2 kept the first building's walls, door, window, banner and weathervane, and added the right wing, hoist, chimney and three goats as asked.
- The footprint did not double. The prompt asked for a 2 by 2 block; level 2 came back on the same size of tile as level 1, with doors at the same scale. In the block above it still reads as an upgrade, but a game that snaps buildings to a grid needs the footprint fixed in the sketch, not in words.
- The angle is steeper than 2:1. Measured along the bottom edges of the footprints, all three buildings sit at a slope of 0.54 to 0.64, closer to a 30-degree view than to 2:1 (0.50). On busy grass the difference is hard to see. For flush placement, draw the footprint at the exact angle in the sketch, or cut the tiles at the angle you measure.
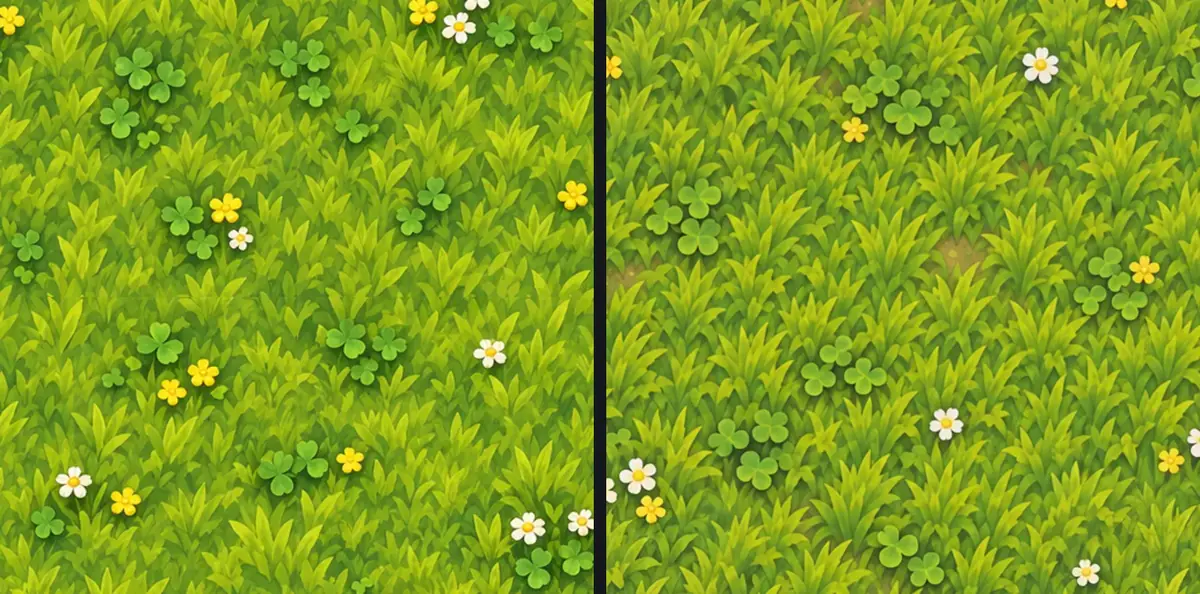
To test Erase Seam, the grass texture was also generated with it off, which costs slightly less. Measured at the wrap-around edges, the edge contrast was about 1.7 times the interior contrast without it, and 1.02 to 1.04 with it. The cobblestone, also made with it on, measured 0.82 to 1.11.
On busy grass the difference is hard to see by eye, which is why the measurement is worth running. Flat surfaces such as sand or plaster show a join much sooner. Keep it on for ground textures.
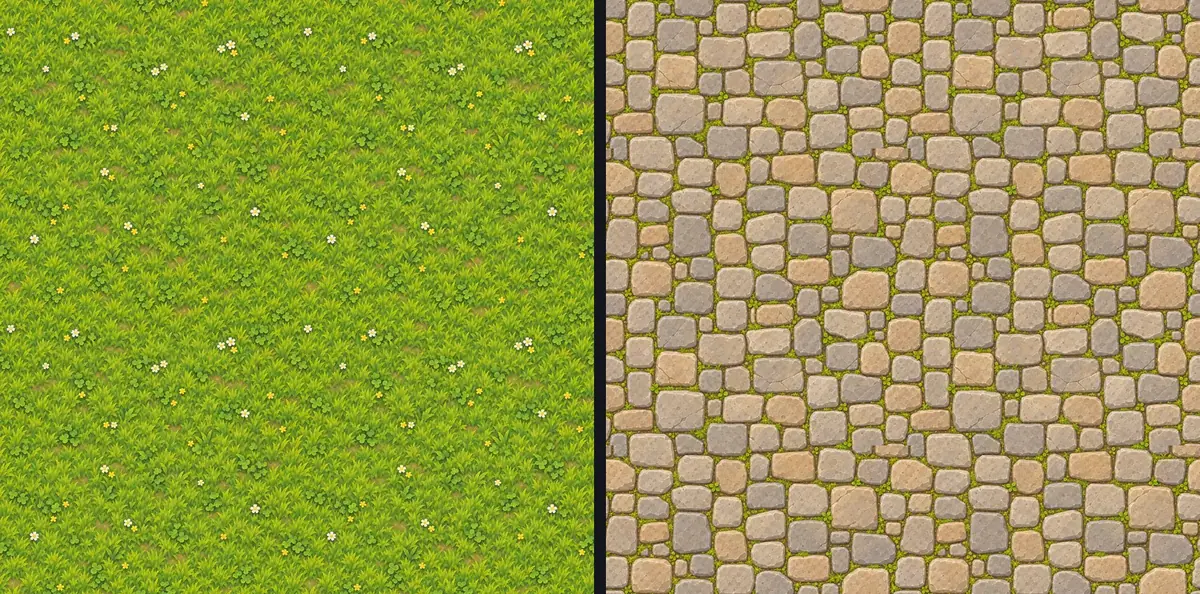
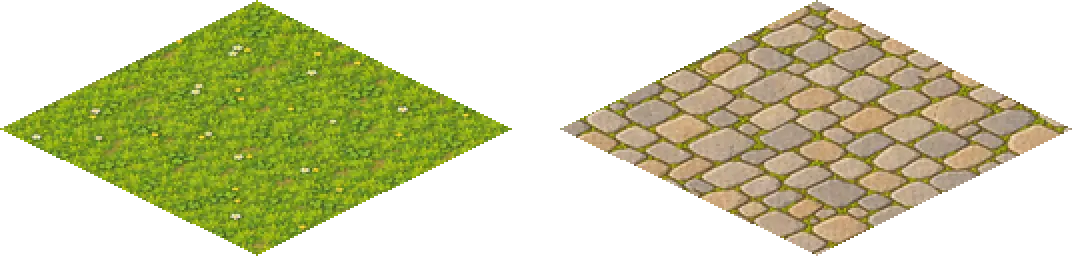
One mismatch remains in this set: each building comes with its own patch of ground baked into its footprint, more detailed than the shared tiles. On the block it reads as a yard, which works here.
If your game needs buildings to sit flush on the shared tiles, ask for "no ground, the building stands on an empty transparent diamond" and let the tile under it show.
1Two runs of the same grass texture, repeated and zoomed on the joins. By eye, neither shows a clear line. How do you choose which one to tile?
Answer: B. Without Erase Seam the edges measured about 1.7 times the interior contrast; with it, 1.02 to 1.04. Flat surfaces show a join much sooner, so keep it on for ground textures.
2The level 2 stable came back on the same footprint as level 1, though the prompt asked for a 2 by 2 block. What do you change?
Answer: B. A sketch fixes layout far more reliably than words; scaling the image would also scale the doors and break the set's proportions.
Make it repeatable
- Keep the anchor and the prompt frame. Store the anchor building, the two tile textures and the prompt frame ("match its projection... Do not copy the building") in one collection. A new building is a sketch plus one paragraph.
- Workflow for new buildings (Package it as a workflow or skill). In the Node Editor: an Image input for the sketch, an Image node with the anchor, a Text input for the building description, a Prompt Builder that adds the fixed frame, an Image Generator on GPT Image 2.5 Sunburst with transparent background, and an Approval node. See Build your first workflow.
- Platform Apps to compare. Under Workflows, Apps: Isometric Tile Maker turns a building photo into an isometric tile, and Isometric Evolution generates six construction and destruction states from one isometric building. Run them on your anchor before building your own.
Runs and time
| Step | Model | Runs | Kept | Wait |
|---|---|---|---|---|
| Goat Stable level 1 from sketch | GPT Image 2.5 Sunburst, 2 references | 1 | 1 | about 65 s |
| Level 2 upgrade and windmill | GPT Image 2.5 Sunburst, 1 reference | 2 | 2 | about 45 s each |
| Grass and cobblestone textures | Scenario Texture, Erase Seam on | 2 | 2 | about 2 min each |
| Grass without Erase Seam (comparison) | Scenario Texture | 1 | 0 | about 70 s |
| Tile cutting, measures and layout | local script | 0 | n/a | seconds |
About 5 minutes with the runs in parallel. A texture run costs a few times a building, so ground types are most of the cost; skip the comparison run once you trust Erase Seam. The price shows on the Generate button before you run.
Variations
- Building damage and construction states: attach the anchor and describe the state ("scaffolding on the left wall, roof half tiled"), or run Isometric Evolution.
- Props and decoration: benches, lamp posts and hay carts on a single small tile, with the anchor attached; see Props and items from sketch.
- Pixel-art isometric: generate as here, then Pixelate with a fixed palette, or use Retro Diffusion Tile for small pixel tiles.
- Board games and maps: the same tiles make printable hex or diamond boards; keep the light direction fixed so tiles can be rotated only in 180-degree steps.
- Seasonal sets: reskin the approved buildings for winter; see Reskin a set of assets.
If it breaks
- The building turns to another camera corner. Draw the footprint diamond in the sketch and say "camera from the front corner" in the prompt. Attach the anchor for every later building.
- The footprint is a square, not a diamond, or the wrong size. Draw the exact footprint in the sketch; words alone did not double it here. Check edges against a guide line at the angle your tiles use.
- The model ignores part of the sketch. List every element of the sketch in the first paragraph of the prompt, in the order a viewer reads it.
- Signs or banners come out with letters. Ask for a symbol ("a small gold crown") and "no text". Set any real text in the game engine.
- Tiles show a grid when repeated. Turn on Erase Seam, and avoid single large features (a big flower, a puddle) in the texture prompt; they repeat visibly.
- Thin light lines appear between tiles in a layout. Antialiased diamond edges leave gaps; overlap each tile by one or two pixels when you compose.