

Clean packshots from a real product photo
Turn one product photo into white, colored and transparent packshots with the wordmark kept pixel for pixel, a print upscale and a 3D model.
- Playbook
Run it in ScenarioPixelcut Product Photo Meshy 7.1 - Image to 3D
See it made
Run it in Scenario
Store-ready packshots of one product from a single photo: white background, brand-color background, transparent cutout, a 2x print version, and a 3D model for a product page viewer. For e-commerce and marketing teams who cannot accept a wordmark with one wrong letter.
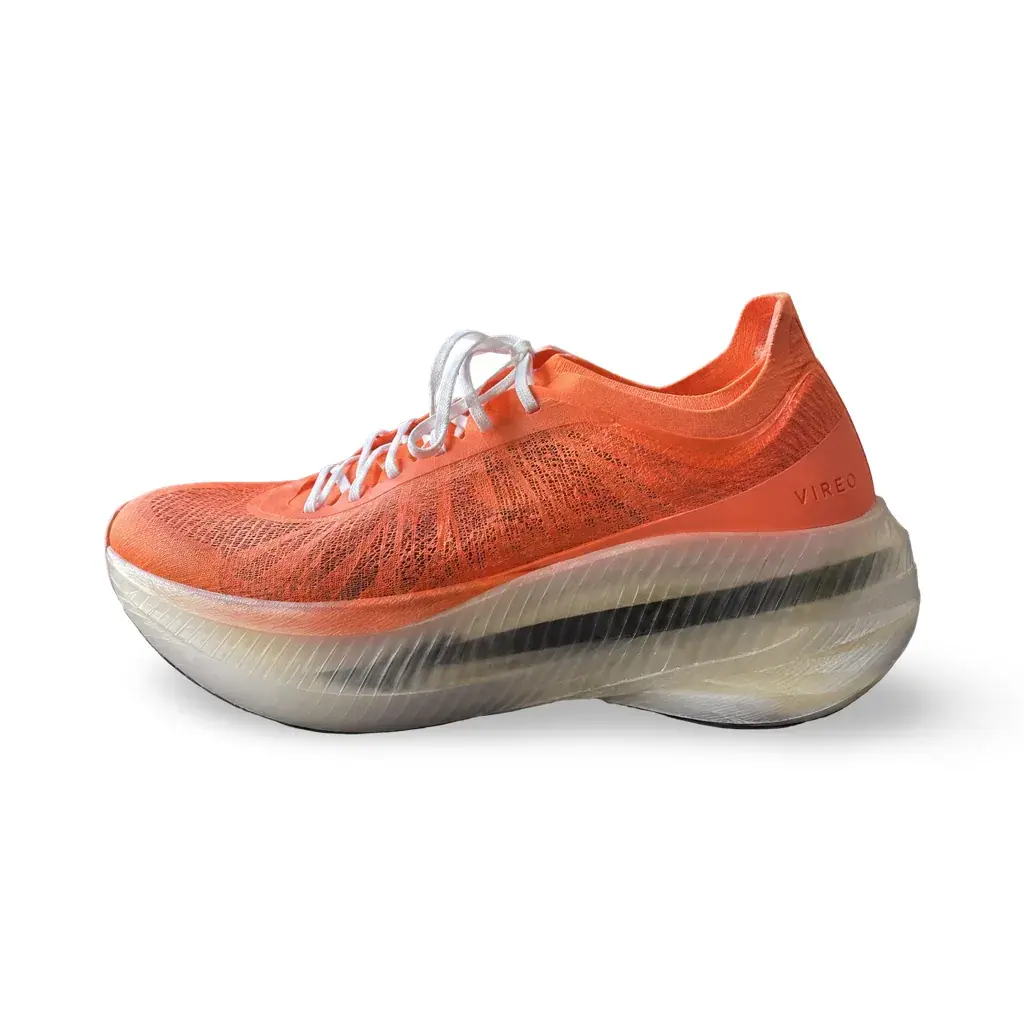
The brief
| Field | Brief |
|---|---|
| Goal | Packshots for a product page, a marketplace listing and print, plus a 3D model for the product page |
| Input | One phone photo of the real shoe on a gym bench, outer side and wordmark facing the camera |
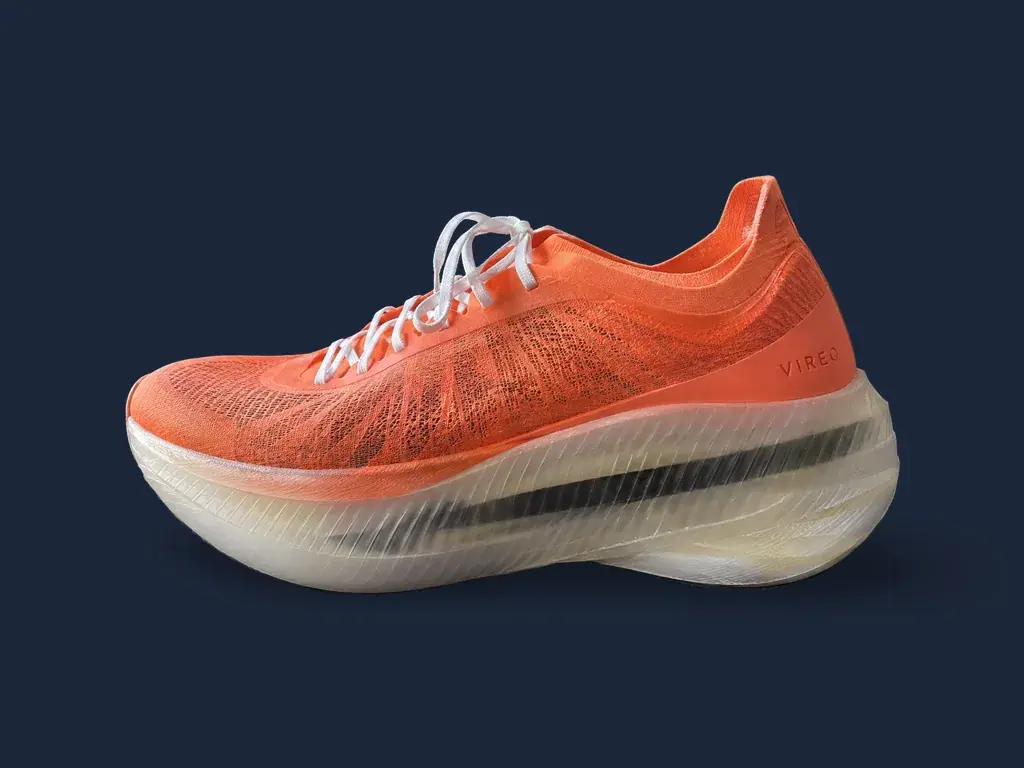
| Format | 1:1 white (marketplace); 4:3 brand navy RGB 28,38,56 (site); transparent PNG (designers); 2x white for print; GLB under 15 MB (viewer) |
| Fixed | The shoe's pixels: shape, knit pattern, laces, the translucent ribbed sole with its carbon stripe, the VIREO wordmark on the outer heel |
| May vary | Background, margin, shadow |
| Accept when | The wordmark reads letter for letter at 100 percent zoom; the outline has no halo or bitten edge; the shadow sits under the sole; the 3D model carries one wordmark, on the outer heel only |
The product used across the Commerce and Brand playbooks is invented: the Vireo Apex, a carbon racing shoe from the running brand Vireo Athletics.
The packshots made here feed Product lifestyle scenes, then Ad variations, Formats from one master and Edit one thing per campaign.
Approach
- 1Source photoSharp, wordmark square to the camera
- 2White packshotPixelcut Product Photo, generative shadow
- 3Brand colorPixelcut, navy background, 4:3
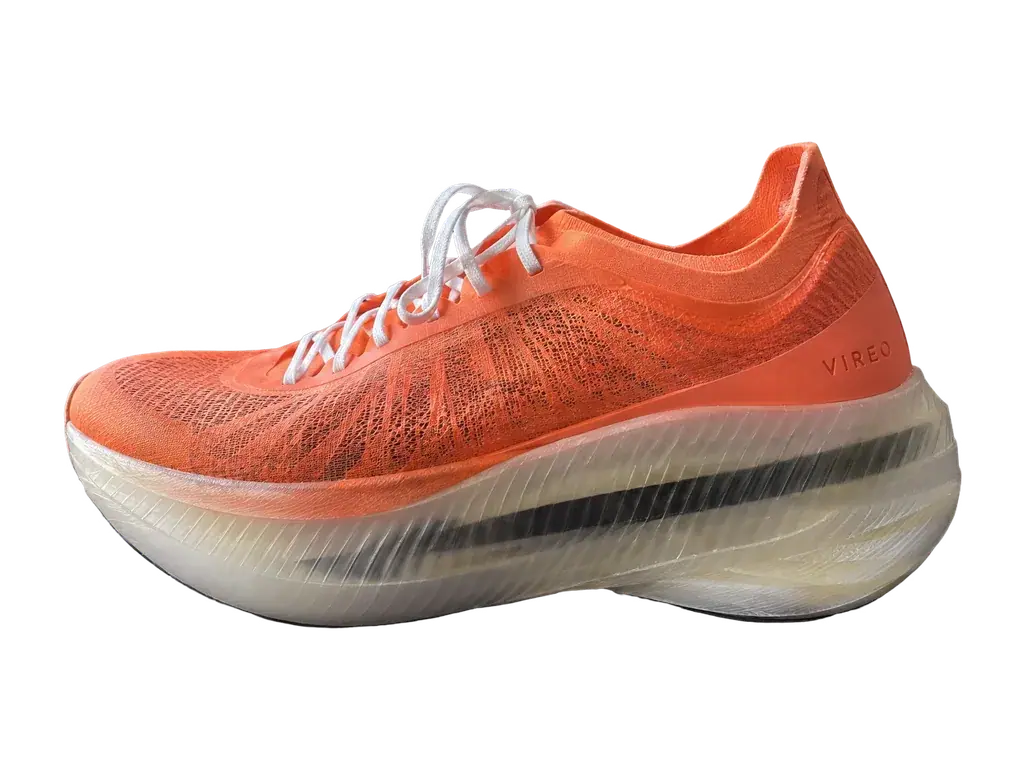
- 4Transparent cutoutPixelcut, no shadow
- 5Print versionTopaz Image Upscale, Text Refine, 2x
- 63D modelMeshy 7.1, cutout plus two more views
- 7Wordmark check1:1 against the photo
The product is never generated: every pixel of it comes from the photo. Background tools cut the product out and keep those pixels; image generators redraw them, even when the prompt says "keep it exactly". This is the core rule of Let code own what must be exact: copy what must be exact, rather than imitate it.
Models, as of October 2026:
- Packshots: Pixelcut Product Photo. It cuts the product out, places it on a color, an image or transparency, and adds a generative or drop shadow.
- Print file: Topaz Image Upscale with its Text Refine model, at 2x.
- 3D model: Meshy 7.1 - Image to 3D, which takes one image or up to four views of the same object.
- Quick check: Create > Remove Background, with Shadow Mode and HD Background Removal options. See Remove and replace backgrounds.
As a test, the run also asked GPT Image 2.5 Flare to turn the phone photo into a clean packshot. It spelled VIREO correctly and still failed: the laces came back criss-crossed, the upper redder, the sole reshaped and the wordmark larger.
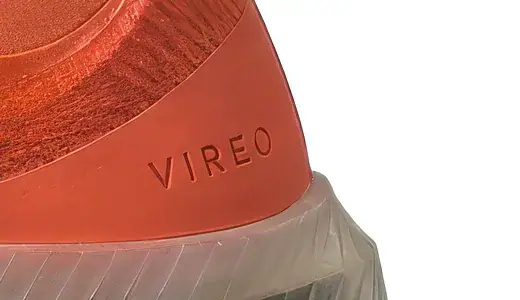
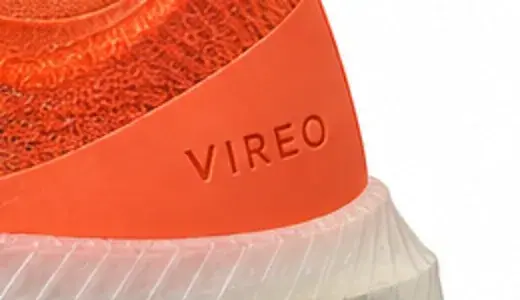 Rejected
Steps
-
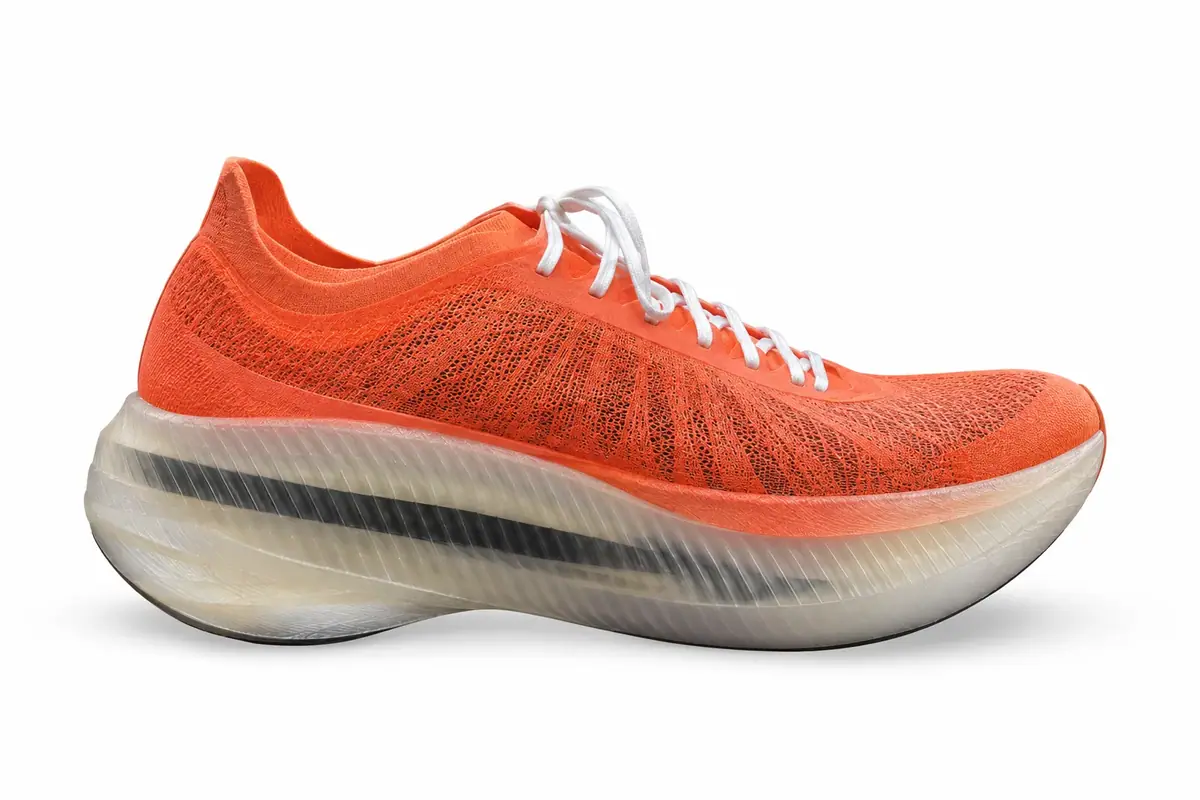
Shoot or pick the photo. Sharp, product whole in frame, wordmark square to the camera, even light, nothing overlapping it. A phone photo on a bench is enough.
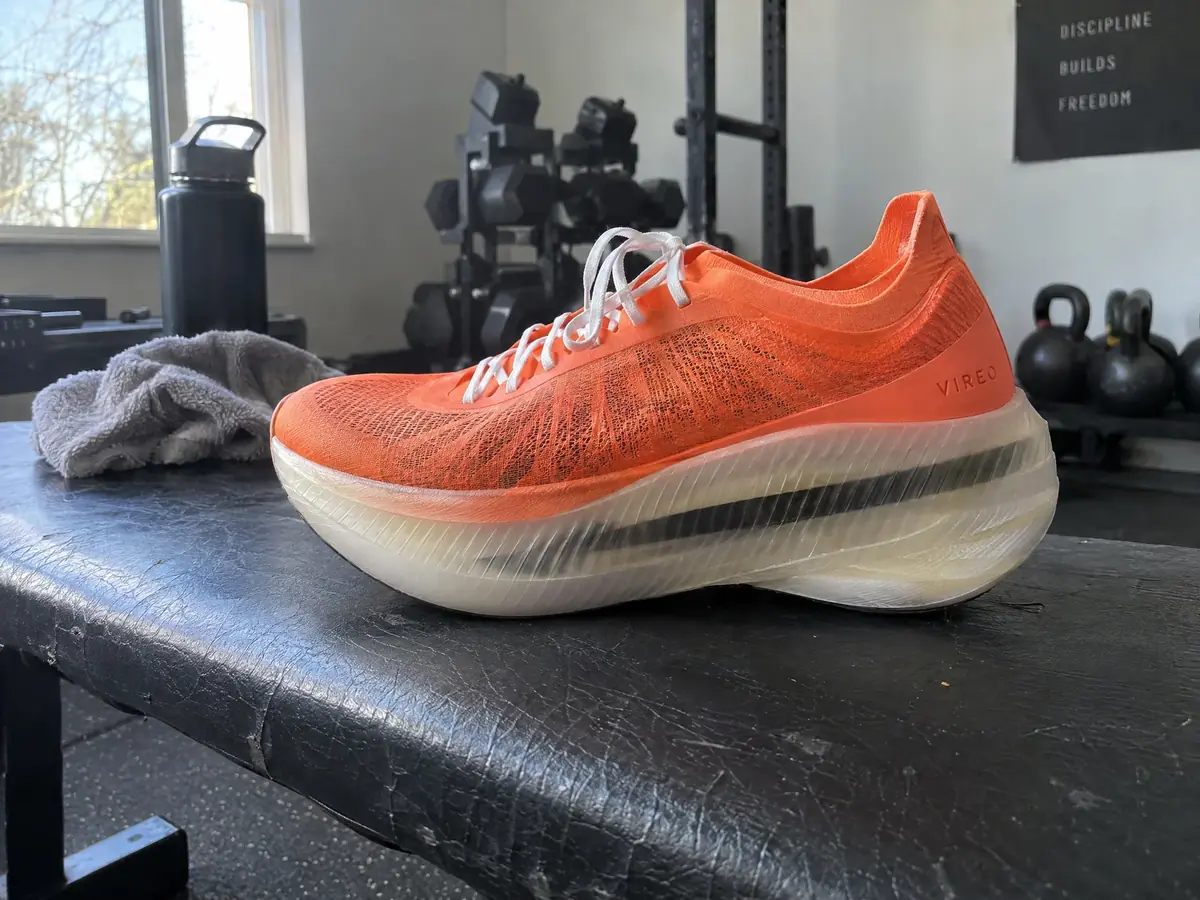
The source photo. For this invented product it was itself generated as a stand-in; with a real product, use your own photo. -
Make the white packshot (Cut out and key). In Choose a Model, pick Pixelcut Product Photo under Image > Remove Background. Upload the photo, then set: image size
square_hd, background modeColor(white is the default), margin10%, shadow typeGenerative, shadow opacity0.3. Run it. -
Make the brand-color packshot. Same model, same photo. Set image size
landscape_4_3(1024 x 768), background modeColorwith red28, green38, blue56(the brand navy), margin12%,Generativeshadow at0.35. -
Make the transparent cutout. Same model, image size
landscape_4_3, background modeTransparent, margin6%, no shadow, for designers' own layouts. -
Make the print version (Upscale and finalize last). Open the white packshot, click Enhance in the asset toolbar, choose the Text Refine model and a Scaling Factor of 2x, then click Enhance. It returned 2048 x 2048 with the wordmark and the knit sharper and no letter shapes invented.
-
Check the wordmark at 100 percent. Zoom each output to 1:1 and read VIREO letter by letter against the photo. Check the outline for a halo or a bitten edge, especially between the laces and around the translucent sole.
-
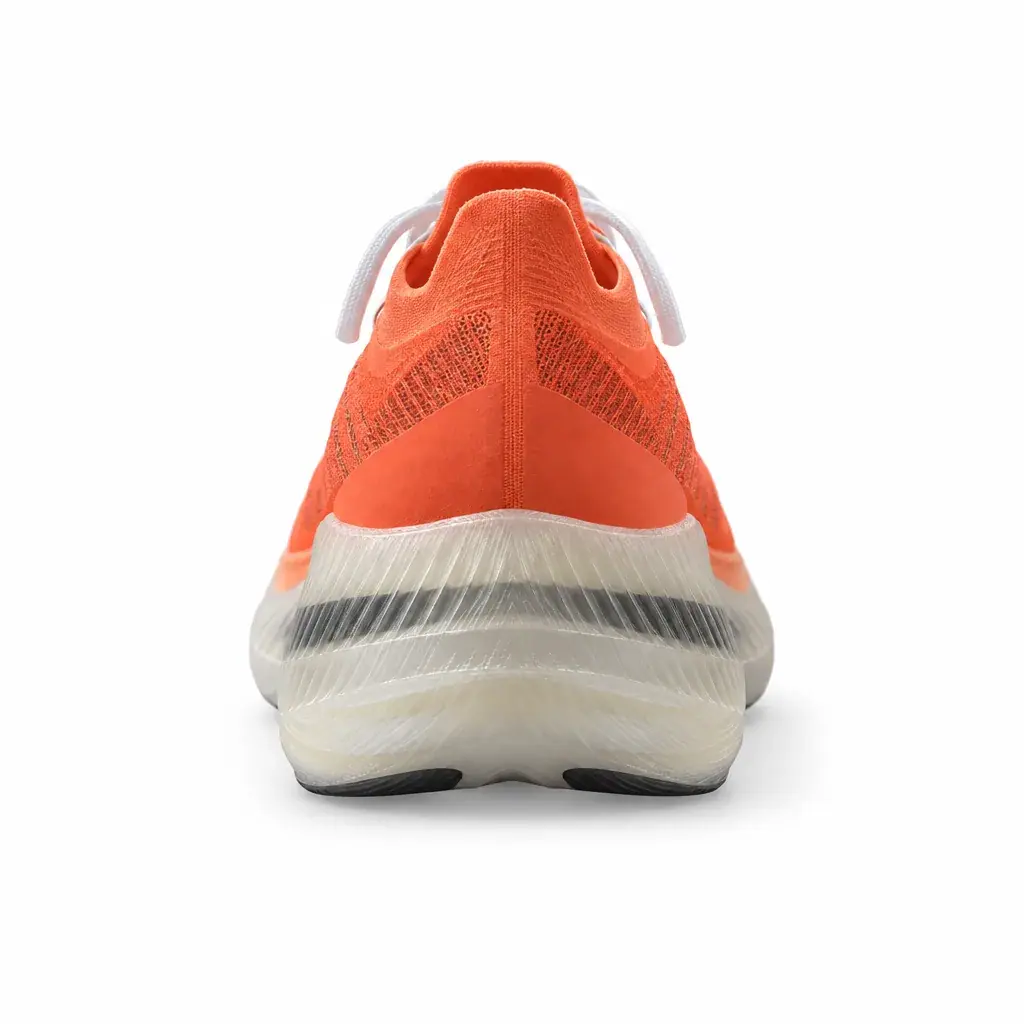
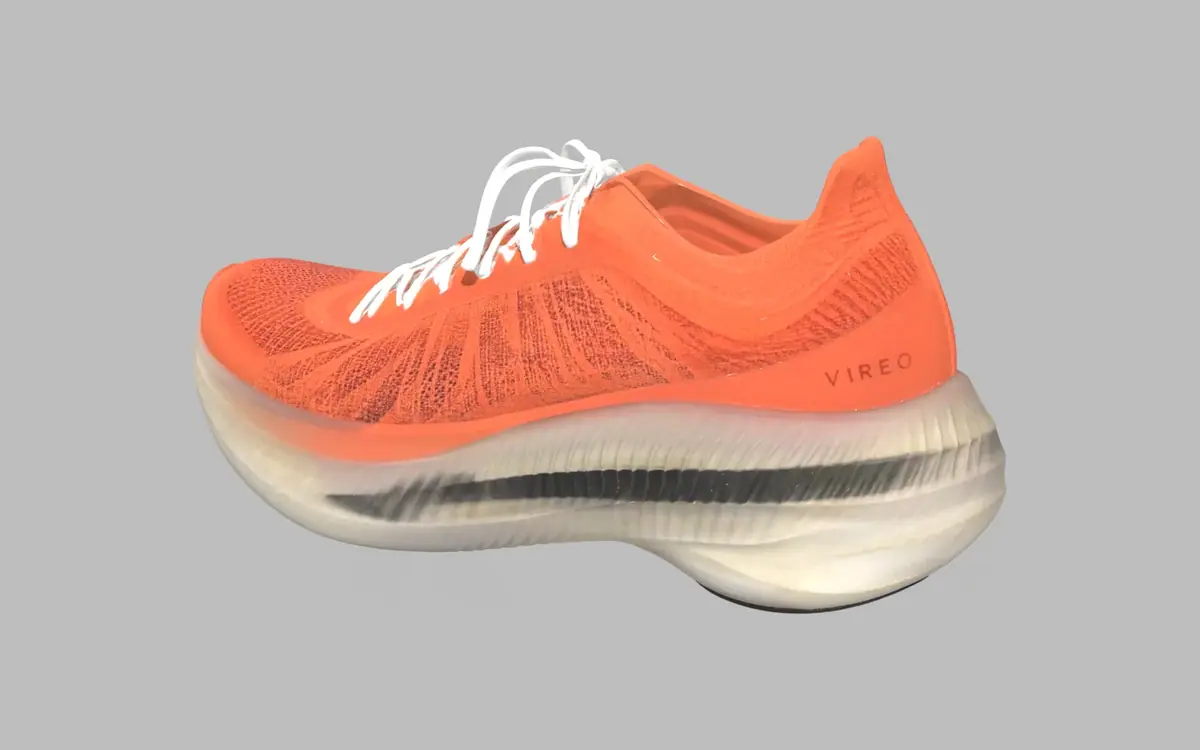
Build the 3D model from more than one view. Create > 3D, pick Meshy 7.1 - Image to 3D, and add the transparent cutout plus a photo of the inner side and one of the back under Image. Settings in this run: geometry resolution 2k, texture on with PBR, texture resolution 2k, remesh on with a target of 100,000 polygons. From the cutout alone, the model invented the side it never saw: a mirrored, garbled wordmark on the inner side and the heel. Download the GLB and turn it in the viewer before you publish it.
-
File the set. Add the kept files to a collection named for the product with Collections. Later playbooks in this series use the white packshot from it as the product reference.
With the Scenario MCP: model_run on model_pixelcut-product-photo with image, imageSize, backgroundMode, backgroundColorRed/Green/Blue, marginAll, shadowType and generativeShadowOpacity; then model_topaz-image-upscale with enhanceModel: "Text Refine" and upscaleFactor: "2x"; then model_meshy-7-1-img23d with image: [cutout_id, inner_id, back_id], geometryResolution: "2k", shouldTexture: true, textureResolution: "2k", enablePbr: true, shouldRemesh: true, targetPolycount: 100000.
The three Pixelcut calls do not depend on each other: start them together with wait: false and collect them with one jobs_wait. The Topaz upscale needs the white packshot and the 3D run needs the cutout, so start them once those are back.
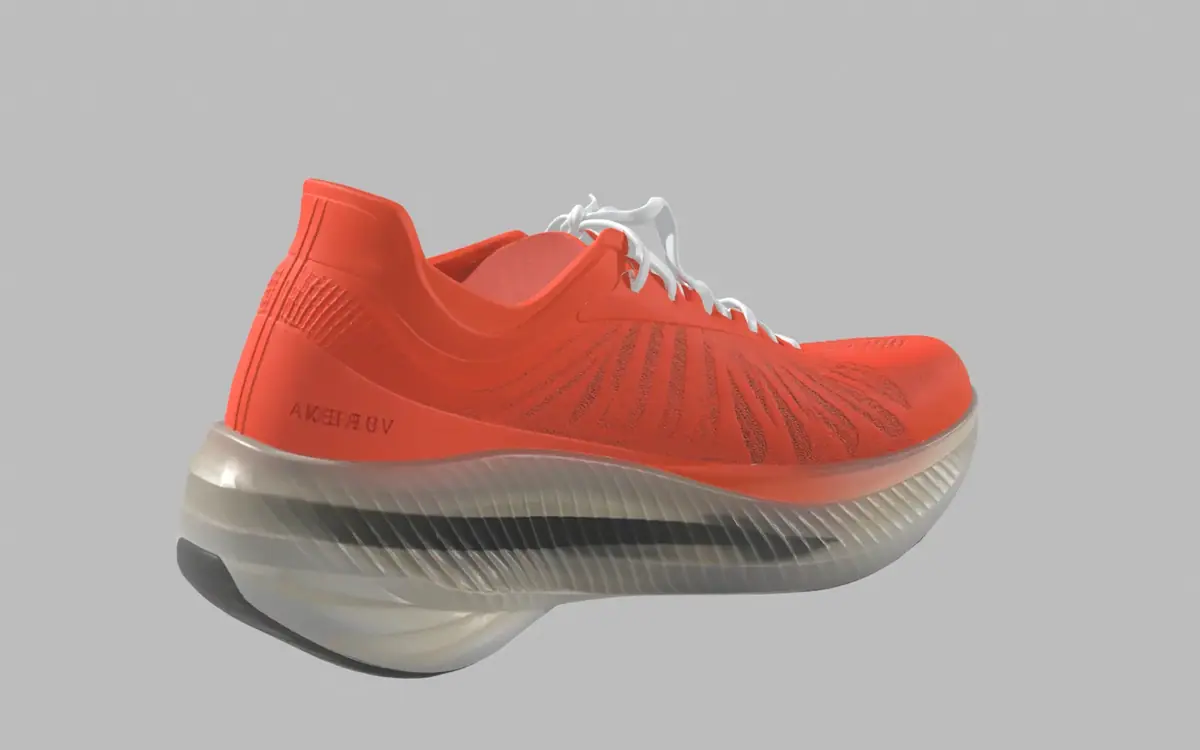 Rejected
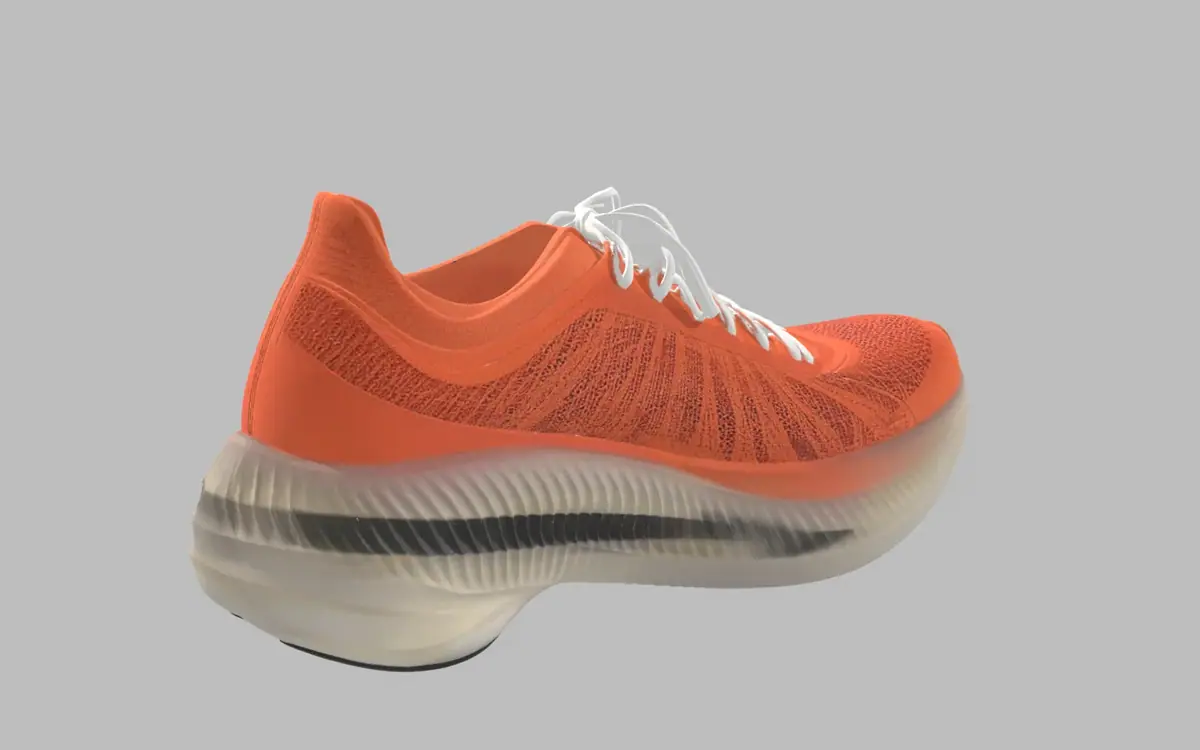
A texture prompt saying "the inner side and the back of the heel are plain orange knit with no letters" did not fix the one-photo model: the second run still printed garbled letters there. Adding views did. With a real product, photograph the inner side and the back; for this invented shoe they were generated stand-ins.
Check the result
the wordmark matches the photo letter for letter at 100 percent; the knit pattern and the sole are the photo's own; the outline is clean on white and on a dark test background; the shadow sits under the sole, not floating beside it; the 3D model shows one wordmark, on the outer heel, and plain knit everywhere else.
any letter, the lacing, the sole shape or the upper's color differs from the photo; the edge shows a white halo or eats into the laces; a shadow appears on the wrong side of the light; the product was redrawn by a generator, even if it looks better; the 3D model shows letters, mirrored or not, on a side the photos did not show.
At thumbnail size the rejected Flare packshot looks like a cleaner photo of the same shoe; at 1:1 the laces cross differently, the heel is smoother and the wordmark is larger. A customer who receives the real shoe would see it. Keep generative packshots for mood boards.
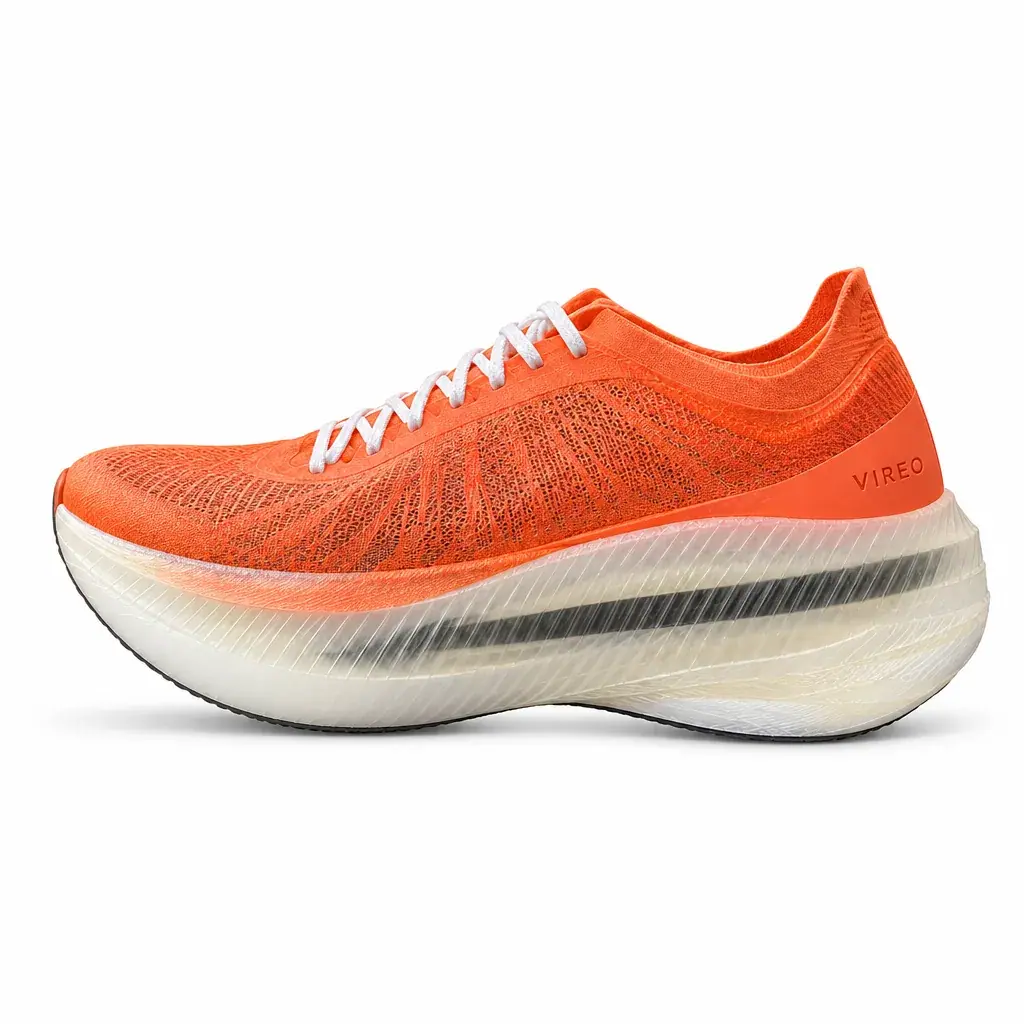
The cutouts keep the photo's low camera angle: Pixelcut places the product, it does not turn it. Shoot from the angle the listing needs.
1Two heel crops of the shoe for the marketplace listing, at the same scale. Which one ships?
Answer: A. The brief fixes the product's pixels. Take B was regenerated: the wordmark is larger and the heel smoother. A regenerated product fails even when the text is right.
2The 3D model from the cutout alone shows a mirrored wordmark on the inner side. What do you do?
Answer: B. In this run the texture prompt did not remove the letters; adding views did. The model only invents what it was not shown.
Make it repeatable
- One App for the whole catalog (Package it as a workflow or skill), so anyone can drop a photo and get the files (Publish a workflow as an App). In the Node Editor:
- three Image input nodes named
Product photo,Inner sideandBack; - three Image Generator nodes set to Pixelcut Product Photo (white, brand color, transparent);
- an Image Generator set to Topaz Image Upscale after the white one;
- a 3D Generator set to Meshy 7.1 - Image to 3D, fed by the transparent cutout and the two side photos;
- an Approval node after the white packshot with the message
Approve only if the wordmark reads correctly at 100 percent and the lace edges are clean.
- three Image input nodes named
- Fix the brand color once in the node settings, not in a note people retype.
- Batch from code. For 200 products, call the workflow once per photo set through the API or the Scenario MCP, then review the approval queue. See Run workflows from code and agents.
- Keep the photo rules with the App, in its long description: most bad packshots start as bad photos, and most bad 3D models start from one photo.
Runs and time
| Step | Model | Runs or takes | Kept | Wait |
|---|---|---|---|---|
| White packshot | Pixelcut Product Photo | 1 | 1 | about 3 s |
| Brand navy packshot | Pixelcut Product Photo | 1 | 1 | about 3 s |
| Transparent cutout | Pixelcut Product Photo | 1 | 1 | about 3 s |
| 2x print version | Topaz Image Upscale, Text Refine | 1 | 1 | about 9 s |
| Generative packshot (rejected example) | GPT Image 2.5 Flare | 1 | 0 | about 25 s |
| 3D from the cutout alone | Meshy 7.1 - Image to 3D | 1 | 0 (rejected) | about 135 s |
| 3D from the cutout, with a texture prompt | Meshy 7.1 - Image to 3D | 1 | 0 (rejected) | about 170 s |
| 3D from three views | Meshy 7.1 - Image to 3D | 1 | 1 | about 180 s |
| Stand-in inner side and back views (invented product only) | GPT Image 2.5 Sunburst | 2 | 2 | about 30 s each |
| Stand-in source photo (invented product only) | GPT Image 2.5 Sunburst | 1 | 1 | about 45 s |
With a real product, the set is the four flat rows plus one 3D run from your own photos; the 3D run is the largest single step by far. The app shows each price before you run; through the Scenario MCP, ask for a dry-run quote.
Variations
- Marketplaces with strict rules: set the margin so the product fills the share of the frame the marketplace asks for; turn the shadow off if the rules forbid it.
- Packaging and boxes: shoot the box at three-quarters so two faces show, and check both faces' text at 1:1. For 3D, add a photo of each printed face.
- Fashion flat-lays: the same tool cleans a garment shot on a table; see Fashion edits and try-on to put it on a model.
- Spare parts and tools: place the transparent cutout on a measured grid in code, so the scale bar is exact.
- Brand backgrounds from an image: set the background mode to
Imageand pass a plain textured backdrop (concrete, track rubber).
If it breaks
- A white halo around the product. The background was close to the product color. Reshoot on a contrasting surface, or try HD Background Removal in the Remove Background tool.
- Gaps between laces are filled. Check every enclosed shape; if one fails, reshoot with more contrast behind the gap.
- The shadow floats or points the wrong way. Switch the shadow type from
GenerativetoDrop, or remove it and add a shadow in your layout tool. - The upscale invents letter shapes. Use Text Refine, not a creative upscaler, and keep the factor at 2x. See Upscale and enhance images.
- The 3D model prints letters where the product has none. Add photos of those sides as extra views (up to four); a texture prompt alone did not fix it in this run.
- The GLB is too heavy for the web. Re-encode its textures as JPEG; here the download was 15.3 MB, mostly PNG texture maps, and 7.8 MB after re-encoding.
- Someone "improves" the packshot with an image generator. Compare the wordmark at 1:1 against the photo before it ships; if the shape or knit changed, go back to the cutout.