

Turn a sketch into a finished prop, in 2D and 3D
Take a sketch of a game prop to a clean transparent render that follows every line, then to a textured 3D model under a triangle budget, compare two 3D models, check scale and maps, and export to an engine.
- Playbook
Run it in ScenarioGPT Image 2.5 Sunburst Meshy 7.1 - Image to 3D Tripo P2
Run it in Scenario
A graphite prop sketch taken to a clean transparent render that adds nothing you did not draw, then through two image-to-3D models and checked for what makes it game-ready: real size, triangle budget, PBR maps and the angles players see. The example is a salvaged ship's lantern for Ashen Tides, an invented dark-fantasy game by Hollowpeak Studios. The same steps then run as a batch.
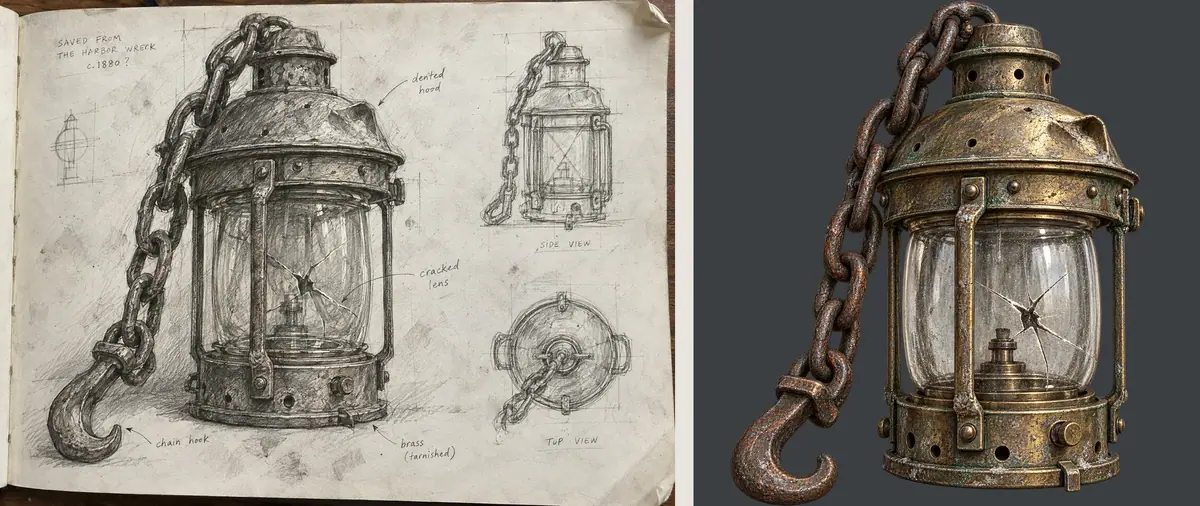
The brief
| Field | Brief |
|---|---|
| Goal | A salvaged ship's lantern prop, 2D render and engine-ready 3D model; the same steps reusable for a batch of props |
| Format | 1536x1536 transparent PNG; GLB with PBR textures (color, normal, roughness/metal) |
| Budget | Under 8,000 triangles, textures 2048 px or less |
| Fixed | Every part in the main drawing (chimney cap, dented hood, riveted bands, four guard bars, cracked glass globe, burner, wick knob, latch tab, chain to a cargo hook); the three-quarter angle; grounded realism |
| May vary | Wear, color of the verdigris, the exact rust pattern |
| Accept when | The render adds no part the sketch lacks; the 3D model matches the render from the front three-quarter view, back and top are plausible, it stays under budget, imports at a known scale and its maps load correctly |
For a character followed by rigging, see Rigged 3D character.
Approach
- 1SketchMain drawing at the final angle
- 2RenderGPT Image 2.5 Sunburst, sketch as reference
- 3Part countSketch against render
- 43D modelsMeshy 7.1, remesh to 8,000, PBR; Tripo P2, 8,000 faces, Auto Size
- 5InspectTriangles, maps, bounding box, clay views
- 6Fix and exportReduce, scale, then GLB or FBX
- The sketch goes in as the reference, and the prompt names every part in it (Use a blockout as the guide), so the model treats the lines as a plan. One sentence forbids additions: "Do not add parts the sketch does not show." Materials and style go in the second paragraph. See Give references a role.
- Tell the model what to ignore. This sketchbook page also holds a side view, a top view and handwritten notes. One line says to follow the large drawing only.
- The 2D render is the input to 3D. Image-to-3D models reconstruct from one view: one centered object, transparent background, a three-quarter angle that shows the top and two sides.
- Fix shape on the render, where it is cheapest; on a mesh it costs far more. See Repair at the cheapest stage.
- Spend on 3D only after the 2D is approved (Approve the still first): a 3D run costs several times an image. See Control cost.
- Set the budget at generation time: a remesh target polycount on Meshy 7.1, a face limit on Tripo P2. Asking for 8,000 up front gives a usable mesh instead of a dense one to reduce later.
- Then measure it. A budget you set is a promise to check, the rule the Image to 3D Benchmark exploration drew from more than 150 meshes. Count triangles in a 3D tool before the model enters the project.
- Compare two 3D models on your own prop once, then standardize. 3D models differ more than image models on thin parts, glass and textures; one comparison on a representative prop is enough for a batch. See Compare models on your brief.
Models, as of October 2026:
- Render: GPT Image 2.5 Sunburst.
- 3D, recommended by the Scenario MCP for this input: Tripo P2 (marked Preview), then Meshy 7.1 - Image to 3D.
- 3D, kept on this prop: Meshy 7.1 - Image to 3D, for the open chain links, the dents in the hood and the surface detail on a hero prop. Tripo P2 is the runner-up and the better pick when real size matters more; Part 2 measures both.
- Also worth a test: Claude Opus 5.5 3D and Rodin Gen-2.5.
The same two moves (name the parts, forbid additions) drive the Sketch to Asset exploration, which publishes its prompts for nine sketches.
Steps
Part 1: the 2D render
-
Prepare the sketch. Scan or photograph it flat, in even light. Clear main lines matter more than shading. Upload it to your library.
-
Render it. Open Create, choose Images, pick GPT Image 2.5 Sunburst. Under Reference Images, add the sketch. Set Dimensions to 1:1, Quality to
highand Background totransparent. This run used 1536x1536 through the Scenario MCP. Prompt:TextThe reference image is a graphite sketch of a game prop: follow the large main drawing only, its shapes, proportions, three-quarter angle and every part it shows: a short chimney cap with vent holes on top, a dented domed hood with small vent holes, a riveted top band with two side lugs, four vertical riveted guard bars, a clear glass globe with a star-shaped crack, a small burner inside the globe, a riveted base band with round vent holes and one knurled wick knob, a small latch tab on the base rim, and a heavy chain running from the chimney cap down to a cargo hook resting on the ground at the left. Do not add parts the sketch does not show. Ignore the small side and top views and all handwriting. Game prop: a salvaged ship's lantern from a harbor wreck. Tarnished brass with green verdigris in the seams, dents and scratches, salt crust around the rivets, a dark iron chain and hook with flaking rust, slightly grimy glass with the crack catching the light, the burner unlit. Single object, centered, filling about 80 percent of the square, three-quarter view as in the sketch, transparent background, no cast shadow, no text. Style: grounded AAA realism, weathered materials, soft overcast light, cinematic depth.Click Generate. The price shows on the button before you run. This run asked for two takes.
-
Compare the render with the sketch, part by part (Approve the still first). Tick each part of the list in the prompt. Anything extra (a handle, a cage over the glass, a second hook) means a re-run.
Part 2: the 3D model
The approved render now goes through two image-to-3D models, is measured, and is prepared for an engine.
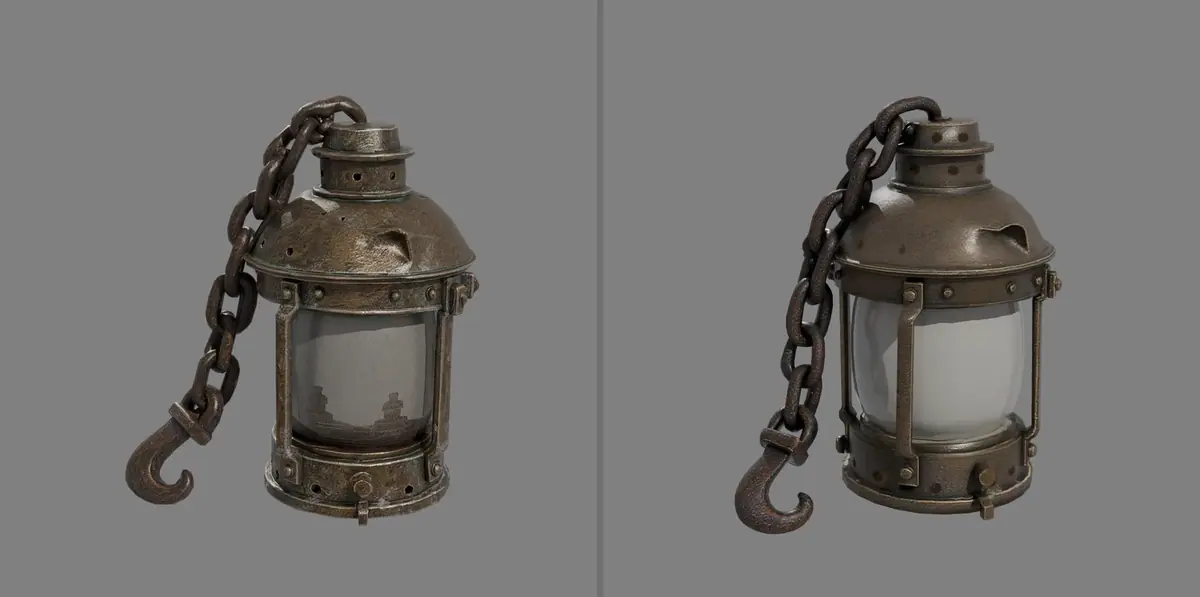
-
Check the input. One object, centered, transparent background, three-quarter view that shows the top and two sides. A cast shadow or a second object becomes geometry.
-
Run the first model. Choose Convert to 3D on the render, or open Create > 3D and add it under Image with Select from Library. Pick Meshy 7.1 - Image to 3D. Turn on Remesh, set Target Polycount to 8,000, choose triangle topology and keep Enable PBR on. Remeshing is off by default; without it, the target polycount is ignored. Click Generate (about 5 minutes in this run); this run costs many times the render, so check the price on the button first.
-
Run the comparison model (Run a same-input shoot-out). Same render, pick Tripo P2, set Face Limit to 8,000, leave PBR on and turn on Auto Size, which scales the mesh to an estimated real-world size. About 1.5 minutes in this run.
-
Inspect each model in a 3D tool (Check by measurement). Import the GLB and record:
- triangle count and number of meshes (also shown in the asset's Details);
- texture maps and their sizes;
- bounding box size in meters;
- front, back and top views, shaded, then as plain grey clay with wireframe. The clay view shows which details are geometry and which are only painted on. The back is the part the model had to invent.
-
Bring it under budget if needed. A model a few percent over the budget needs no new run: a small reduction in your 3D tool (Blender's Decimate at a ratio of 0.95 here) keeps the look. Far over budget, use the Remesh category in the 3D model picker or see Process 3D models.
-
Fix scale on import. A mesh without Auto Size has no real size: scale to your game's units with a reference object (a 1.8 m character, a 1 m cube) first.
-
Export to the engine. Download as GLB (Godot, Unreal Engine, Blender, web) or FBX (Unity, Maya, most DCC tools). Engine import settings are in Export 3D to engines and DCC tools.
With the Scenario MCP: run model_openai-gpt-image-2-5-sunburst with referenceImages: [sketch_id], width: 1536, height: 1536, quality: "high" and background: "transparent", then model_meshy-7-1-img23d with image: [render_id], geometryResolution: "4k", textureResolution: "2k", enablePbr: true, shouldRemesh: true, topology: "triangle" and targetPolycount: 8000, or model_tripo-p2-image-to-3d with image, faceLimit: 8000, pbr: true and autoSize: true.
Quote each 3D job with dry_run: true first (Quote before you run): the Meshy 7.1 job cost about five times the two-take render in this run. For a batch, start all jobs with wait: false, then one jobs_wait, and download each with format: "glb".
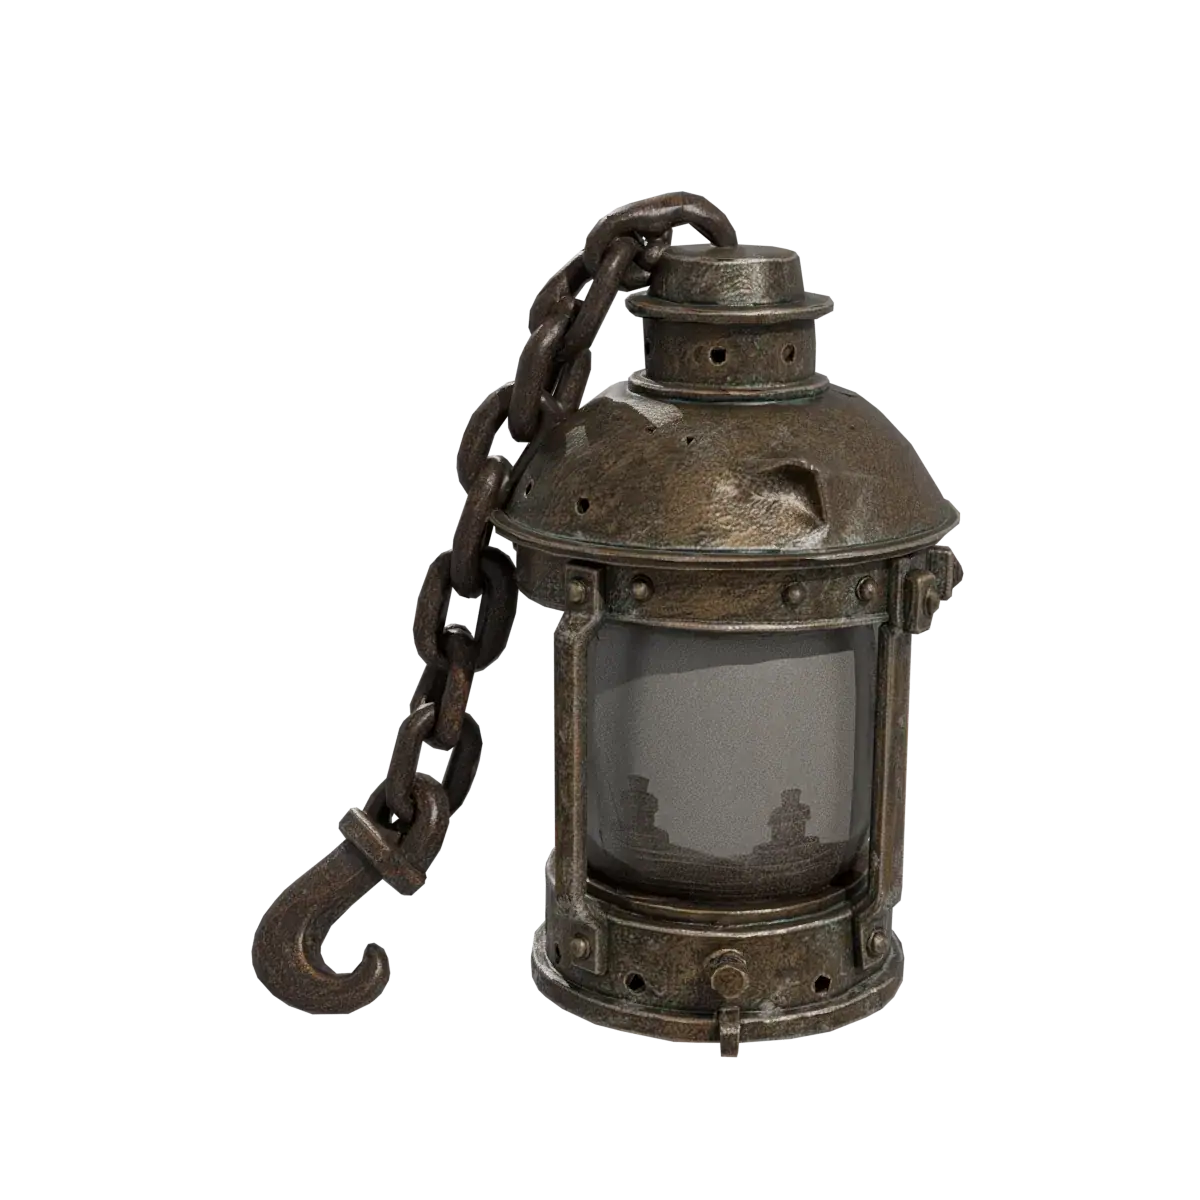
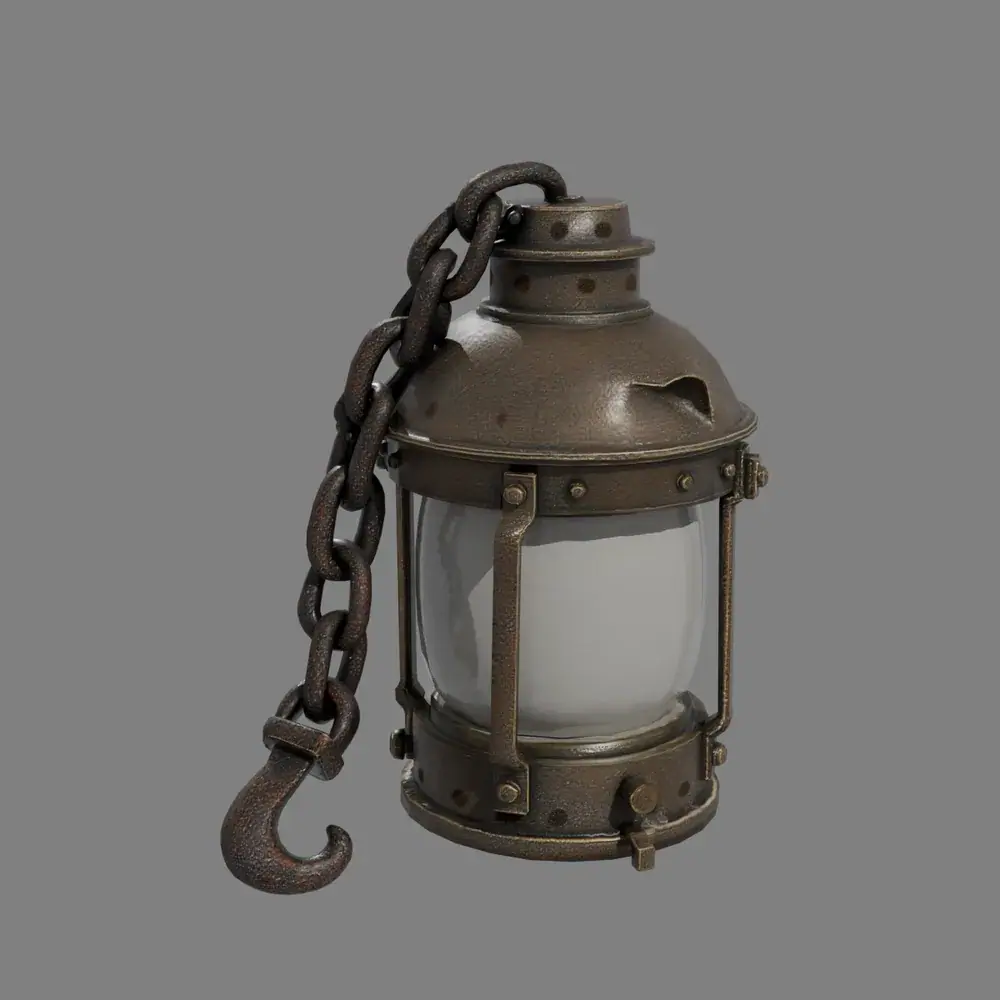
Check the result
the render shows exactly the sketched parts at the sketched angle; the alpha edge is clean; the 3D front matches the render; the triangle count is measured and under budget; color, normal and roughness data load in the engine and carry the wear (dents, rivets, rust); thin parts survive; nothing floats or is missing from the back.
the render adds or drops a part, or the angle changes; the 3D model loses a part, merges thin parts into blobs, or shows smeared texture on large faces; the normal map shows inverted lighting in the engine; or the mesh has holes visible from a gameplay angle.
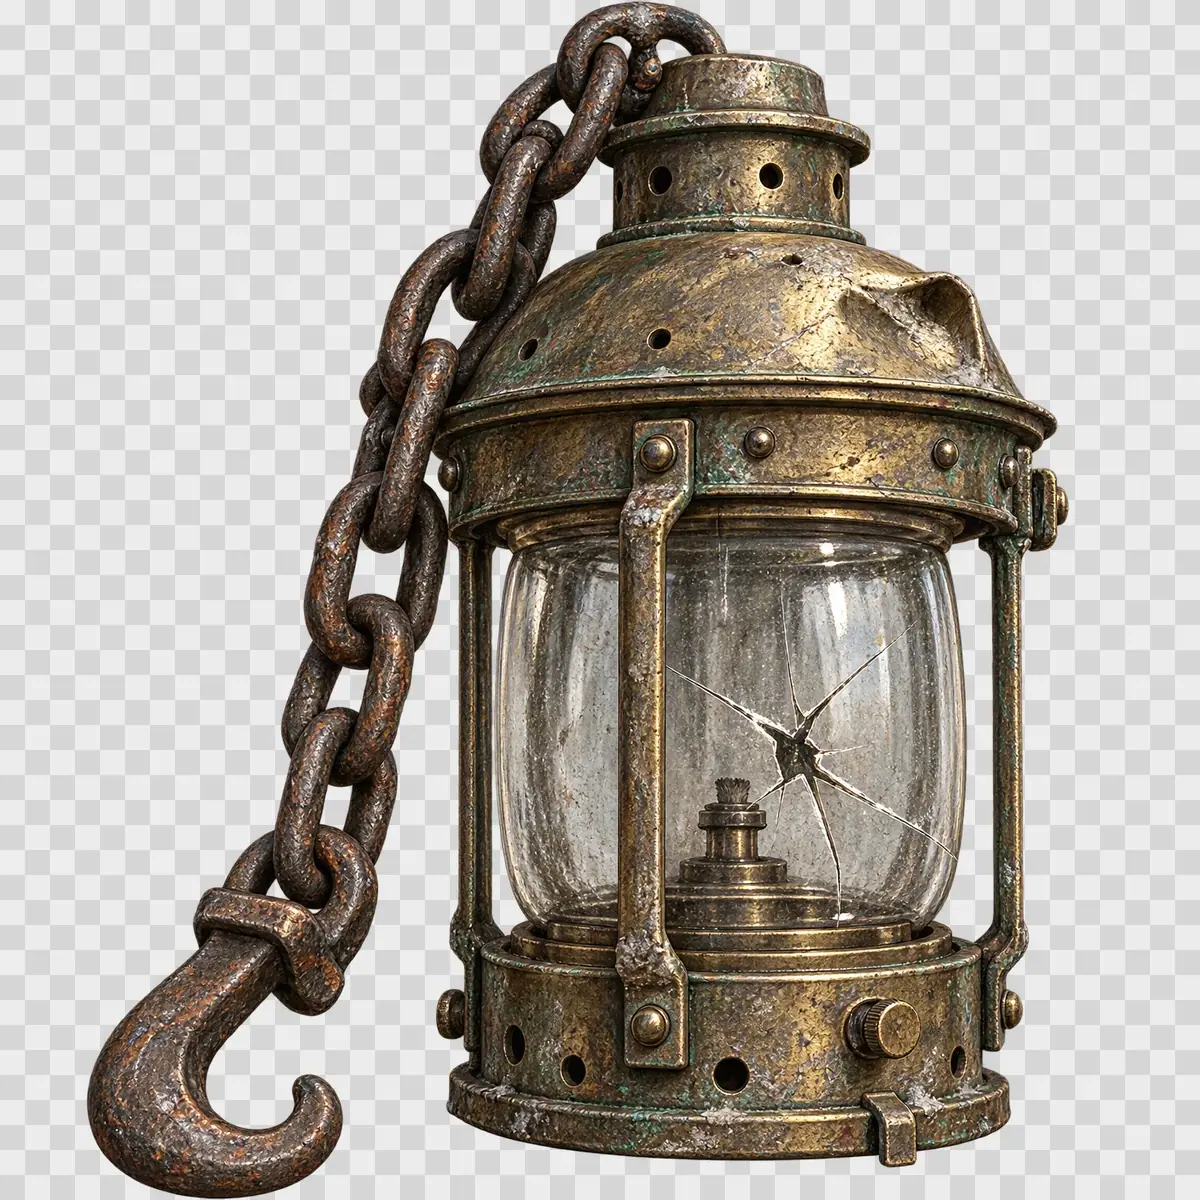
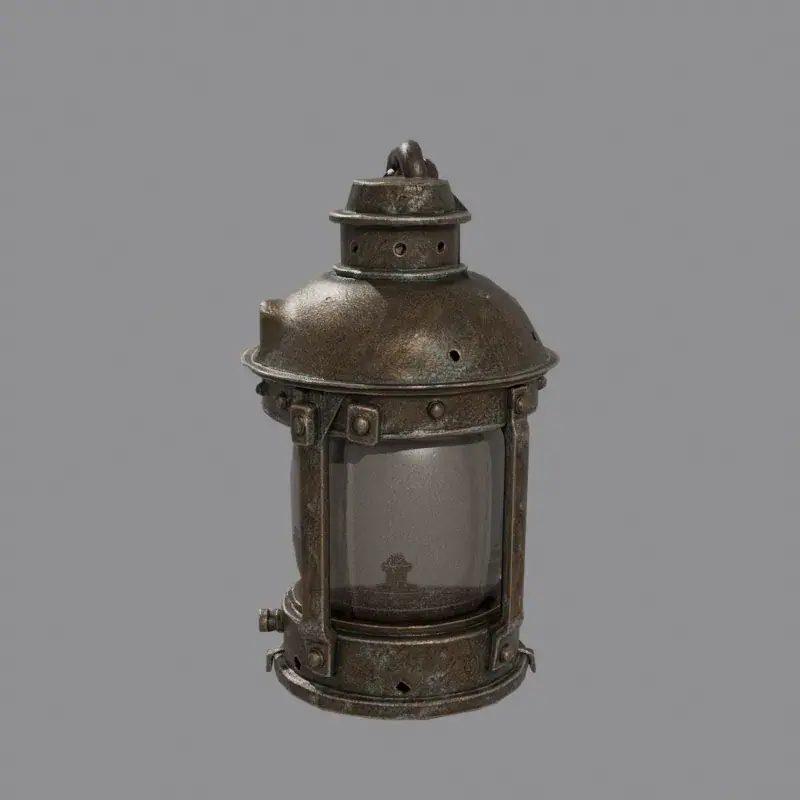
The render followed the sketch on the first take: chimney cap, dented hood with its vent holes, riveted bands, four guard bars, the star crack, the burner, the wick knob, the latch tab, and the chain falling to the hook at the left. Nothing was added. Both 3D models kept that from the front. Measured side by side:
| Measure | Meshy 7.1 | Tripo P2 |
|---|---|---|
| Price | Lower | About 1.6 times Meshy 7.1 |
| Wait | about 5 min 12 s | about 1 min 25 s |
| Triangles | 8,274 (3 percent over the target); 7,860 after a 0.95 reduction | 7,882 |
| Meshes, materials | 1, 1 | 1, 1 |
| Texture maps | color, metal-roughness, normal, 2048 px each | color, normal, ORM (occlusion, roughness, metalness), 2048 px each |
| Bounding box | about 1.09 x 1.67 x 1.90 m (no real size) | about 0.32 x 0.26 x 0.40 m (Auto Size) |
| Front detail | dents, rivets, verdigris, open chain links | cleaner metal, fewer dents, globe reads as milk glass |
Both meshes came back as one mesh and one material each, what an engine wants for a small prop.
- Hero props near the camera: Meshy 7.1 kept more of the render's wear, at the lower price and the longer wait. Treat its polycount as a target and check the count.
- Props dropped straight into a level: Tripo P2 with Auto Size arrived at about 40 cm tall, close to a real ship's lantern, and stayed under the face limit.
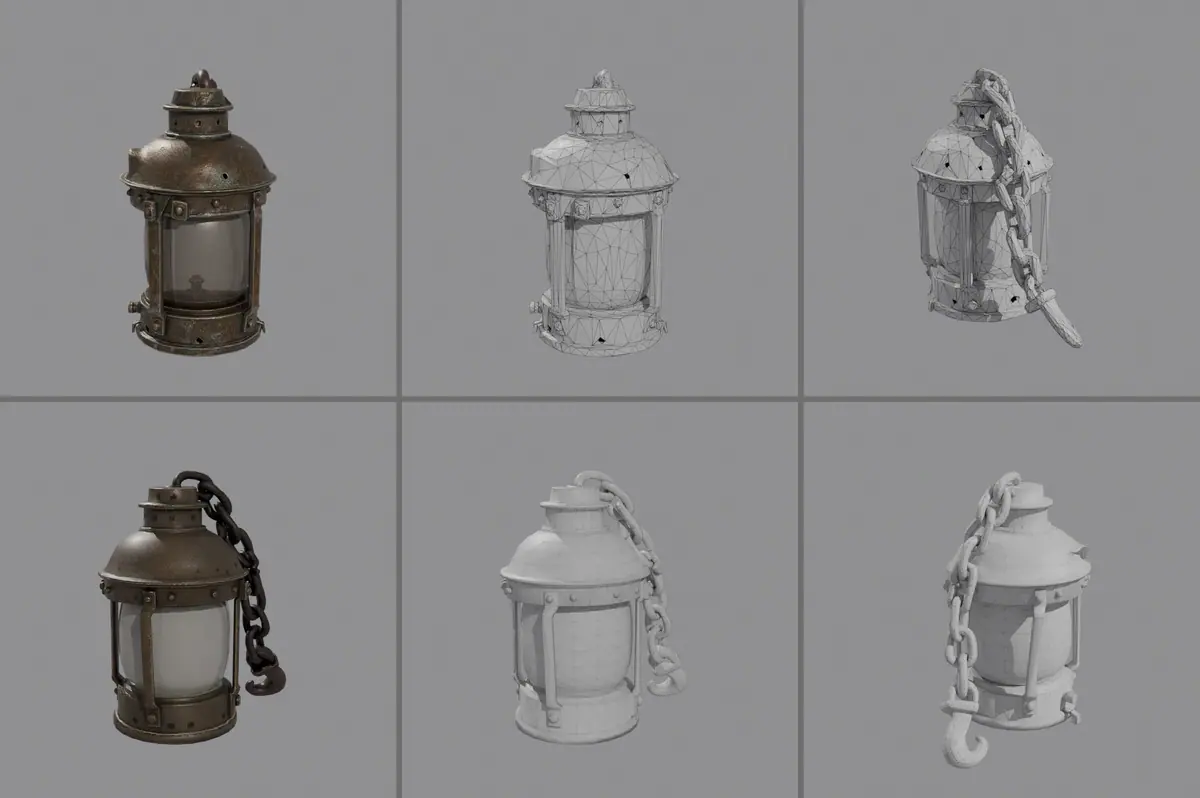
Three limits are typical of single-image reconstruction:
- The back is invented. Both models made a plain back. If the back matters, or the player walks around the object, draw it, render a back view and use Meshy 7.1 - Multi Image to 3D or another multi-view model.
- Glass does not survive as glass. Neither model kept the clear cracked globe of the render. Meshy baked it to an opaque grey with the burner painted on and lost the star crack; Tripo to a milky white with no burner. Give the globe its own transparent material in the engine.
- The budget is a target. Meshy returned 8,274 triangles for an 8,000 target. A 5 percent reduction in Blender brought it to 7,860 with no visible change.
Painted against built detail. In clay, Tripo's chain and hook are real geometry down to the tip of the hook. Meshy's chain links are open but its hook is a flat blob that only the texture turns into a hook. At game distance both read; for a close-up the clay view decides.
1Two renders of the lantern. The sketch shows a chimney cap, a dented hood, riveted bands, four guard bars, a cracked globe, a burner, a wick knob, a latch tab and a chain to a hook resting at the left. Which render goes to 3D?
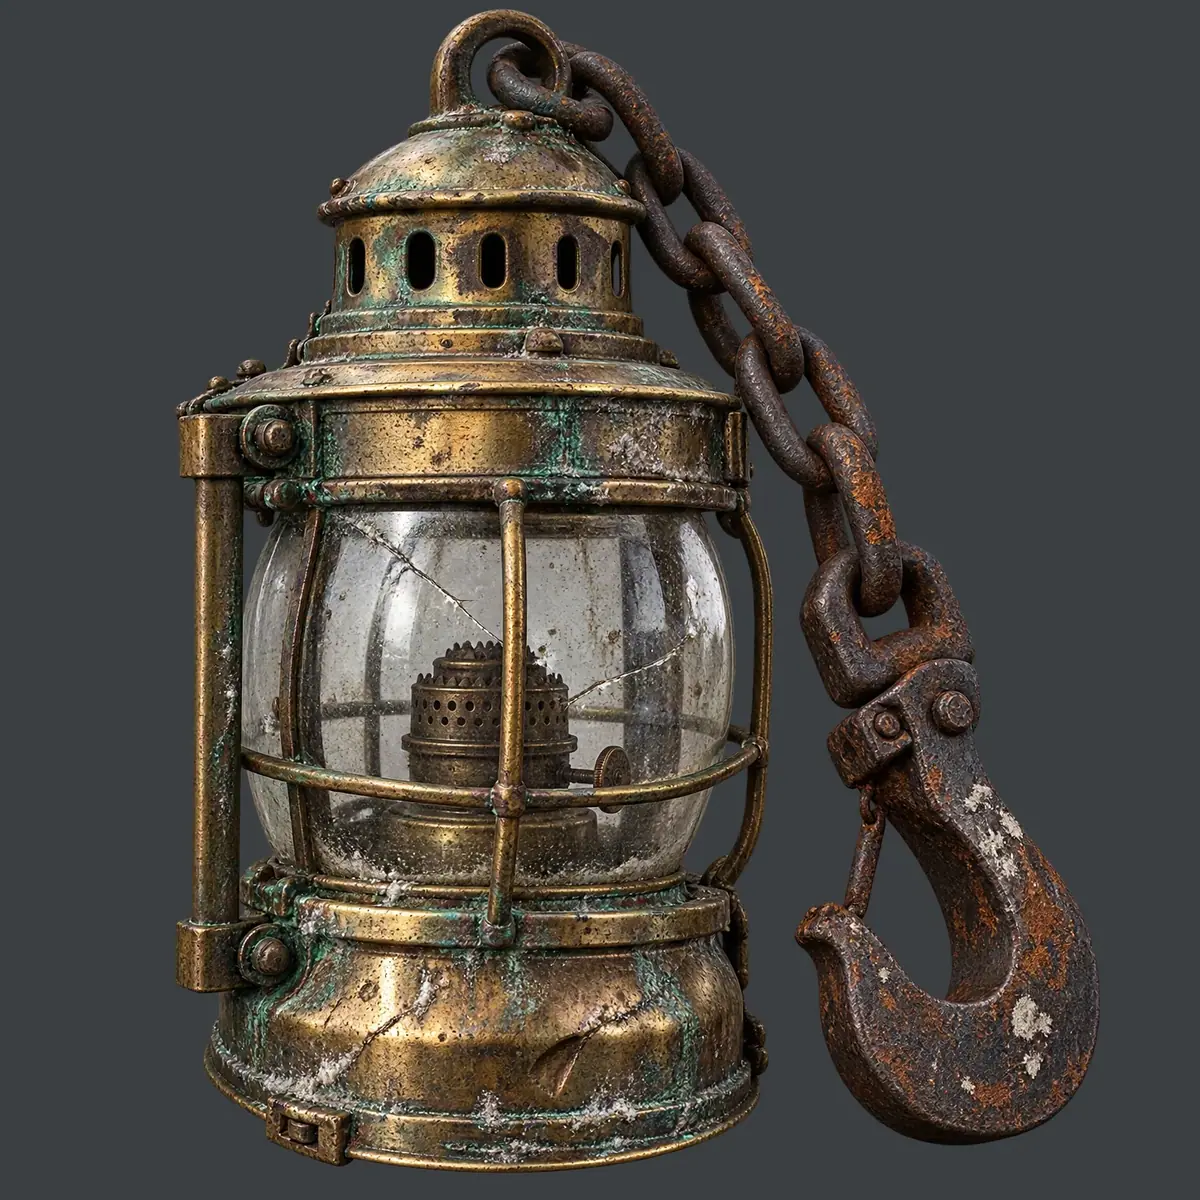
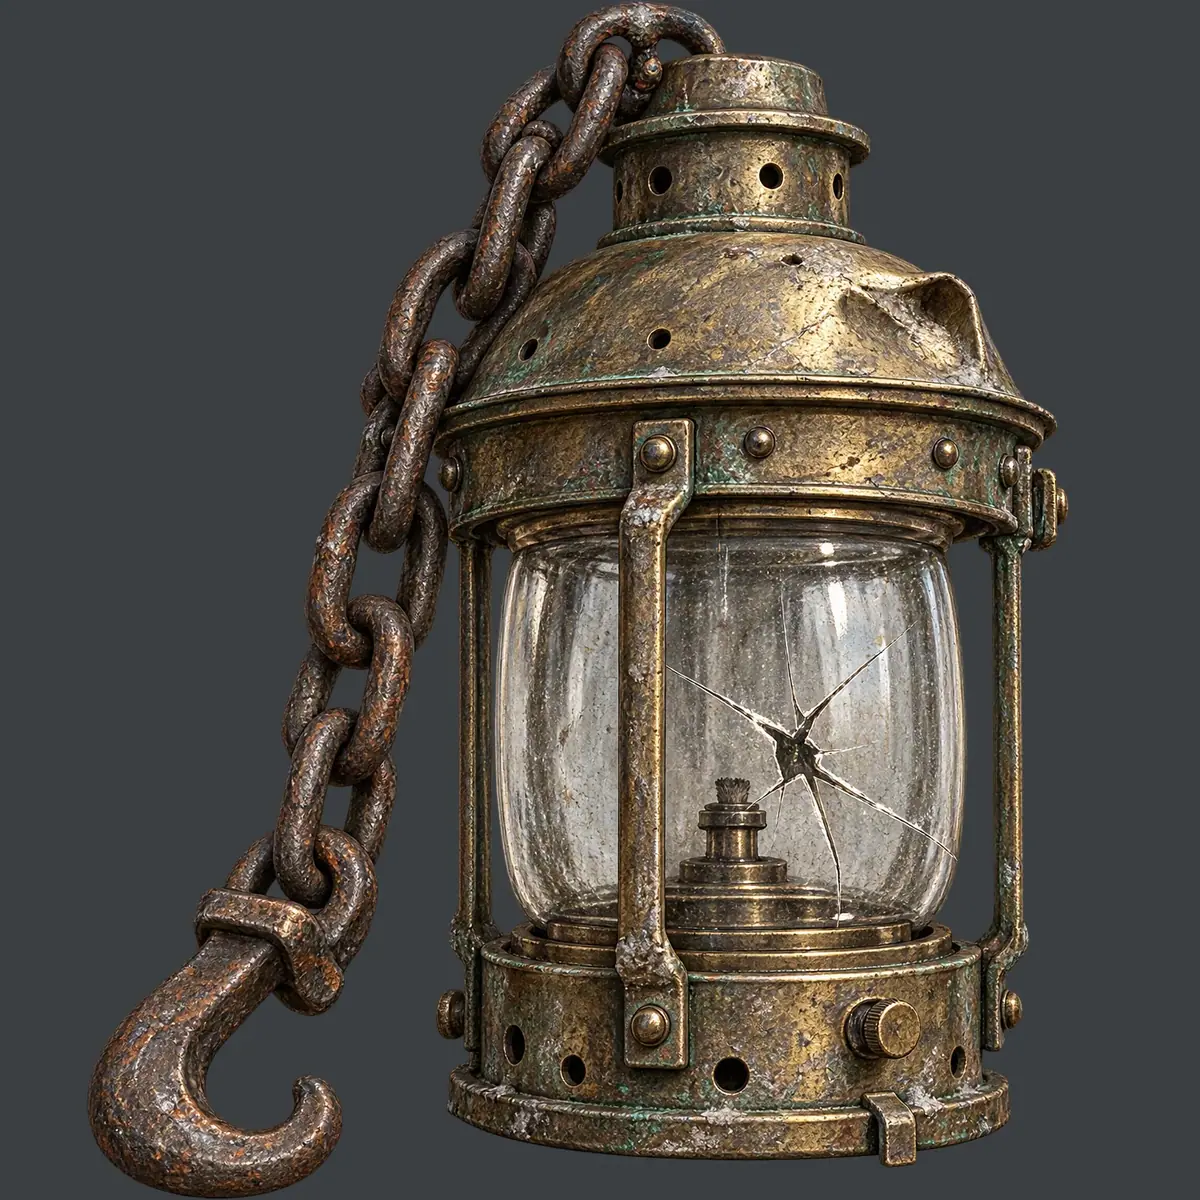
Answer: B. Take A came from the text prompt alone: the chain falls on the right, a side handle bar and a cage over the glass appear, and the burner changes. Take B followed the sketch. Shape is cheapest to fix on the render, before the 3D step.
2The same lantern render through two image-to-3D models. The lantern is a hero prop seen close to the camera. Which one do you keep?
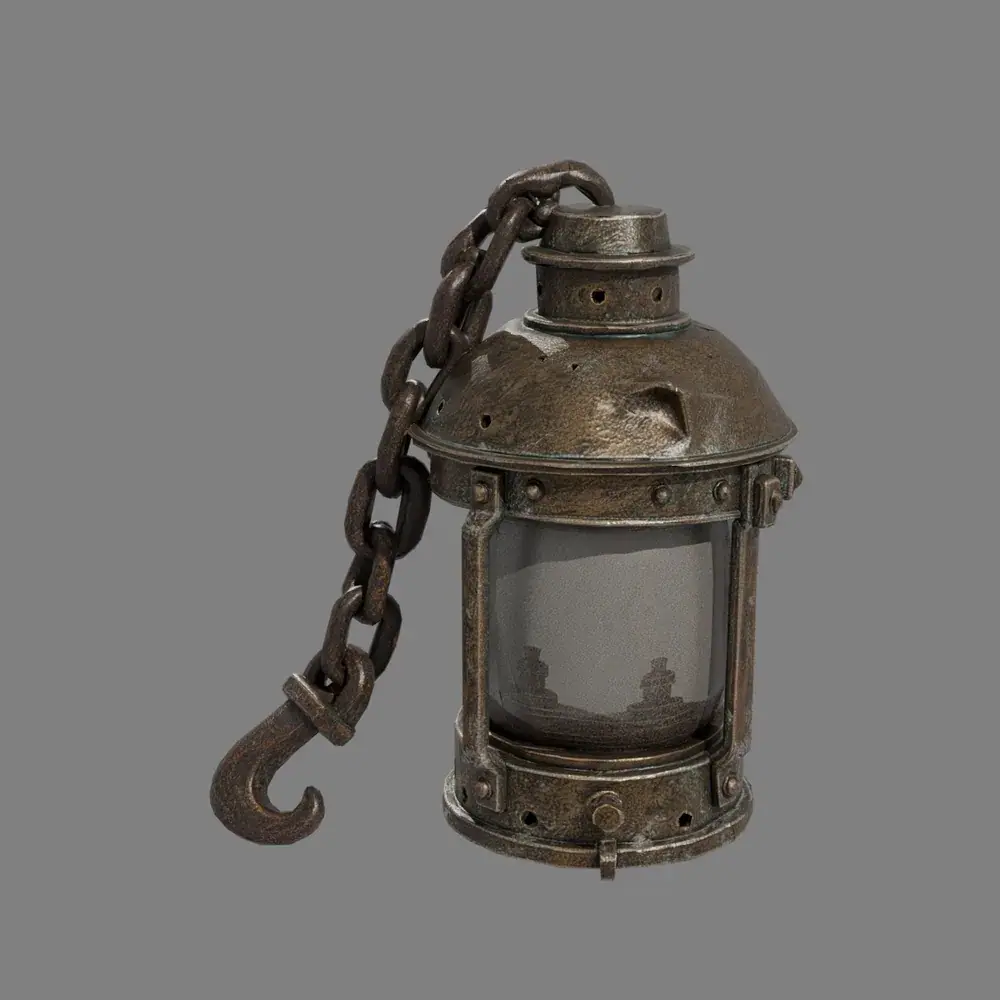
Answer: B. Model B (Meshy 7.1) kept more of the render's wear. Model A (Tripo P2) is cleaner and turned the cracked globe into milk glass. Neither kept the glass clear, so that part goes to an engine material either way.
3The 3D lantern matches the render from the front, but its glass is opaque grey and the crack is gone. How do you read this?
Answer: A. Image-to-3D models bake what they see into color maps. The glass in the render was clear; neither 3D model in this run kept it clear.
4You asked for 8,000 triangles. The model you prefer comes back at 8,274. What do you do?
Answer: B. A budget is a promise to check. A small reduction keeps the look; a new run at half the target would cost a run and lose detail.
Make it repeatable
- Keep the prompt frame (Batch from a template). The first paragraph ("follow the large main drawing only... every part it shows... Do not add parts") stays for every prop; only the parts list and materials change.
- One sheet of settings (Keep sources as data): 3D model, target or face limit, PBR setting, Auto Size, reduction ratio, import scale and export format, in the project's README or collection description.
- Workflow with approval before 3D (Package it as a workflow or skill). In the Node Editor: an Image input for the sketch, a Text input for the parts list and materials, a Prompt Builder with the fixed frame, an Image Generator on GPT Image 2.5 Sunburst with transparent background, an Approval node so only approved renders reach 3D (Approval and review steps), then a 3D Generator.
- Inspection script. Run the import-and-measure script (triangles, maps, bounding box, shaded and clay renders) on every model before it enters the engine project. This run used Blender headless.
- Platform Apps to compare (Workflows, Apps): Sketch to Render (line art to a colored render), Sketch Colorizer (color and shading), Game 3D Assets - Concept to 3D Model (description and style reference to a 3D asset), 3D Model Pipeline (High-poly to Game-ready), Optimize 3D Model and Retopologize 3D model.
Runs and time
| Step | Model | Runs or takes | Kept | Wait |
|---|---|---|---|---|
| Render from sketch | GPT Image 2.5 Sunburst, 1 reference | 1 run, 2 takes | 1 (take 2 runner-up) | about 58 s |
| Render from text only, for comparison | GPT Image 2.5 Sunburst | 1 | 0 (quiz take) | about 53 s |
| 3D model, PBR, 8,000-triangle target | Meshy 7.1 - Image to 3D | 1 | 1 | about 5 min 12 s |
| 3D model, 8,000 faces, PBR, Auto Size (comparison) | Tripo P2 | 1 | 0 (runner-up) | about 1 min 25 s |
| Inspection, clay renders, 0.95 reduction | Blender, headless | 0 | n/a | about 2 min |
About 8 and a half minutes of generation, plus about 2 minutes of local inspection. The 3D runs carry the cost; a batch costs one 3D run per prop on the model you pick, plus the renders.
The price shows on the Generate button before you run; through the Scenario MCP, ask for a dry-run quote. To size a batch, see Estimate your budget.
Variations
- Weapons and tools: list grip, guard and blade as parts.
- Rarity tiers: attach the approved render and ask for a gilded or cursed version with the same silhouette; see Edit one thing across a campaign, or run the Asset Evolution App.
- Inventory icons: render the prop at icon framing with the icon set's anchor attached; see Make a consistent game icon set.
- Background props in bulk: a lower target (2,000 to 4,000) for props that stay far from the camera, and Auto Size so they drop in at scale.
- Modular kits: render each module (wall, arch, stair) on its own at the same angle, and generate them separately.
- Multi-view input: render front, side and back with the front attached as reference, then use a multi-view model; see Multi-view and parts.
- Product and packaging concepts: the same sketch-first method works outside games; a web or AR model of a product can start from one packshot.
- 3D printing and printable figures: a closed, solid mesh needs different checks.
If it breaks
- The render adds parts. Name every part of the sketch in the prompt and keep "Do not add parts the sketch does not show." If one part keeps appearing, name it as excluded.
- The render copies the notes or the small views. Say "follow the large main drawing only" and "ignore the small views and all handwriting", or crop the sketch.
- The angle changes. Say "three-quarter view as in the sketch" and redraw the sketch at the exact angle you want.
- The 3D model is a lumpy blob, or has extra geometry where the background was. The render probably had a background, a cast shadow or a second object. Re-render: transparent background, one object, centered.
- Thin parts disappear in 3D. Chains and wires are the first to merge. Make them thicker in the sketch and render, or model them separately and attach them in your DCC tool.
- The back side looks wrong. Render a back view with the front render attached as reference, then use a multi-image 3D model.
- A few percent over budget. Reduce in your 3D tool and recount. Far over budget: lower the target or face limit and run again, or remesh the existing model.
- Glass or transparent parts turn opaque. Expected from one image: assign a transparent material to those faces in the engine.
- Texture smears on large flat faces. Ask for more surface detail in the render (rivets, dents, grain), or retexture.
- The model is the wrong size in the engine. Turn on Auto Size where the model offers it, or scale on import with a reference object and note the factor for the batch.
- The normal map lights the wrong way. Some engines expect the green channel flipped (OpenGL versus DirectX convention). Flip it in the import settings.