

Take a character from concept to rigged, animated 3D
Turn an approved character image into a textured 3D mesh, auto-rig it with a humanoid skeleton, and check the walk and run clips before the engine.
- Playbook
Run it in ScenarioMeshy 7.1 - Image to 3D Meshy Rigging
A 2D character turned into a playable 3D character in two generations: image to mesh, then mesh to rig. This playbook does both for one hero, checks the skeleton and the skinning, and shows where an auto-rig stops and hand work begins.
The brief
| Field | Brief |
|---|---|
| Goal | Zuri, a roller-blade hero, as a rigged, animated 3D character for a prototype |
| Format | GLB with skeleton and skin; walk and run clips |
| Budget | About 20,000 triangles, textures 2048 px |
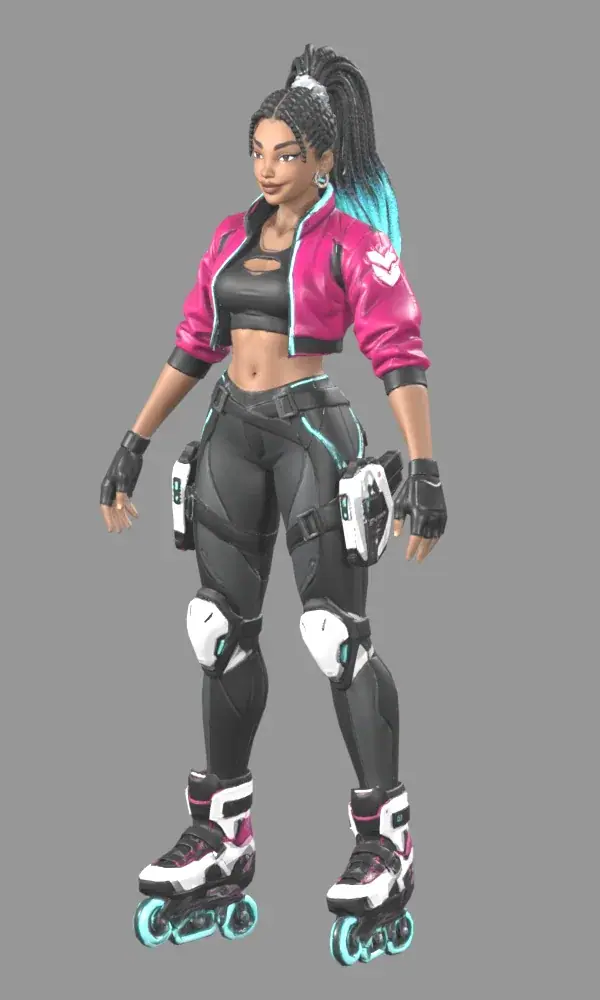
| Fixed | The keep-list from the reference sheet (box braids with cyan tips, magenta bomber with the white chevron on her right sleeve, black top, gloves, charcoal leggings, white knee guards, two thigh blasters, roller blades with cyan wheels) |
| Accept when | The mesh matches the hero from the front; the skeleton is a standard humanoid; walk and run play without tearing or floating parts; the blasters move with the body |
The character is Zuri Vex from Build a character reference sheet; her approved hero image is the only input. Props follow the same image-to-3D path in Game-ready 3D props.
Approach
- 1A-pose heroApproved full-body image
- 2MeshMeshy 7.1 - Image to 3D, A-pose, 20,000
- 3RigMeshy Rigging, height 1.8 m
- 4Check in motionWalk and run clips
- 5ExportGLB or FBX
- Start from an A-pose image (Prepare a rig-ready input). Auto-riggers fit a skeleton to the limbs; arms away from the body and legs apart give clean armpits and crotch. Zuri's hero was generated in a relaxed A-pose for that reason. If yours is not, generate one with the hero attached first (Character reference sheet).
- Mesh with a rig in mind. Ask for an A-pose and a polycount the rig and engine can carry. Meshy 7.1 takes a pose mode and a remesh target.
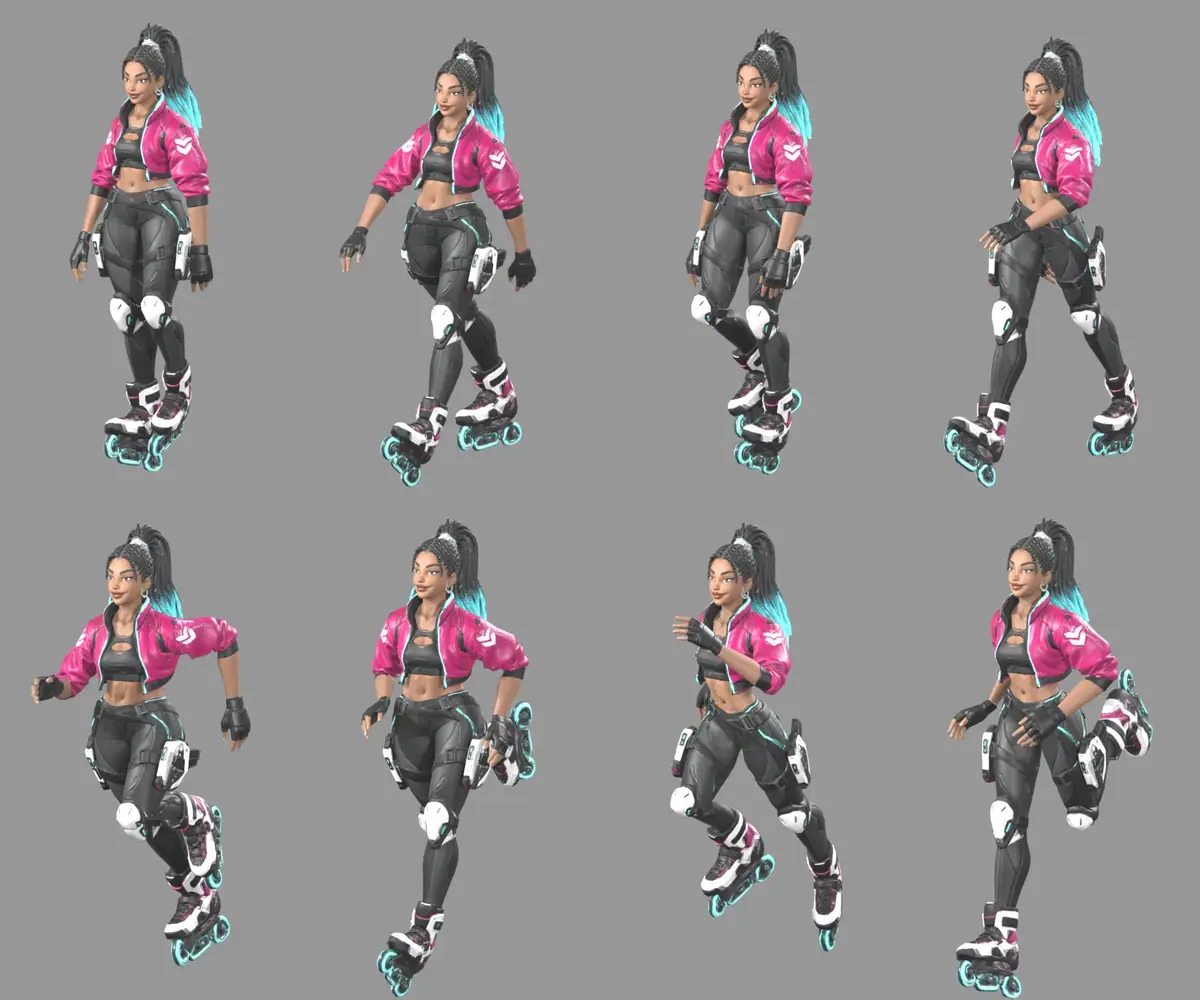
- Judge the rig in motion. Watch knees and elbows bend, the blasters follow the thighs, the braids follow the head. The rigging model returns walking and running clips with the rig, so the check is immediate.
Models, as of October 2026:
- Mesh: Meshy 7.1 - Image to 3D, ranked first for image to 3D by the Scenario MCP
recommendtool. - Rig: Meshy Rigging, the recommended auto-rigger for humanoids. Alternatives: Uthana Character Rigging and Cartwheel Character Rigging.
- More motions: Uthana Text to Motion 3.0 and Meshy Text to Motion generate animation from a description. See Rig and animate 3D.
Steps
-
Generate the mesh. Open Create, choose 3D, add the hero image under Image with Select from Library, and pick Meshy 7.1 - Image to 3D. Under Settings, set the pose mode to A-pose, turn on remesh with a target polycount of 20,000, and keep PBR on. Click Generate; the button shows the price first.
-
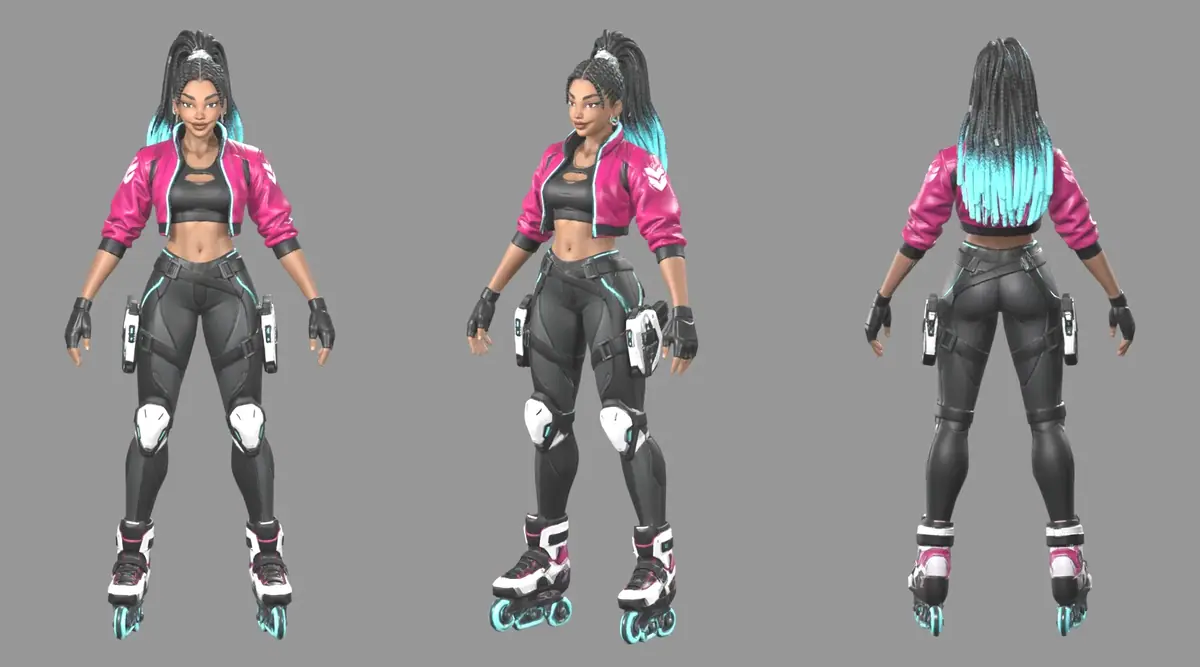
Inspect the mesh. Look at the front, three-quarter and back views. The back is reconstructed from a front image, so check the braids, the holsters and the back of the jacket. This mesh had 20,754 triangles, one material and 2048 px maps, and stood about 1.9 m tall in its own units.
-
Rig it (Rig and animate). In the model picker, open the Rigging tab and pick Meshy Rigging. Select the mesh (the rigger takes GLB only) and set the height in meters to the character's height (1.8 here, roller blades included; the default is 1.7). Click Generate.
-
Unpack the result. The rigging run returned five GLB files: the rigged mesh in a rest pose, a walking clip and a running clip, each clip both with the mesh and as animation only. The animation-only files are what you retarget onto other characters with the same skeleton.
-
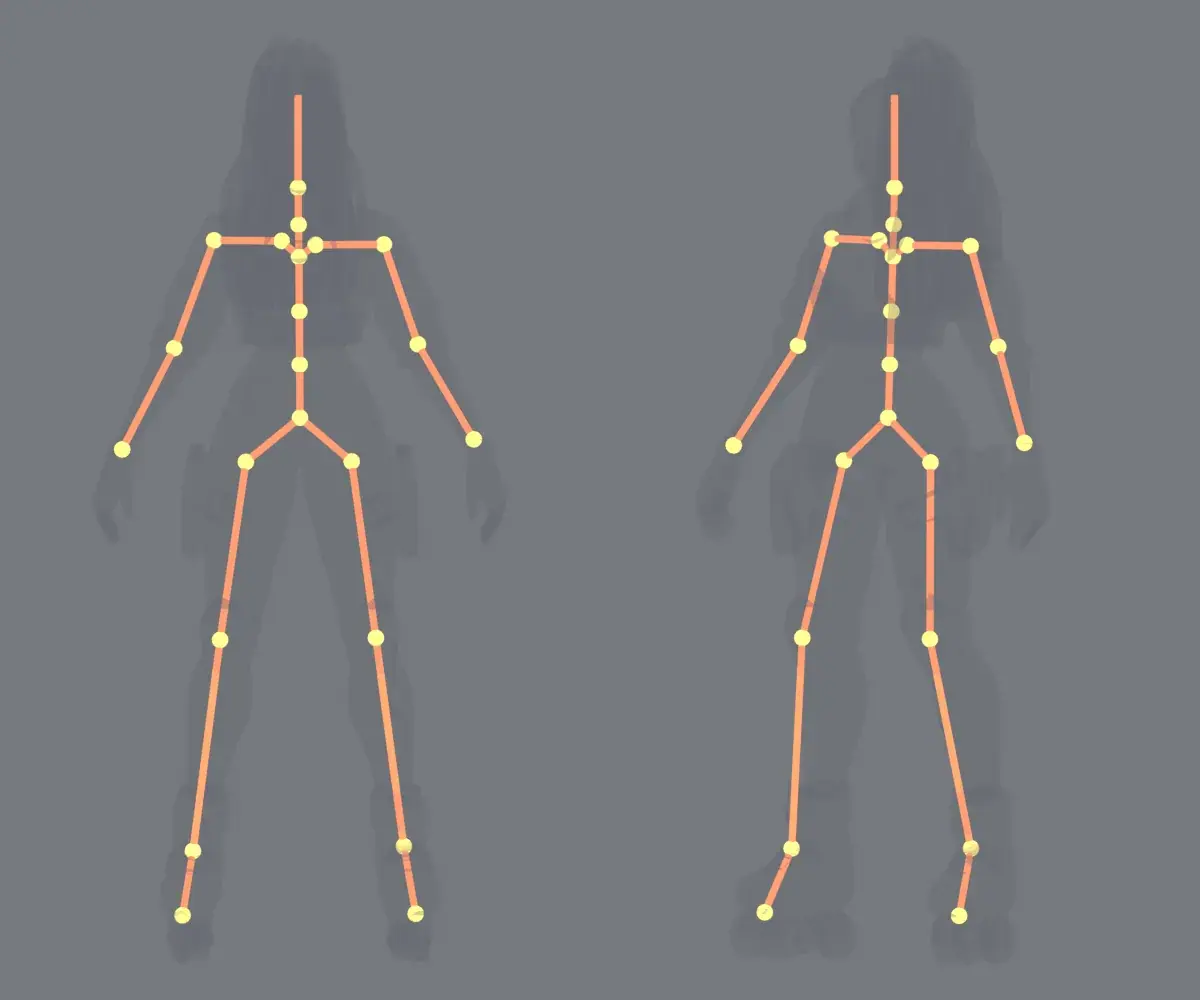
Check the skeleton. Import the rigged GLB. This one had 24 bones: hips, three spine bones, neck, head and two head-end markers, shoulder, upper arm, forearm and hand on each side, and upper leg, lower leg, foot and toe on each side. There are no finger bones and no face bones.
-
Play both clips and watch the deformation. Loop the walk (about 26 frames) and the run (16 frames). Watch knees, elbows, the thigh blasters and the braids in particular.
-
Export. GLB keeps mesh, skeleton and clips in one file; FBX suits Unity and Maya. See Export 3D to engines and DCC tools.
With the Scenario MCP: run model_meshy-7-1-img23d with image: [hero_id], poseMode: "a-pose", shouldRemesh: true, targetPolycount: 20000, enablePbr: true, shouldTexture: true; then model_meshy-rigging with model set to the mesh asset and heightMeters: 1.8.
Quote both with dry_run: true (see Quote before you run). The rigging job returns several assets; download each as GLB.
Check the result
the front of the mesh matches the hero's keep-list; the skeleton has the standard humanoid bones in the right places; knees and elbows bend without collapsing; the blasters and braids move with the body; feet plant on the ground in the walk.
the mesh merges arms into the torso, a bone sits outside the limb, a joint tears or pinches when it bends, or an accessory stays in place while the body moves.
The mesh kept the keep-list from the front: braids tied high, magenta bomber with cyan piping, black top, gloves, knee guards, both thigh blasters and the roller blades. Three differences from the hero:
- The chevron is on both sleeves. The model mirrored it; the hero has it on her right sleeve only. Fix it in the texture if the side matters in your game.
- Nothing glows. Meshy 7.1 returns no emission map, so the braid tips and wheels are pale cyan paint. Add an emissive mask in the engine.
- The magenta reads slightly pinker than on the hero.
The back was plausible: one mass of braids, the jacket and the holster straps continued around the body.
The rig fitted on the first run. In the walk and run clips, knees and elbows bend cleanly, and the thigh blasters, which are part of the same mesh, are skinned to the legs and move with them. Four limits to plan around:
- Walking, not skating. The clips are a generic walk and run. A roller-blade stride needs a motion model or hand animation.
- No finger bones. The hands are single bones, so they cannot grip or point. For close-up hand animation, add finger bones in a DCC tool.
- No secondary motion. The braids move only with the head bone. Add physics or extra bones in the engine for swing.
- Two clips only. Other motions need a motion model or a library of clips retargeted to the same 24-bone skeleton.
As a test of the A-pose rule, the same model meshed a second image of Zuri, standing at attention with her arms flat against her sides, without the pose mode. The arms fused to the torso, the hands merged with the holstered blasters and the legs joined: a mesh no auto-rigger can separate.
1Two meshes of Zuri from the same model, front view, untextured. Which one goes to the auto-rigger?
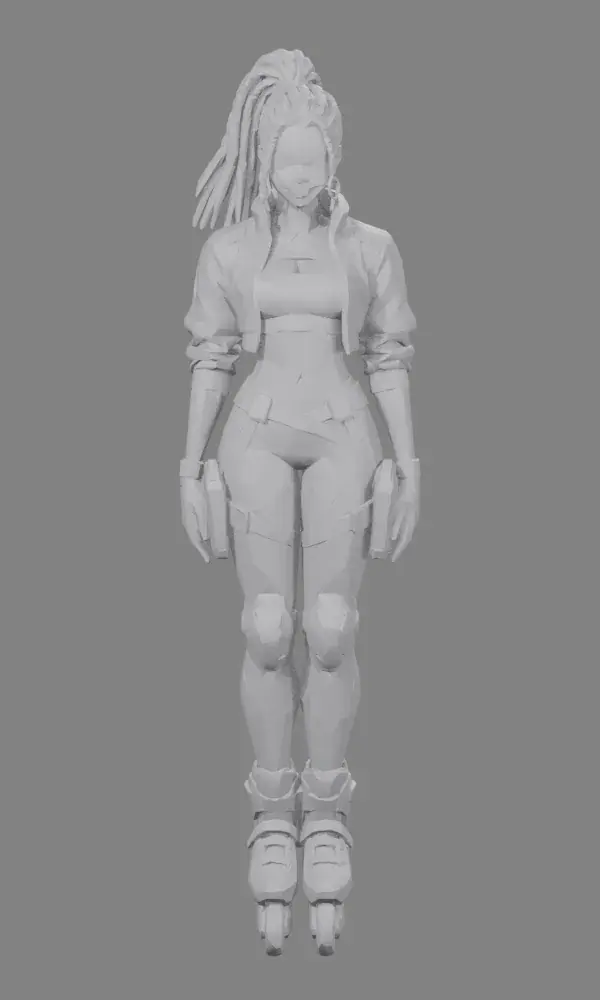
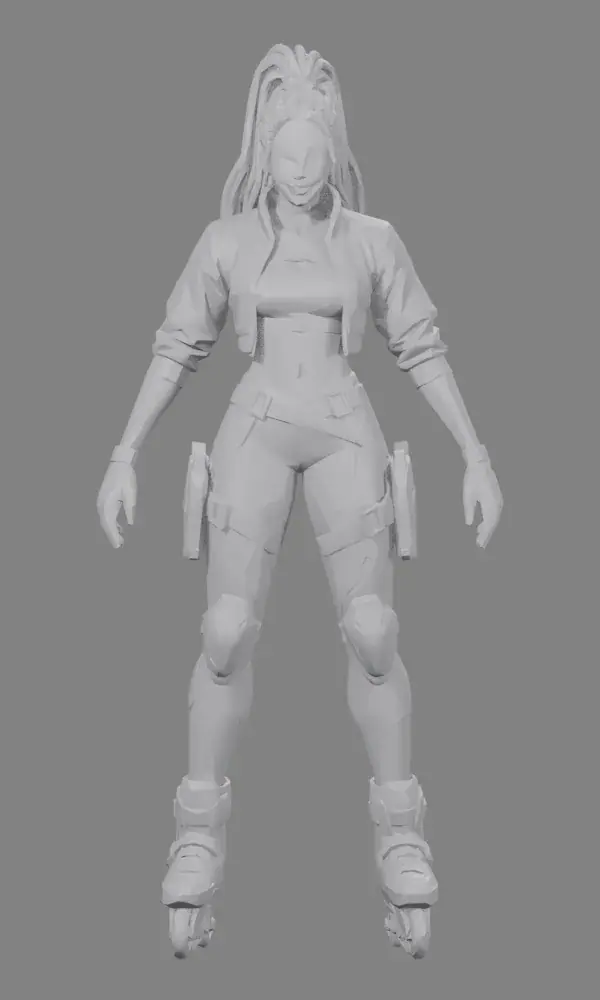
Answer: B. A mesh that merges the arms into the torso is on the Reject list. Take A was meshed from an image with the arms against the body, and its hands merged with the holstered blasters; the fix is an A-pose image first.
2In the walk clip, knees and elbows bend cleanly, but one thigh blaster stays in place while she walks. Accept or reject?
Answer: A. The brief asks for the blasters to move with the body. Keep accessories in the same mesh as the body, or parent them to a bone in the engine.
Make it repeatable
- Fix the inputs. Every character in the project starts from an A-pose hero at the same framing; the same mesh and rig settings then apply to all of them.
- Shared skeleton. Characters rigged by the same model share bone names, so one library of animation-only clips works for the whole cast.
- Platform Apps to compare. Under Workflows, Apps: the 3D Character Auto-Rigging App rigs a bipedal 3D model, and Image to Rigged Low Poly Character goes from a 2D character image to an optimized rigged character. Run one on the same hero and compare deformation in motion.
- Approval before the expensive step (Approve the still first). In the Node Editor, place an Approval node after the A-pose image so only approved images go to 3D. See Approval and review steps.
Runs and time
| Step | Model | Runs | Wait |
|---|---|---|---|
| Mesh, A-pose, remesh 20,000, PBR | Meshy 7.1 - Image to 3D | 1 | about 3 min 45 s |
| Rig with walk and run clips, height 1.8 m | Meshy Rigging | 1 | about 45 s |
| Arms-down test image (quiz) | GPT Image 2.5 Sunburst | 1 | about 35 s |
| Arms-down test mesh, untextured (quiz) | Meshy 7.1 - Image to 3D | 1 | about 55 s |
| Inspection and preview renders | Blender, headless | 0 | a few minutes |
The playbook itself is two runs: the mesh carries most of the cost, the rig is a small share. The arms-down test is optional. The price shows on the Generate button before you run; through the Scenario MCP, ask for a dry-run quote. The hero image itself comes from Character reference sheet.
Variations
- Another mesh model: try Hitem3D 3.0 or Tripo P2 for the mesh, then rig the same way; compare the face and hands, which matter most on characters.
- Stylized low-poly: set a low remesh target (5,000 or less) for mobile or crowd characters.
- Animation and film previs: use the rigged character as a stand-in in a 3D layout, then restyle the gray render into finished shots.
- Avatars and learning guides: one rigged guide character, reused across lessons with a library of clips.
- Creatures and non-humanoids: humanoid auto-riggers expect two arms and two legs; for wings, tails or extra limbs, rig the closest body plan and finish the rest in a DCC tool.
If it breaks
- Arms are fused to the body. The input image had arms against the torso. Generate an A-pose image first, or set the pose mode to A-pose, and mesh again.
- A bone sits outside the limb. Check that the height you entered matches the character; re-run the rig with the corrected height.
- The mesh tears at a joint. Usually too few polygons around knees or elbows. Raise the remesh target and rig again.
- An accessory floats when she walks. Separate meshes need their own skinning; keep accessories in the same mesh as the body, or parent them to a bone in the engine.
- Glowing parts come out flat. The mesh has no emission map; paint an emissive mask from the base color in the engine.
- The character imports at the wrong size. Scale on import to the height you entered, then apply the scale before using the animations.