

Generate PBR materials
Get base color, normal, roughness, metalness and height maps from a prompt, a photo or an existing texture, check each map, and set them up in an engine.
- Guide
- Step 1 Learn
Run it in ScenarioPATINA Material
On this page12 sections
A color texture only says what color a surface is. A PBR material adds how it reacts to light: which parts are bumpy, rough, shiny or metal. This guide makes one with the PATINA models: you pick the model by what you start from, generate the texture and five maps in one run, check each map, prove the tile, and set the maps up in an engine. The example is a tarred ship hull with riveted iron straps.
Quick version
- Open Create › Textures and choose PATINA Material (from a description), PATINA Material Extract (from a photo of a scene) or PATINA Image to Maps (from a flat texture).
- Describe the surface in detail and end with "flat top-down view, even diffuse light".
- Keep all five maps selected, tiling set to both directions, and no upscale while you iterate.
- Click Generate: you get the texture plus five map assets.
- Check metalness first, then normal and base color, and run the 2x2 tiling check.
- In the engine, set base color to sRGB and every other map to linear (non-color).
- 1Describesurface detail, even light
- 2Generatetexture plus five maps
- 3Check mapsmetalness, normal, base color
- 4Tile check2x2 repeat
- 5Enginecolor spaces, normal convention
Before you start
- What you'll need: a description of the material, a photo that has the surface in it, or a flat texture or scan with color only.
- Where it lives: Create › Textures, in the model list.
- Credits: the cost of a run shows on Generate. An upscale of the maps adds to it, so leave it off until the final take.
- Key words: PBR (physically based rendering) describes a surface with several maps that an engine combines under its own lights. Each map is a grayscale or color image the same size as the texture.
The five maps
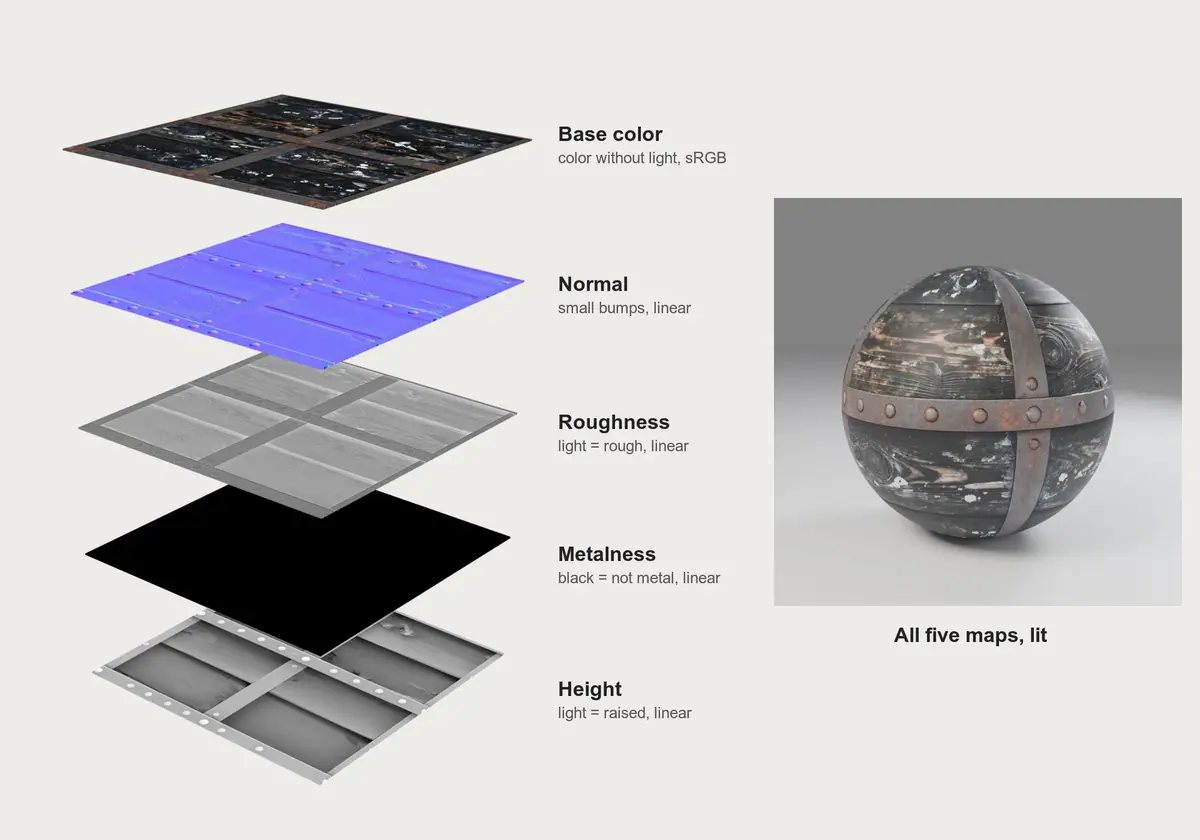
| Map | What it holds | Reads as | Color space |
|---|---|---|---|
| Base color | The color without light | Flat color, no shadows or highlights painted in | sRGB |
| Normal | Small bumps that catch the light | Mostly blue-purple | Linear |
| Roughness | How blurry reflections are | Light for rough (clay, stone, fabric), dark for glossy (polished or wet) | Linear |
| Metalness | What is bare metal | White for bare metal, black for everything else | Linear |
| Height | What is raised and what is sunk | Light on raised parts, dark in gaps | Linear |
Every map other than base color is non-color data. If bumps look inverted under light, flip the normal map's green channel.
Step 1: Choose the model by what you start from
The PATINA models cover three starting points and return the same five maps:
| You have | Model | What it does |
|---|---|---|
| A description only | PATINA Material | A tileable texture plus the five maps from a prompt. An optional reference image adds variations around it; a reference image with a mask changes one region only |
| A photo of a scene with the surface in it | PATINA Material Extract | Name the surface ("the wooden tabletop, not the linen runner"). It isolates that region, flattens the perspective and lighting, and makes the material |
| A flat texture or scan with color only | PATINA Image to Maps | No prompt. Your image passes through unchanged as base color, and the other four maps are predicted from it |
Texture Converter is a quicker, manual option: a flat image to a surface material, with sliders for how raised, shiny, polished and angular it looks.
If you only need a tileable color texture, without maps, use Scenario Texture: see Generate seamless textures.
Step 2: Describe the surface
Be specific about surface detail, not just the material name. "Cracked clay" is generic; "sun-baked cracked clay with fine hairline fractures and pale dust" gives the model something to build the normal and height maps from. Name the wear (rust, moss, salt, peeling paint) and where it sits.
End with the view and the light, "flat top-down view, even diffuse light", so no shadows get painted into the base color.
On PATINA Material Extract, the prompt names the region instead: "the rusty metal bicycle frame", or "the white marble countertop surface, not the cutting board or lemons". Saying what to leave out helps on a busy photo.
The example is a deck and hull material for a sailing game: dark tarred wood held by riveted iron straps, two materials in one tile.
Tarred oak ship hull planks, weathered and salt-stained dark brown wood with black tar in the seams, a riveted iron strap running across the planks with rows of rusted iron rivets, pale salt crust in the grain, flat top-down view, even diffuse light
Step 3: Set the maps, tiling and upscale
These settings work the same on all three PATINA models:
- Maps: which of the five to make. Keep all five selected. On Material and Material Extract, deselecting all of them skips the maps and returns the base texture only.
- Tiling mode: Both repeats in every direction, for a full tile. Horizontal or Vertical repeats along one axis only, for a strip such as a trim or a column.
- Upscale factor: None, 2x or 4x, up to 8K from a 2048-pixel texture. It applies to the PBR maps only, not to the base texture. Leave it at None while you iterate, and set it once on the final take.
- Image strength (Material and Material Extract): how far the result moves away from the reference image or the extracted region. Higher changes more.
- Seed: reuse it with the same settings to get the same result.
The example used PATINA Material at its default settings.
Step 4: Generate
Click Generate. One run returns the texture plus five map assets. The example took about 98 seconds.
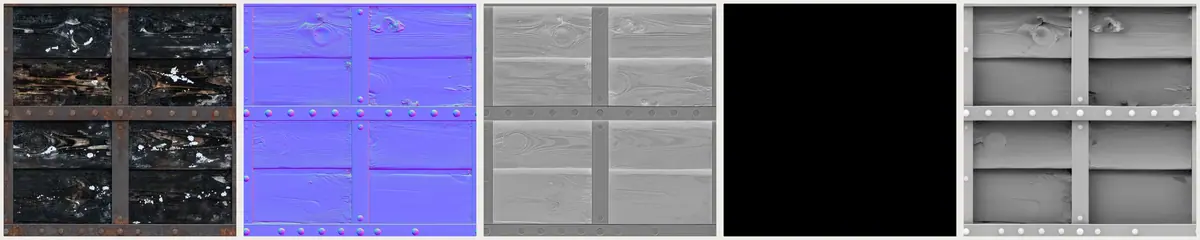
Step 5: Check each map
Check in this order, because metalness is where the model makes the biggest decisions:
- Metalness. It should be white only on bare metal. In the example it is fully black, the iron straps included: the model treated heavy rust as a non-metal, which is how rusted iron behaves under light. If you want the bolt heads to shine, paint them white in the metalness map.
- Normal and height. They should follow the relief you can see in the color. Here they follow the plank grain, the knots and every rivet.
- Roughness. It should match the material. Here it is light on the wood and the straps: both are rough.
- Base color. No baked shadows or highlights.
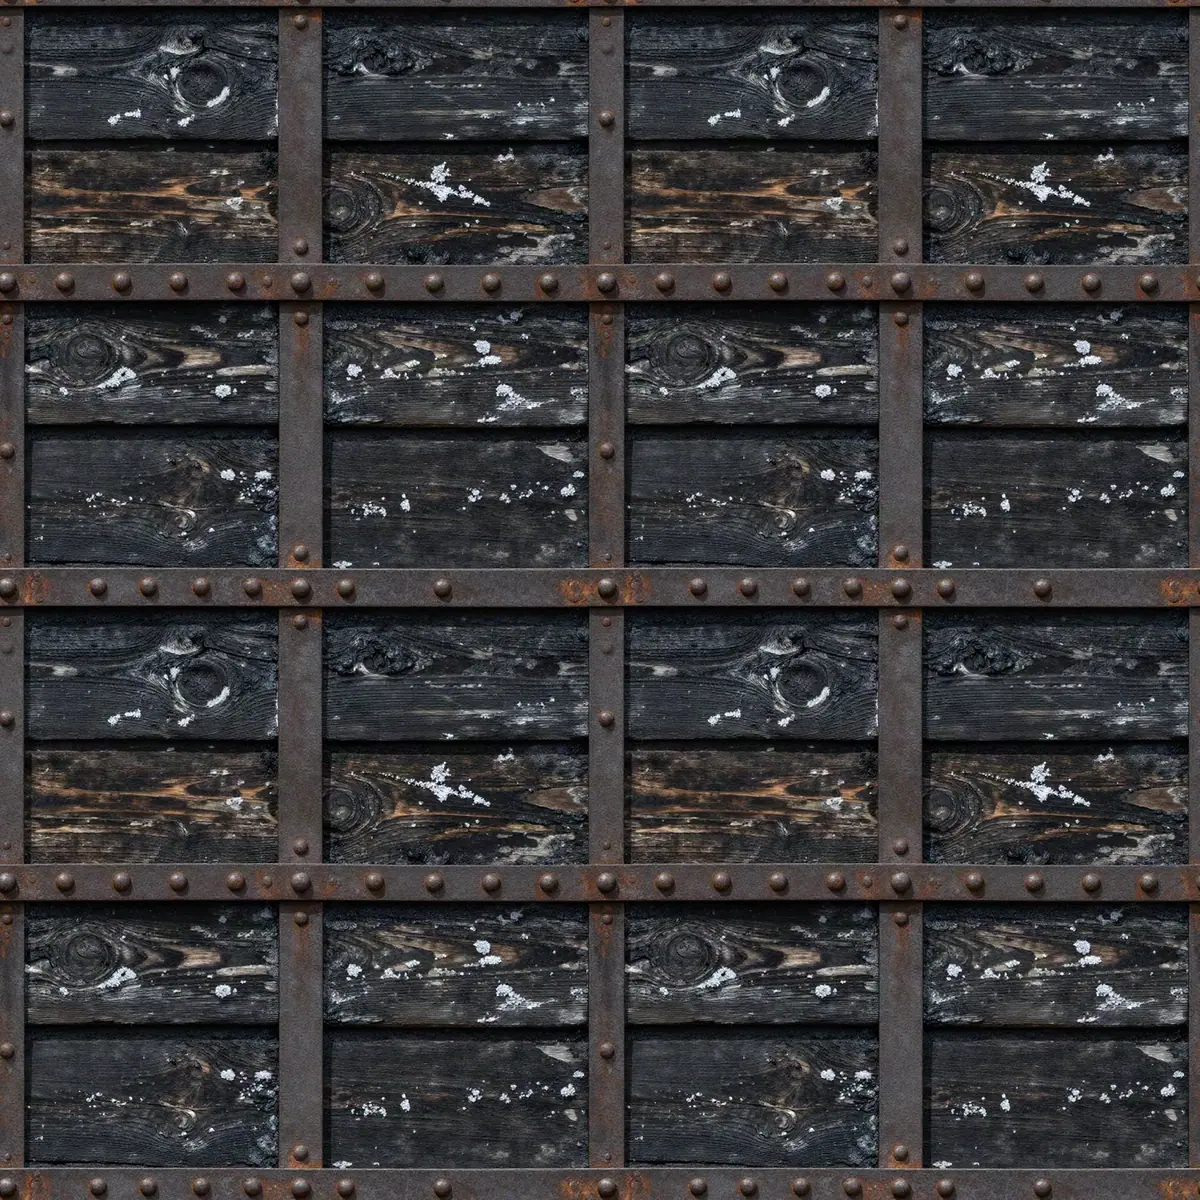
- Layout. Check what is in the tile, not only the surface. The model made a cross of two straps where the prompt asked for one.
Step 6: Run the 2x2 tiling check
Put four copies of the texture in a 2x2 grid and look at the center cross, where the edges meet. See Generate seamless textures for how.
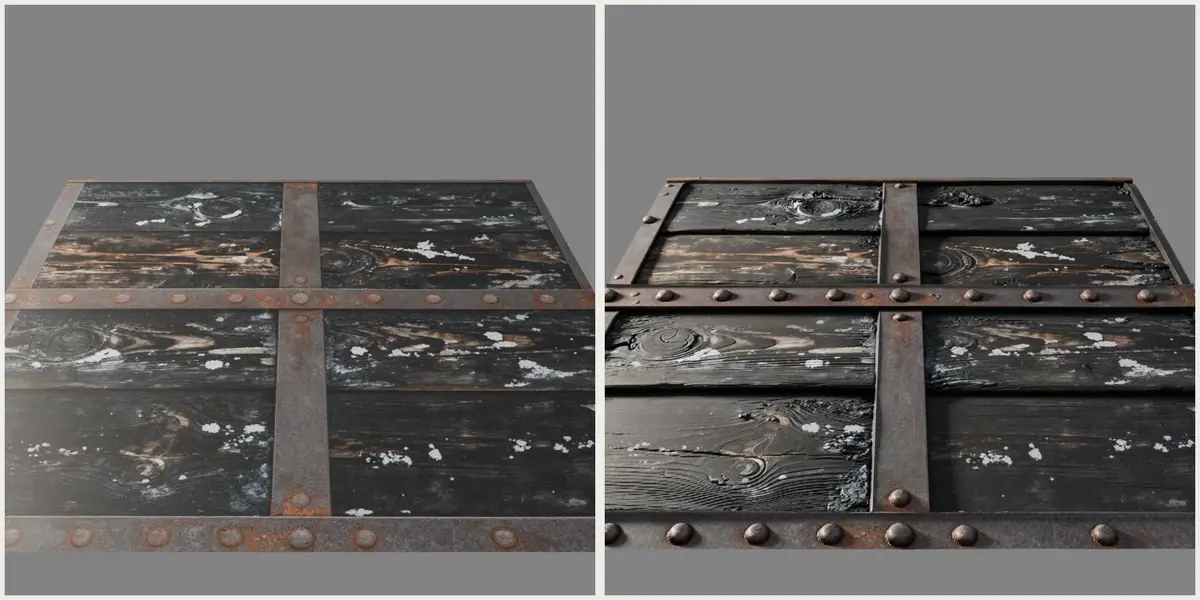
The same plane under the same low light, with color only and with all five maps:
Step 7: Use the maps in an engine
- Color space. Base color in sRGB; normal, roughness, metalness and height in linear (non-color).
- Normal map convention. Engines differ on the green channel (OpenGL or DirectX style); flip it if bumps look inverted.
- Roughness or smoothness. Engines that use smoothness need the roughness map inverted.
- Height. Use it for parallax or displacement only where the engine supports it, at low strength; the normal map does most of the work.
- Packing. Some engines want roughness, metalness and occlusion in one image: combine them in an image tool or the engine's material editor. A GLB from Scenario's 3D models already packs roughness and metalness this way.
Engine import notes: Bring your 3D model into Blender, Unity and Unreal.
Make it repeatable
- One description pattern and the same settings for every material.
- Name every map with the material and its role (
roof_terracotta_normal.png). - Keep the six assets of each material in one collection (Organize your work).
base color has no baked shadows, the normal map follows the visible relief, roughness matches the material (rough clay is light, polished metal is dark), metalness is white only on real metal, and the texture tiles in the 2x2 check.
a non-metal surface shows gray or white areas in the metalness map, the base color has painted highlights, the normal map shows relief that isn't in the color, or the maps don't line up with each other.
Common problems
| What you see | What to do |
|---|---|
| A non-metal reads as metal | Shiny paint, pearl or glazed surfaces can be mistaken for metal. Paint the metalness map black, or override metalness to 0 |
| A metal reads as non-metal | Rusted or painted metal often comes back black in metalness, which is usually right. Paint white only the bare, polished parts |
| The surface looks flat in the engine | The normal map is in sRGB, or not assigned as a normal map |
| Bumps look inverted | Flip the normal map's green channel |
| Shadows baked into the color | Add "even diffuse light, flat top-down view" to the prompt, or use Material Extract on photos |
| Extract picked the wrong surface | Name the region more precisely, and say what to leave out |
| A trim or column repeats the wrong way | Set Tiling mode to Horizontal or Vertical |
| The maps are too small for a close-up | Set Upscale factor to 2x or 4x on the final take |
| Visible repeat | Use a larger tile, or adjust tile size and stride on PATINA Material |
What's next
To wrap the scene these surfaces sit in, generate the sky around it: Generate skyboxes and 360 panoramas. To put the material on a model, see Process 3D models.